How to Translate WooCommerce (Every Situation Covered)
Struggling with how to translate WooCommerce so that you can create a shopper-friendly, multilingual eCommerce store?
Creating a multilingual WooCommerce store has a lot of benefits, with the two biggest ones being the following:
- Shoppers can browse your store in their preferred languages, which creates a much better shopping experience for them. A Gallup survey commissioned by the European Union found that 42% of shoppers will not buy from stores that aren’t available in their native languages.
- You can reach more shoppers in the first place thanks to multilingual SEO. You can rank your products in Google for different languages, which helps you drive more organic traffic to your store.
However, WooCommerce doesn’t include built-in multilingual functionality, so you might be hitting some issues regarding how to translate WooCommerce.
Thankfully, with the right tools, you can easily create a multilingual store with zero technical knowledge required. And in this guide, we’re going to show you how.
By the time you finish this tutorial, you’ll be able to use a simple visual interface to fully translate your store into an unlimited number of new languages—this includes your products, shop pages, cart, checkout, and everything else:
Or, if you don’t want to translate your store from scratch, you can get some help from automatic machine translation powered by Google Translate or DeepL and then refine those translations via the visual editor.
On the frontend, your shoppers will be able to choose their preferred languages using a flexible language switcher and you can even automatically redirect people to their local languages based on their location and browser preferences.
Ready to learn how to set up WooCommerce translation? Let’s dig in!
Table of contents
What You Need to Translate WooCommerce
WooCommerce includes all of the features that you need to create a fully functioning eCommerce store… but only in a single language.
So—how do you make it so that you can translate your store into multiple languages and let shoppers choose their preferred languages?
Well, as is so often the case with WordPress, you’ll need the help of a plugin.
While there are many popular multilingual plugins, we’re going to use the TranslatePress plugin for this tutorial for a few reasons:
- It offers out-of-the-box support for WooCommerce, so you’ll be able to completely translate WooCommerce including the cart and checkout pages.
- A free version lets you create a fully multilingual store in one new language. You can follow most of this tutorial using just the free version.
- You can manage your translations using a visual interface like you saw above.
- It supports automatic machine translation via Google Translate or DeepL if you want to save time.
How to Translate WooCommerce With TranslatePress
Now that you know what TranslatePress is, let’s get into how to translate WooCommerce using the plugin.
For this tutorial, the only thing that we’ll assume is that you already have a working WooCommerce store in your store’s original language.
In addition to configuring WooCommerce settings and adding product/store content, you’ll want to fully set up your WooCommerce theme and any WooCommerce plugins you use.
For this example, we’re using the free Unite theme, which offers full WooCommerce support. However, TranslatePress will work with literally any WooCommerce theme, so you can choose whichever theme you want.
You’ll be able to follow most of this tutorial using the free version of TranslatePress available at WordPress.org. However, a few features require the paid version of TranslatePress, which we’ll be sure to note in the tutorial below.
1. Install TranslatePress and Choose Languages
To get started, install and activate the TranslatePress plugin.
You can install the free version from WordPress.org. Or, if you decide to purchase TranslatePress premium, you can download the premium plugin from your TranslatePress dashboard.
If you’re unsure which version is best for you, you can always start with the free version and upgrade later without losing any of your settings and translations.
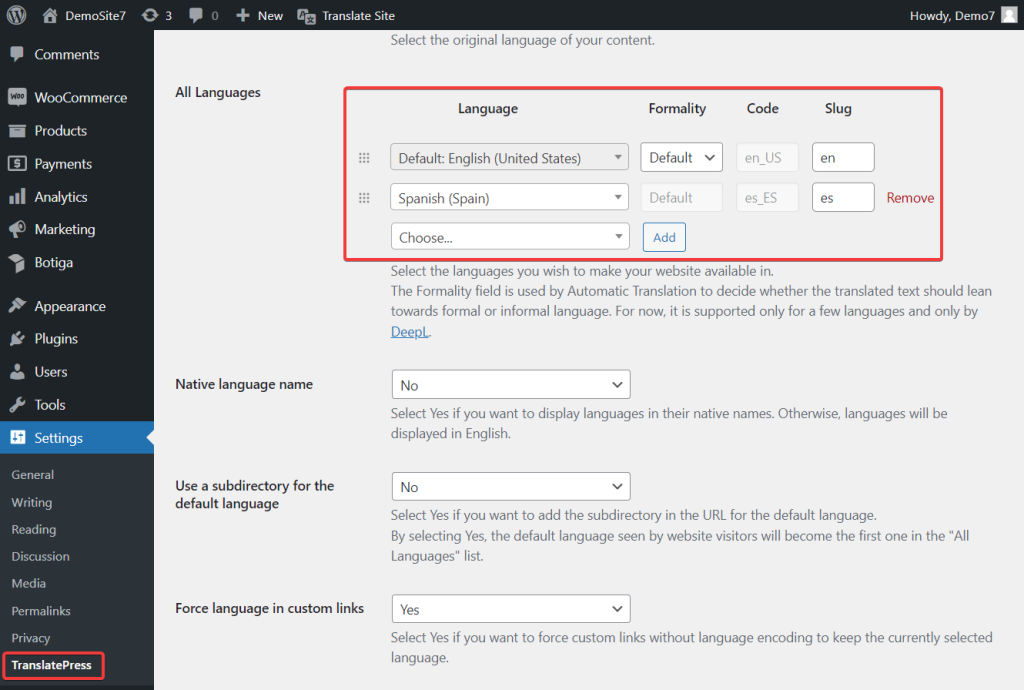
Once you’ve activated the plugin, go to Settings → TranslatePress to choose the languages that you want to use on your store:
- Default Language – the language in which all of your store’s current content exists.
- All Languages – one or more new languages into which you want to translate your store’s content. The free version of TranslatePress lets you add one new language (two languages total). To add two or more new languages, you’ll need the premium version of TranslatePress, which supports unlimited languages.
For example, if your store currently exists in English and you want to translate it into Spanish, you’d configure the TranslatePress settings like so:
TranslatePress offers out-of-the-box support for hundreds of languages and locales, so you should be able to find all of your desired languages using the drop-down.
However, if you don’t see the language you want to use, TranslatePress also lets you add custom languages.
You can set these up by going to the Advanced tab of the TranslatePress settings area and scrolling down to the Custom language section.
2. Set Up Automatic Translation (Optional)
This step is optional. However, if you want to save some time, you can use automatic machine translation to generate your store’s baseline translations rather than translating everything from scratch.
Even if you use machine translation, you’ll still be able to fully edit all the translations that the service generates, so you’ll have full control over every single translation on your WooCommerce store.
If you do not want to use machine translation, you can skip the next step to start translating your content manually.
If you do want to use machine translation, TranslatePress supports two different services:
- Google Translate – you can use this with the free version of TranslatePress;
- DeepL – this service requires the premium TranslatePress Business license.
Google Translate should be fine for basic uses, but many people find DeepL’s translations to be a bit more accurate, especially regarding context and informal language.
However, the downside of DeepL is that it doesn’t support as many languages as Google Translate, so you’ll want to double-check that it supports your chosen language.
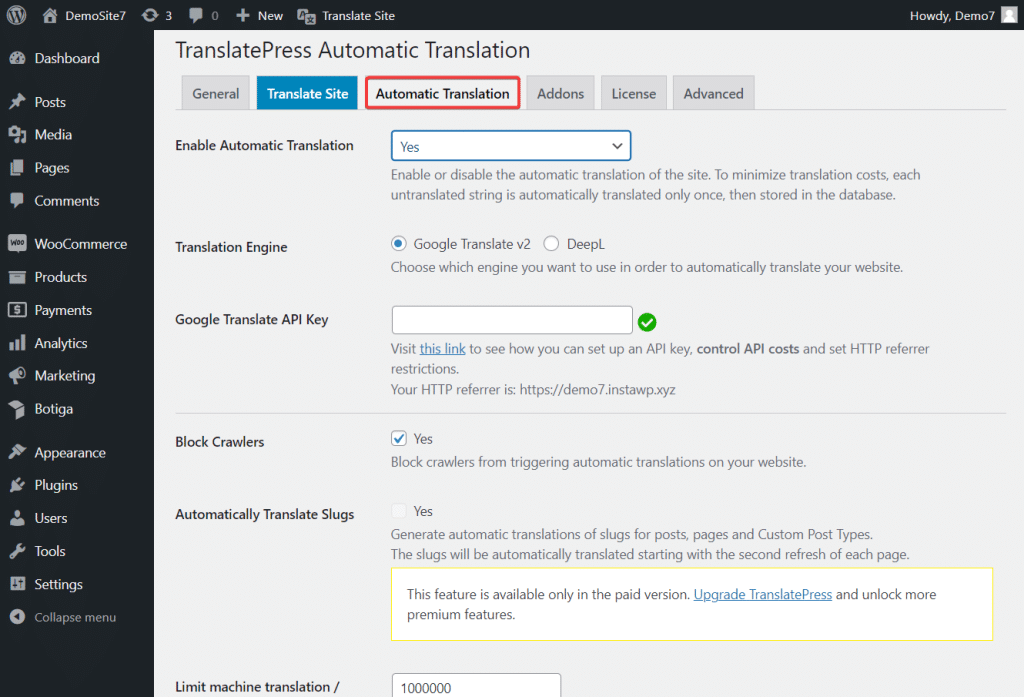
You can set up these services by going to the Automatic Translation tab of the TranslatePress settings area.
First, set the Enable Automatic Translation drop-down equal to Yes to expand additional options.
Next, choose your preferred translation engine. Then, you’ll need to enter an API key for that service, which lets you connect your WordPress site to that service.
TranslatePress has step-by-step documentation on how to obtain the API key for both services:
Finally, you also have the option to set a limit for how many machine translation characters to perform per day, which helps you control your budget.
The TranslatePress plugin does not charge you anything based on your machine translation usage. However, you may need to pay Google Translate or DeepL directly depending on your usage.
Google Translate and DeepL offer free plans that let you translate 500,000 characters per month for free, roughly equal to around 100,000 words per month.
If you need to translate more than 500,000 characters in a single month, you’ll need to pay:
- Google Translate charges $20 per million characters over the free limit.
- DeepL charges a flat $5.49 fee per month plus $25 per million characters, making it a little more expensive than Google Translate.
If you’re worried about your budget, you can use TranslatePress’s daily translation limits to either guarantee that you stay within the free tier or limit how much you might need to pay for the API access.
Once you’ve made your choices, click the Save Changes button. Then, TranslatePress will start automatically translating your site‘s content.
3. Translate WooCommerce Content
Now, you’re ready to start translating your WooCommerce store‘s content.
Whether you decided to use automatic machine translation or not, you’ll use the same visual translation interface to manage all of your translations:
- If you used machine translation, your store’s translations will be pre-filled with the translations from the service. But you’ll be able to fully edit those translations if needed.
- If you did not use machine translation, the translation fields will be empty to start with and you’ll need to add your translations from scratch.
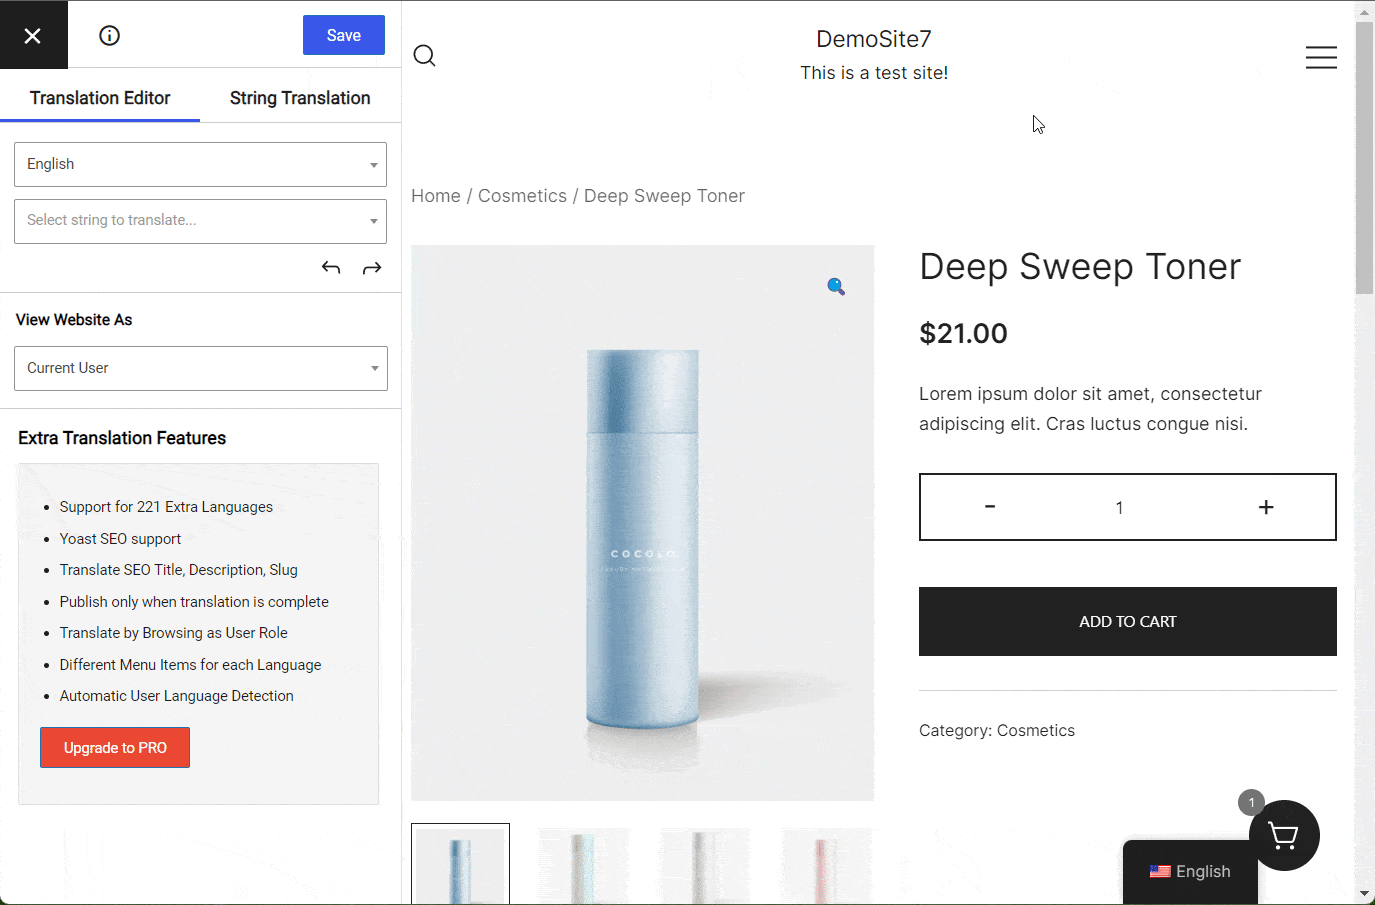
TranslatePress uses a visual translation editor, as you saw above. We’ll show you how the editor works at a high level and then dig into how to translate specific parts of WooCommerce.
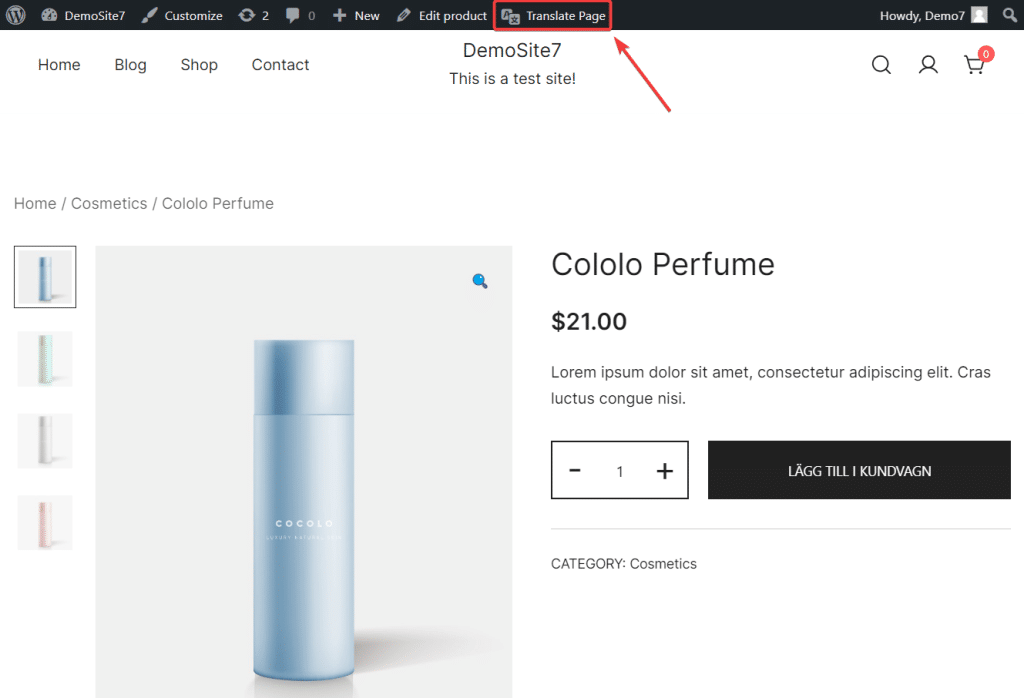
To launch the translation editor, open the piece of content that you want to translate on the frontend of your site. Then, click the new Translate Page option on the WordPress toolbar:
In the translation editor, you’ll see a live preview of the page on the right side of the screen and a sidebar on the left where you can manage your translations.
To translate any text or other content, all you do is hover over it on the live preview and click the pencil icon. This will open the translation in the sidebar, where you can make your changes using the editor field:

You’ll use this same approach to translate your store’s content, whether it’s a product, the cart page, a blog post, or anything else.
To better understand how it works, let’s look at how to translate specific parts of your WooCommerce store.
How to Translate WooCommerce Products
To translate a WooCommerce product, open the product you want to translate on the frontend of your store. Then, click on the Translate Page option on the WordPress toolbar to launch the editor.
You can then translate all of the product details we showed you in the GIF above.
You can also go beyond just translating product text and ” translating” product images so that your store will show different images based on the language a shopper has selected.
This is especially useful if some of your product images include text or if you just need to localize an image for some reason.
To translate a product image, just hover over it and click the pencil icon. You’ll then be able to select a different image to use from your WordPress Media Library:

Note – if your WooCommerce theme uses a lightbox or zoom effect for product images, you might need to click on the image to open the lightbox before you’re able to click the pencil icon.
How to Translate WooCommerce Store Page
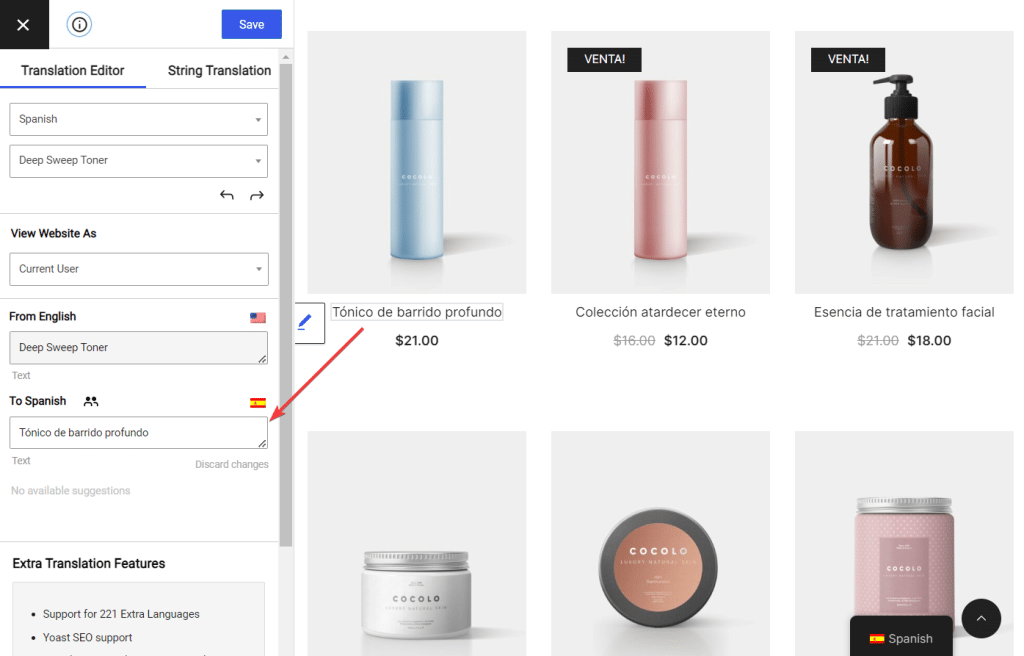
To translate your store pages, you can use the same visual editor. Just open the store page or product archive you want to translate and click the Translate Page button.
The nice thing here is that TranslatePress will automatically detect any product details you’ve already translated. So if you’ve already translated all of your product’s titles, those translations will be pre-filled on your shop pages:
How to Translate WooCommerce Cart Page
TranslatePress also makes it easy to translate the WooCommerce cart page using the visual editor.
By default, TranslatePress will try to use WooCommerce’s existing language pack if it’s available. However, you can fully edit all of the translations in all of your store’s languages (including your store’s original language).
Your WooCommerce shopping cart has two different states that need to be translated:
- Empty – the cart content before a shopper has added any items.
- Full – the cart content when the shopper has added one or more items.
To begin, go to the frontend of your store and ensure that your shopping cart is empty. Then, open the cart page and launch the TranslatePress editor.
Now, you can use the same point-and-click approach to translate all of the empty cart content. When you open a translation, you might see that it’s pre-filled with the translation from WooCommerce’s language packs, but you can edit both translations as needed:

Once you’re finished translating the empty version of your cart, go back to the frontend of your store and add an item to your cart. Any item will do—the only thing that matters is a product in your cart.
Then, go back to the cart page and launch the TranslatePress editor again. Now, you can use the same approach to translate all of the content that will appear when a shopper has items in their cart:

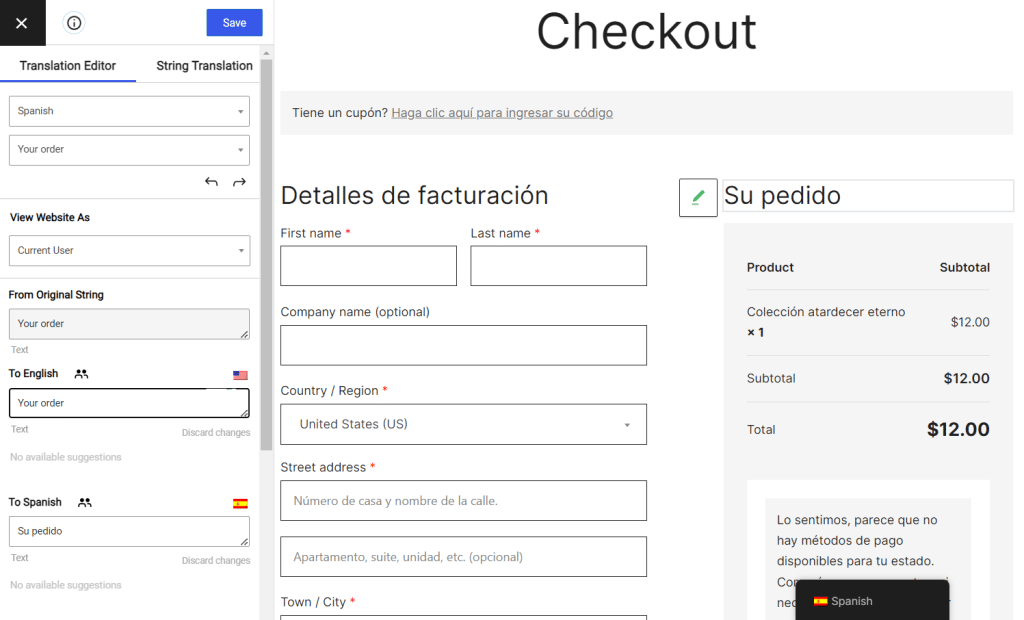
How to Translate WooCommerce Checkout Page
You can translate the WooCommerce checkout page just like you translated the cart page.
To begin, launch the checkout page on the frontend of your store. That means you’ll need to add an item to your cart and click the button to check out.
Once you have the checkout page open, use the button on the WordPress toolbar to launch the TranslatePress editor just as you’ve been doing.
Now, you can translate the WooCommerce checkout using the same point-and-click approach.
As with the WooCommerce cart page, TranslatePress will try to pre-fill the translations by importing them from the existing WooCommerce language pack if available. However, you can fully edit the translations in all of your store’s languages, including the original language.
How to Translate Menu Items, Widgets, and Other Frontend Content
At this point, you know how to translate all the important elements of your WooCommerce store. However, it’s important to note that you can use the exact same approach to translate other elements on your store including:
- Menu items;
- Widgets (or block widgets);
- Content from the WordPress editor—it works with both the new block editor (Gutenberg) and the classic TinyMCE editor;
- Content that you’ve designed with page builder plugins;
- Forms from any form builder plugin;
- Popups from popup plugins;
- …and so on.
For example, if you want to translate one of your store’s menu items, you can just hover over the menu item and click the pencil icon:
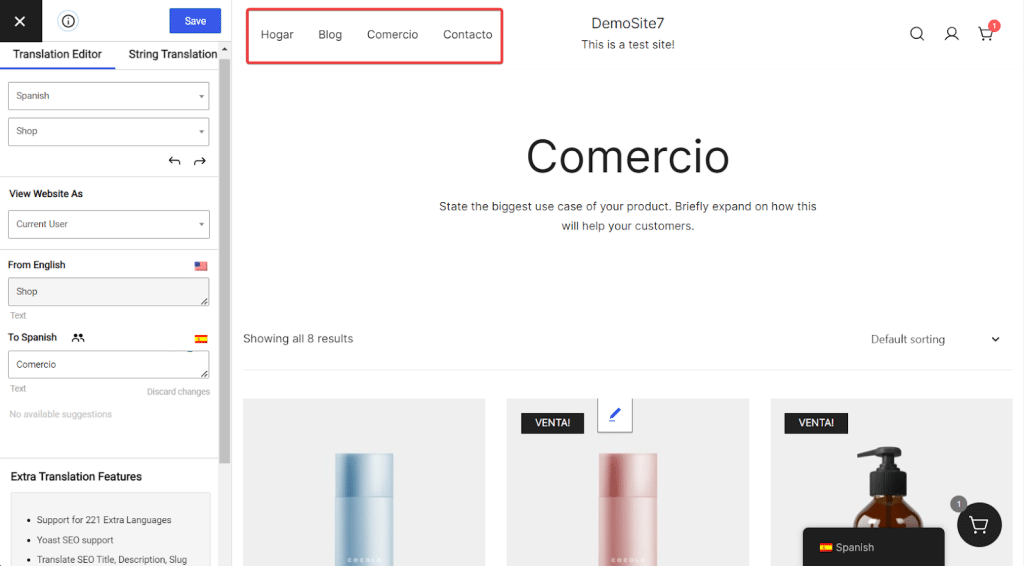
Once you translate the menu item once, TranslatePress will automatically use that translation for every spot where that menu item appears—there’s no need to duplicate your work on other pages.
How to Translate SEO Metadata
Suppose you want to benefit from multilingual WooCommerce SEO. In that case, you’ll also need to translate your store’s backend SEO details such as SEO titles, meta descriptions, URL slugs, Open Graph information, etc.
TranslatePress can also help you translate all of these details, but you’ll need the SEO Pack add-on, which is available on the premium Personal license of TranslatePress.
With this add-on, you can translate all of your site’s SEO information. To do this, TranslatePress automatically integrates with most popular SEO plugins including Yoast SEO, Rank Math, and more.
Once you install the SEO Pack add-on, you’ll be able to translate these details by selecting them using the drop-down in the translation editor.
For example, if you’ve already set your SEO details using Yoast SEO, you’ll see those details appear in the editor and then you’ll be able to translate them just like other content:
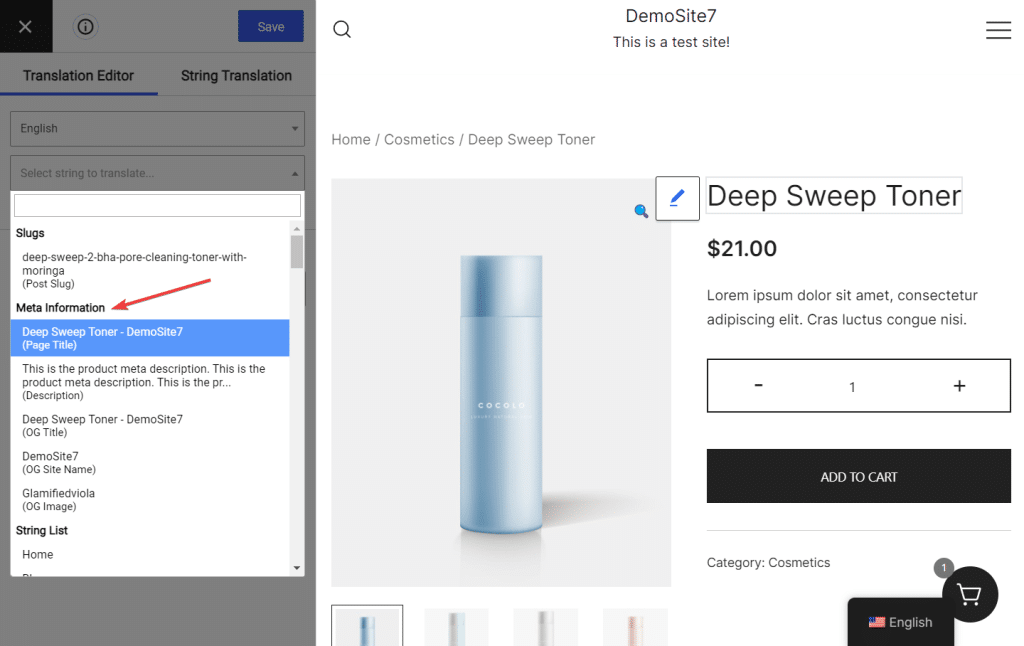
You can also use the same approach to translate the URL slug for individual products (and other pieces of content, such as blog posts).
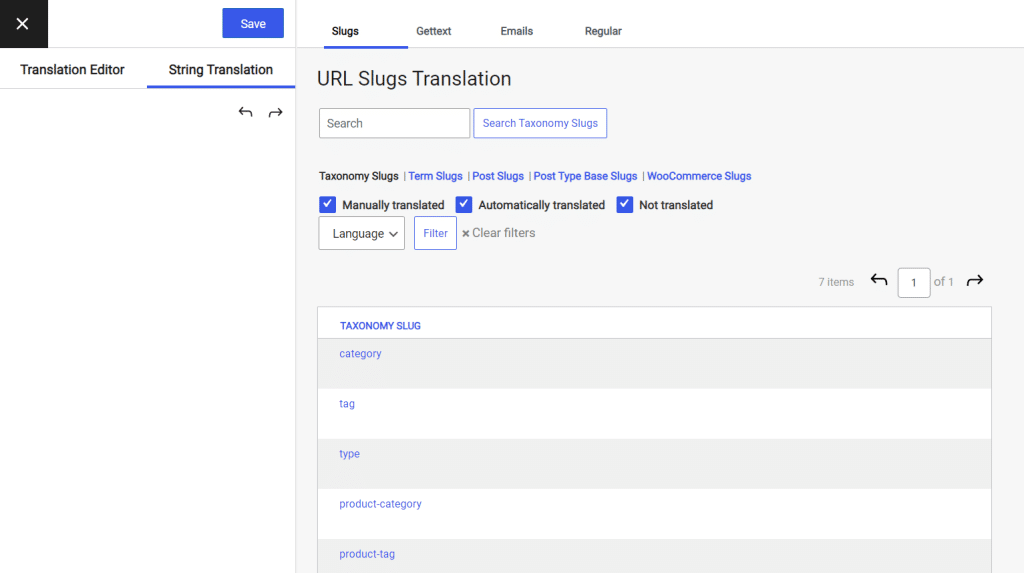
For sitewide URL slugs, such as your product category base slugs, you can open the String Translation interface:
How to Translate WooCommerce Emails
To complete the translation of a WooCommerce store, you need to translate your emails.
If you go to WooCommerce → Settings → Email, you can find emails set up for your store which includes:
- Admin emails for managing orders (e.g. new order notice, failed order, or cancel order notice) and
- Emails triggered by the customer’s action (e.g. refund order notice, complete order, new account notice, etc)
You can translate both types of email using TranslatePress’ automatic translation or use the manual method to translate from scratch or to improve automatic translations.
Translating WooCommerce emails is slightly different from translating any other element of your store. It involves pulling up email strings and then translating them into the editor.

After translation, TranslatePress uses the language logged-in customers last browsed your website to send the emails. For stores that don’t need customers to log in to make purchases, emails are sent in the language selected on the checkout page to identify user language preferences.
4. Configure Your WooCommerce Language Switcher
At this point, you have a working multilingual WooCommerce store.
However, to make it easy for shoppers to choose their preferred languages, you’ll want to set up your store’s frontend language switcher.
By default, TranslatePress adds a floating language switcher in the bottom-right corner of your store. However, you can also change the location of the floating language switcher or use a completely different placement option.

Here are your options for placing your store’s language switcher:
- Floating language switcher – display it on all of your pages, in any corner of your store.
- Menu item – add your language switcher as a menu item to any menu on your site by going to Appearance → Menus.
- Shortcode – manually place your language switcher anywhere on your site using a shortcode.
You also get settings to control the content and behavior of your language switcher. For example:
- Language names – choose whether to display the full language name or just the two-letter ISO code.
- Country flags – choose whether or not to show country flags. If you enable flags, TranslatePress will show the flag for the specific locale you selected. So if you chose Spanish (Spain), it will show the Spanish flag. But if you chose Spanish (Mexico), it would show the Mexican flag.
To configure these settings, go to Settings → TranslatePress and scroll down to the Language Switcher settings:

Let’s look at alternative placements to the default floating language switcher.
How to Add Your WooCommerce Language Switcher as a Menu Item
To add your WooCommerce language switcher as a menu item, go to Appearance → Menus to access the normal WordPress menu editor and open the menu you want to edit.
Then, you can use the Language Switcher settings to configure your language switcher.
You have two main options here…
First, if you only use two languages on your site, you can just add the Opposite Language item as a top-level menu item. With this menu item, your store will display an option for people to switch to the other language that you offer:
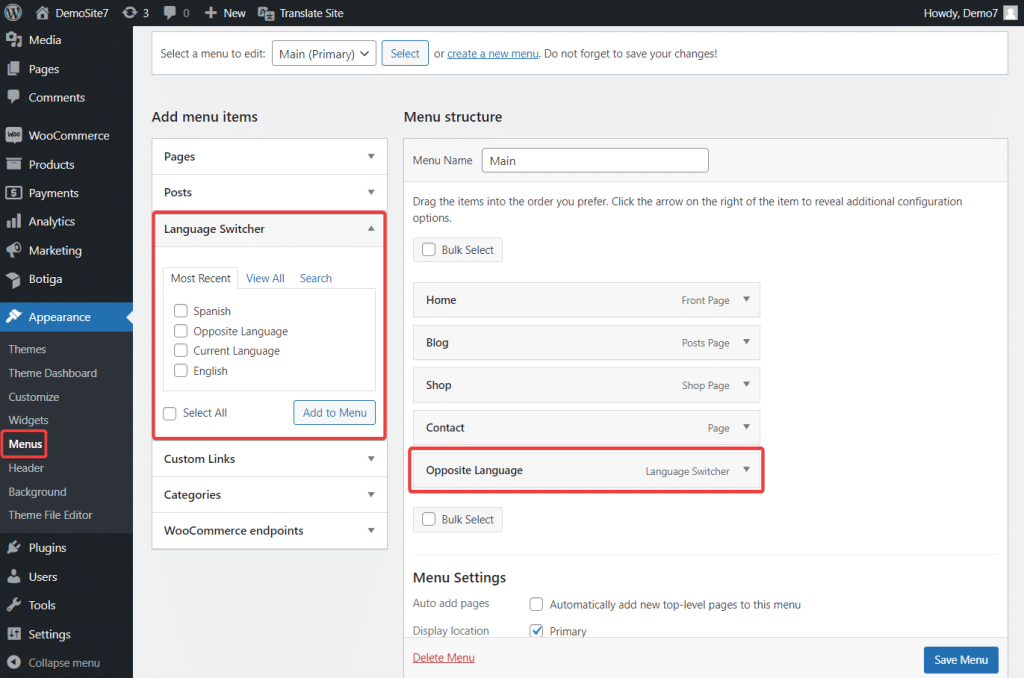
Let’s say your store is available in both English and Spanish. If a shopper was browsing in English, they would see the option for Spanish on your menu. But if they’re browsing in Spanish, they would see the option for English:

The other option is to use the Current Language menu item. This will display the language that the shopper is currently browsing in. You can then add the specific languages as sub-menu items of the Current Language menu item like this:
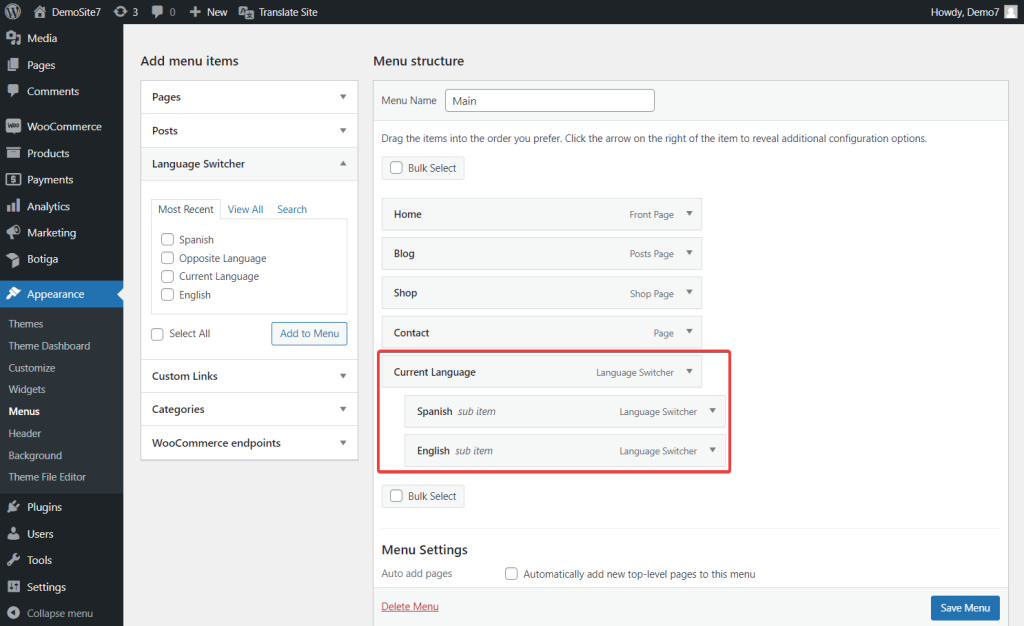
With this setup, shoppers will see their currently selected language as the top-level menu item. They can then hover their cursor to display a drop-down with all the available languages. TranslatePress will hide the drop-down for the user’s currently selected language, though, to avoid duplication:

This is probably the best approach for your store if you offer more than two languages.
How to Add Your WooCommerce Language Switcher as a Shortcode or Block
If you want even more control over the placement of your language switcher, you can add it manually anywhere on your store using the following shortcode:
[language-switcher]
You can place this shortcode in widgets, blocks, content you create with the editor, and so on.
You can also use the WordPress do_shortcode() function to place the language switcher directly in your theme’s template files.
Another way to go about it is by using the dedicated Language Switcher block in the block editor.
Create a Multilingual WooCommerce Store Today
Translating your WooCommerce store is a great way to offer a better shopping experience for your existing customers and reach new customers thanks to multilingual SEO and other new marketing opportunities.
While WooCommerce doesn’t support multilingual functionality in the core plugin, you can easily create a multilingual store using the TranslatePress plugin.
Using TranslatePress’s visual editor, you’ll be able to fully translate your store including your single product pages, shop pages, cart page, checkout page, SEO metadata, and non-WooCommerce content.
You can add a frontend language switcher so shoppers can choose their preferred languages while browsing your store.
In this post, you’ve learned how to translate WooCommerce and create your multilingual store step-by-step.
If you’re ready to start, install the free TranslatePress plugin today to see how it works.
And if you’re still in the planning stages of your store, check out the best WooCommerce themes and some other great WooCommerce plugins to set your store up for success.
Do you still have any questions about WooCommerce translation? Let us know in the comments!
Related Posts


Comments (0)