How to Create a Multi Language Website in WordPress
Want to create a multi language website in WordPress?
There are several ways of boosting a site’s visitor count and revenue collection. Translating the site into multiple languages is one of the most effective ways of doing just that.
The problem is that translating every page of a website is a lot of work. You can easily get overwhelmed and make mistakes. But there’s nothing to worry about because, with the right kind of guide, creating a multi language site is a breeze.
Translating a WordPress website into multiple languages is time-consuming so we recommend setting aside an hour or two to learn how to translate an entire website into one or more languages.
Let’s get started.
Why Create a Multi Language WordPress Site?
There are two major advantages of converting your WordPress site into a multi language website. Those are:
More Organic Traffic: So far your site appears to users largely speaking in a single language. After translation, Google will index the translated pages as separate content and your site will appear before users speaking (and searching for) different languages. This means the same content will attract more visitors and significantly boost your monthly organic traffic.
Better Trust & Credibility: Speaking the same language as your visitors can create a sense of familiarity and comfort, helping establish trust and credibility, showing that you understand their needs and are catering to them specifically. Eliminating the language barrier will remove misunderstandings and it can lead to a smoother and more positive user experience.
With these advantages in mind, let’s translate your WordPress website into multiple languages.
How to Create a Multi Language WordPress Website?
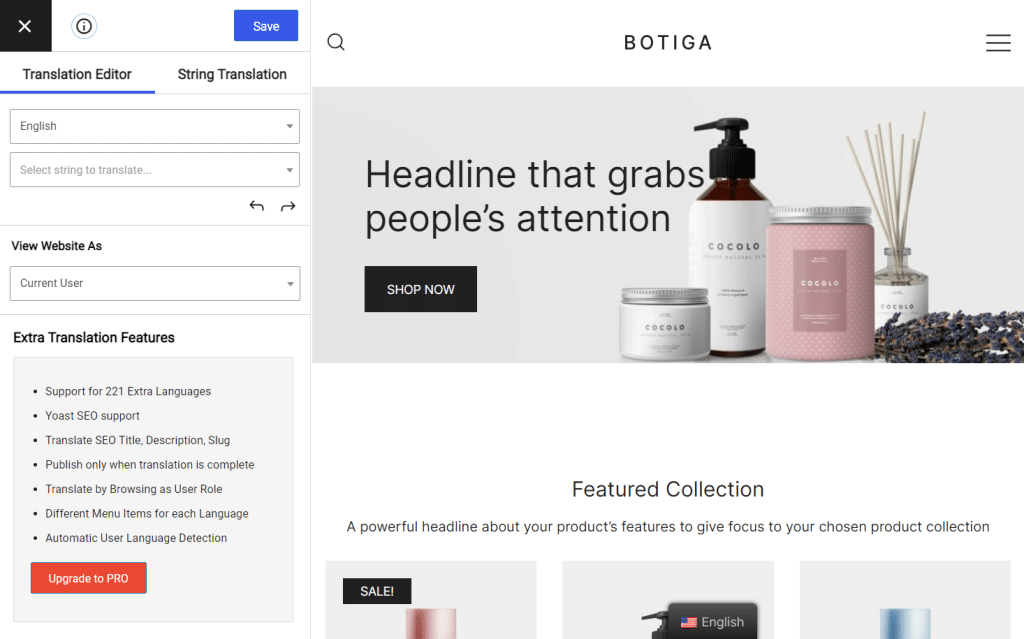
To create a multi language WordPress website, you need a translation plugin. While there are several translation plugins to choose from, we recommend using the most popular, reliable, and easy-to-use plugin called TranslatePress. The plugin is extremely user-friendly and lets you translate the content of your website from a visual interface, similar to the WordPress customizer:
TranslatePress is loaded with some incredible features like:
- Automatic user language detection using browser settings or IP address
- Automatic translation using Google Translate or DeepL
- Manually refine automatic translations
- Manually translate yourself or hire translators via dedicated Translator accounts
- SEO support for page title, slug, description, etc helping boost local search rankings
- Language switcher allows site visitors to choose their preferred language
- Support for over 200 languages, among other things
You can learn about all the features that TranslatePress offers here.
TranslatePress has a free and a premium version. The free version offers a ton of features for you to translate your WordPress site into one new language, manually or automatically. However, the pro version gives you access to even more advanced features like multilingual SEO support, automatically redirecting users to their preferred language, automatic translations via DeepL (the most accurate translation engine), etc.
For this article, we are using the free version of the plugin to translate your WordPress site. The free version is more than enough for you to create a fully functional multi language WordPress site with 2 languages your visitors can choose from.
Step 1: Install TranslatePress
Install and activate TranslatePress on your WordPress website. Simply search for it in the WordPress repository (Plugins > Add New) and add it to your site.
After installation, you will be automatically taken to the TranslatePress settings page.
You can also access the settings page manually by going to Settings > TranslatePress > General tab on your WordPress dashboard.

Step 2: Choose Your Translation Languages
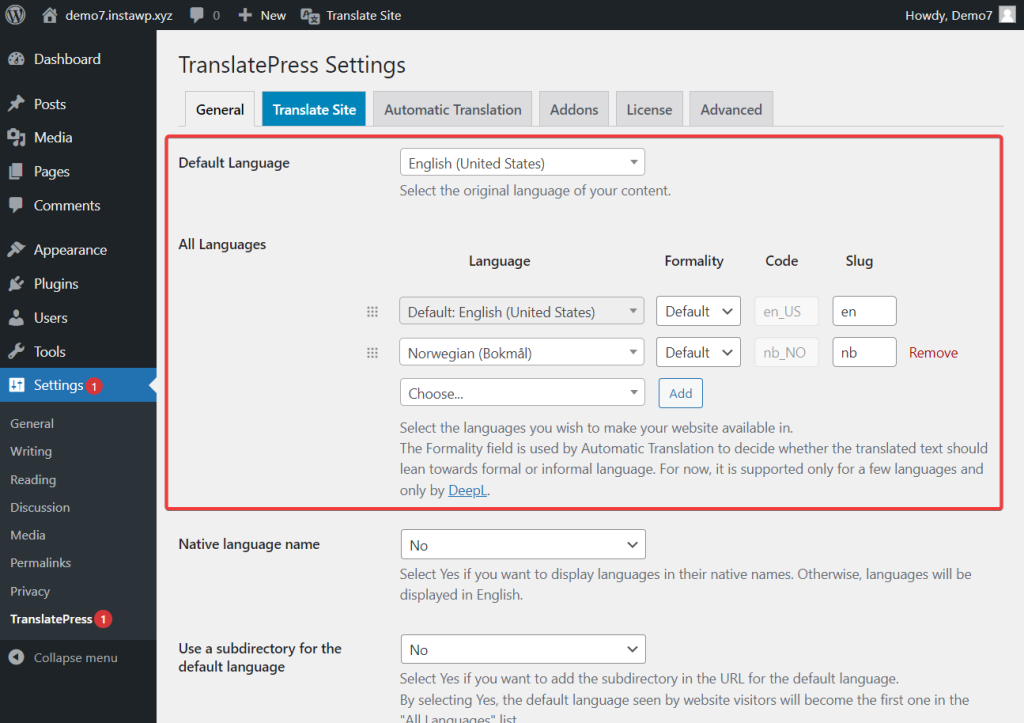
The first thing you need to do is set a default language for your website and select languages in which you would like to translate your website.
Let’s say most of your site’s visitors are English speaking, located in the US. And your web analytics show that your site also draws some Norwegian visitors.
In this scenario, you can set the default language as English (United States) and add Norweigan as your translation language.
As for the formality and slug options, we recommend leaving them in their default state.
Please note that with the free version of TranslatePress, you can add one translation language. To be able to translate your website into more languages, you’ll need the premium version of the plugin.

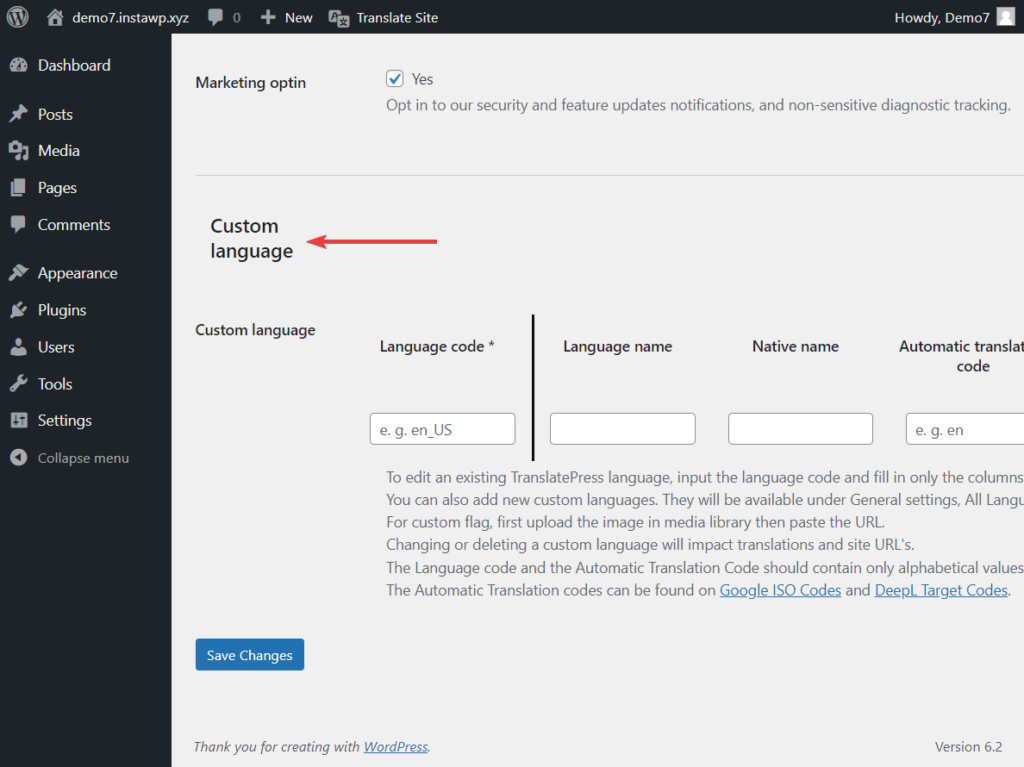
Although TranslatePress supports numerous languages, there can be times when you can’t find the language of your choice from the drop-down menu. In that case, you can add custom languages by going to Settings > TranslatePress > Advanced tab > Custom Language section. Here’s a guide on how to add custom languages to TranslatePress if you need a little extra help.
Step 3: Set Up Automatic Translation (Optional)
You can use TranslatePress to translate your website manually or automatically.
In the manual method, you will need to edit every page and manually insert translated content into your website. Just like I showed you at the beginning of this post, using the visual editor. But if that sounds like a lot of work to you, then you can always use the automatic translation method instead. With this method, all you need to do is enable the automatic translation and set it up properly.
To use the manual method, skip this section and dive straight into step 4.
To set up automatic translation, here’s what you need to do:
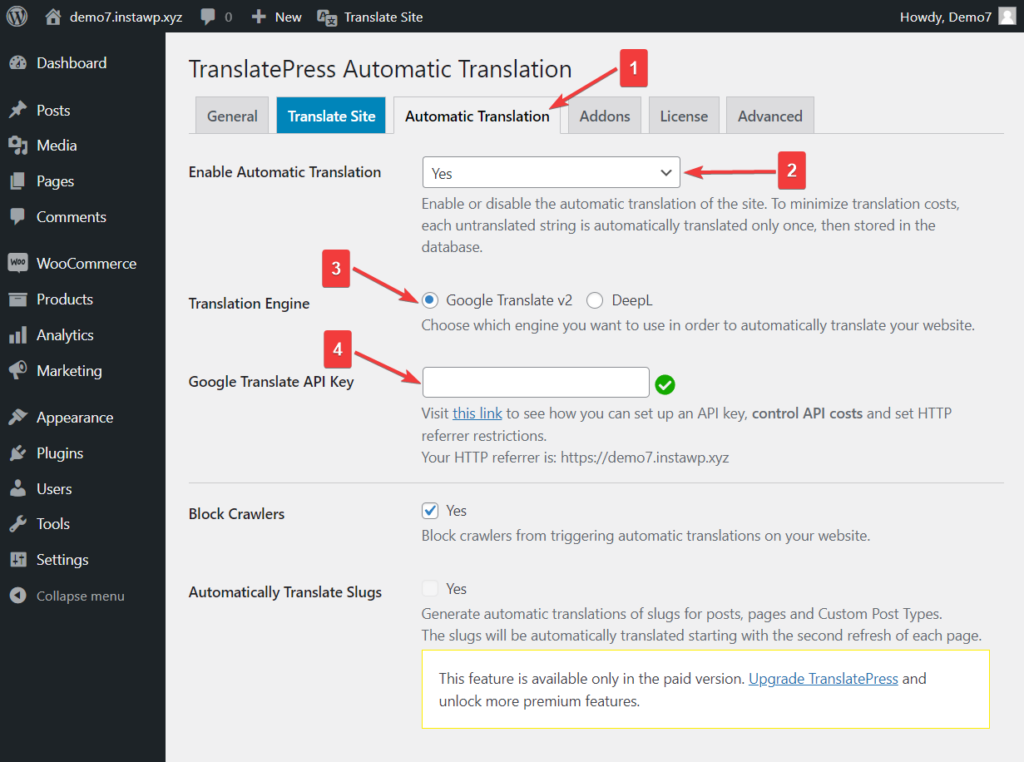
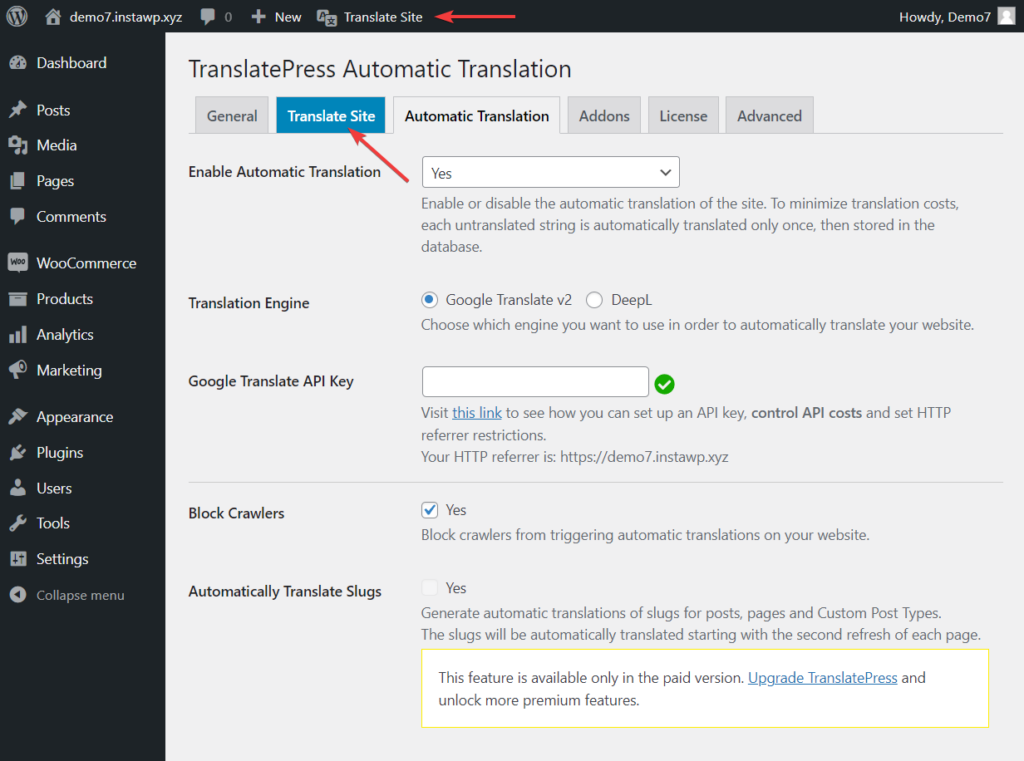
Go to the Automatic Translation tab in the TranslatePress Settings page and select Yes from the dropdown menu. The rest of the settings will appear.
You have the option to either use Google Translate v2 or DeepL to automate translation. DeepL is only available to premium users, so for this tutorial, we are going to proceed with Google Translate as we are using the free version.
You can read more on how Google Translate vs DeepL compares here.
To enable Google Translate v2, you will need to set up a Google API key and add it to the plugin.
Note that Google will ask for your card details when you set up an account to generate your API key even if you opt for the free tier. However, they will not charge it unless you manually upgrade to a paid plan.
After adding the API key, let’s move to the more advanced setting options. Here’s a quick rundown of what these options mean:
Block crawlers: The free Google Translate tool lets you translate a limited number of characters per month. Blocking bots will save you from wasting your translation quota.
Automatically translate slugs: Slugs from your posts, pages, and custom post types will be translated automatically. This is a premium feature.
Limit machine translation/characters per day: Google Translate lets you translate 500,000 characters per month for free which is approximately 100,000 words. If you need to use the Translator beyond this limit, you will need to subscribe to a paid plan. By adding a character limit to your translation, you can ensure that you never cross the 500,000 characters limit.
Today’s character count: This shows you how many characters were translated in a given day.
Log machine translation queries: By enabling it, you will allow the plugin to log requests made to the Google Translate API and save them in your website’s database. An account of API requests comes in handy while testing and debugging errors on your website.
Step 4: Manually Translate Content Using the Translation Editor
If you want to translate your website manually or adjust the automatic translations made by Google Translate, then select the Translate Site button located on the admin bar or the TranslatePress Settings page.
You will be immediately taken to the front end of your site.
The interface on the left side of your screen might look familiar but it’s not the theme’s customizer.
It’s a TranslatePress tool called Translation Editor and it will help you to manually translate your site’s content.
Go ahead and hover over any piece of content on your screen. You will see a pencil icon appear next to every item. Click it and then you’ll be able to insert the translation for that item in the sidebar to the left.
Add the translated text and hit the Save button. And that’s it. That’s how easy it is to translate content using this plugin.
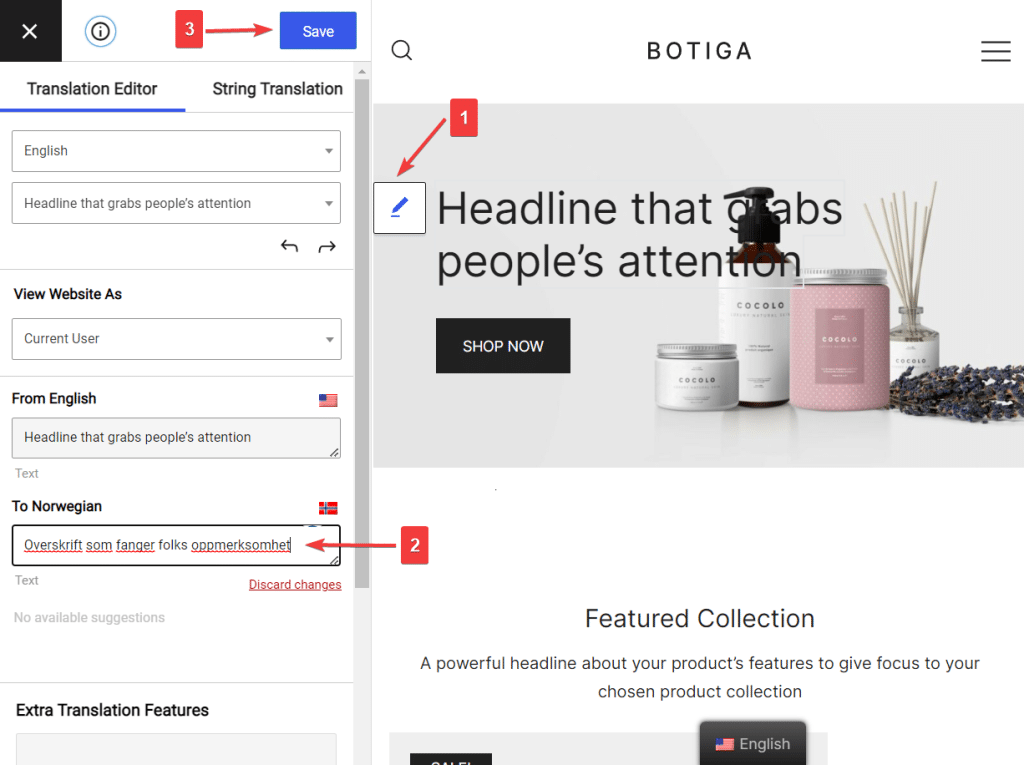
You can choose the next or the previous text by using the rightward or leftward arrows.
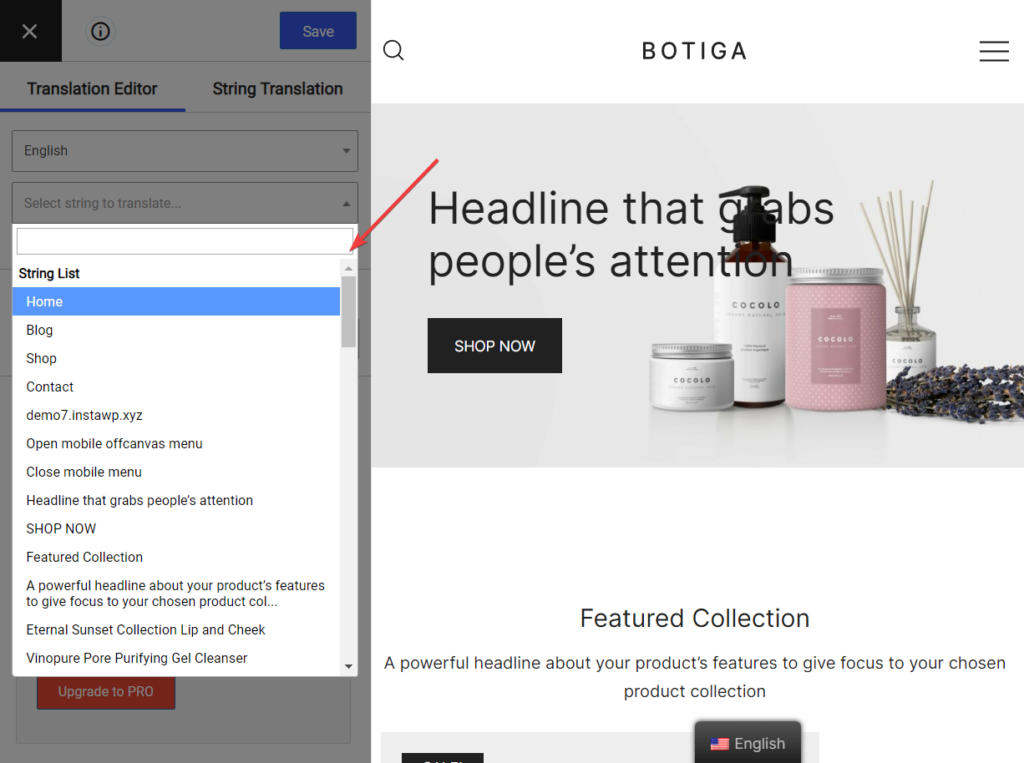
Alternatively, choose the dropdown menu (located right above the arrows) on the editor to select the texts available on the screen.
Besides translating texts, TranslatePress allows you to change different types of content. You can use the plugin to translate:
- Images
- Menus
- Contact forms
- Popups
- WooCommerce products
- SEO data & slugs
Let’s take a quick look at how to translate these types of content.
Images
Images containing default language text need to be replaced with images containing the translated language.
You will need to first create a new image and then upload it to your WordPress site by going to Media > Add New.
Copy the URL of the new image.
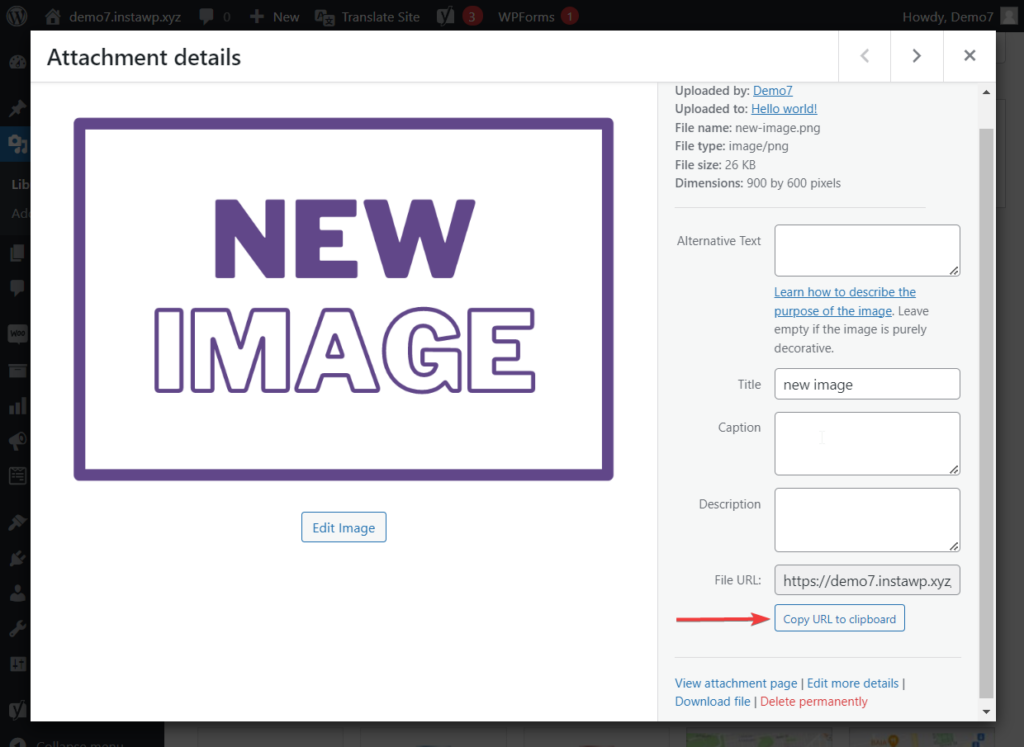
Next, open the page where the image with the default text is present and launch the Translation Editor.
Select the image using the pencil icon. Then in the translation sidebar, add the URL of the new image.
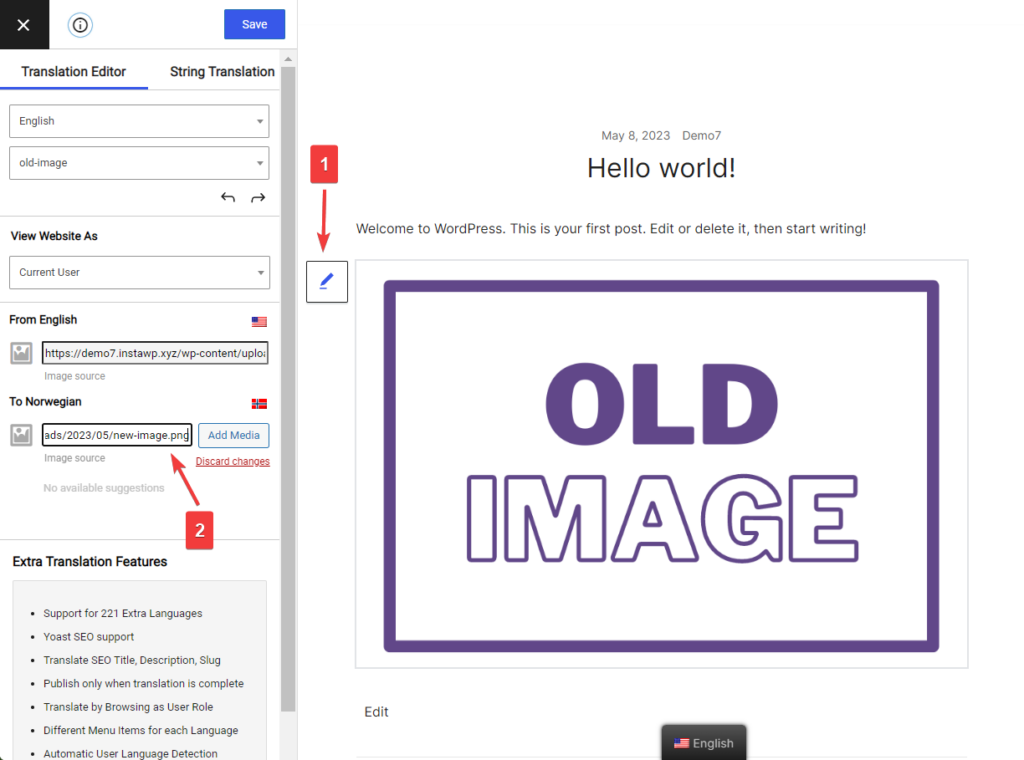
Alternatively, you can simply use the Add Media button from the translation editor and add your image directly from the interface.
If you want to take things even further, the pro version of TranslatePress lets you translate the alt text for that image as well.
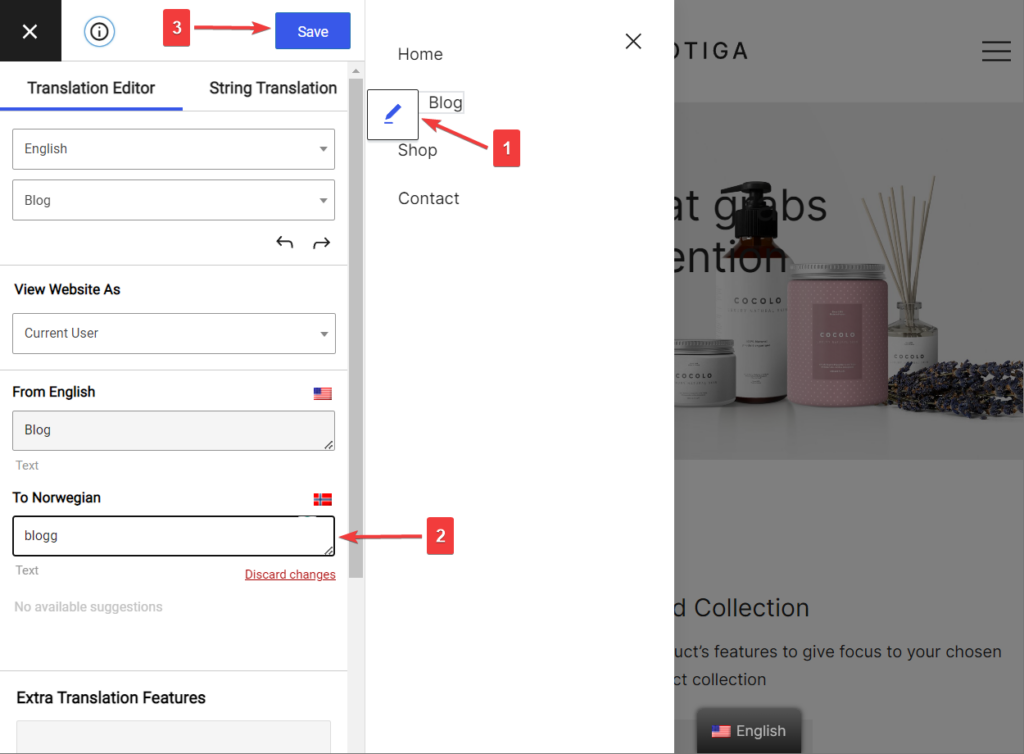
Menus
Menus can be translated in the same you translate any other text on the screen.
Select the text, insert the translated content in the Translation Editor, and hit the Save button.
Contact Forms, Popups, WooCommerce Products
Contact forms, popups, and WooCommerce products can be easily translated in the exact same way. By launching the Translation Editor, selecting the content, and replacing it with their translations.
SEO Data & Slug
In order to be able to tackle SEO elements and URL slugs, you’ll need to upgrade to the premium version of the plugin.
After upgrading, these new elements will now be displayed in the Translation Editor’s strings dropdown menu.
The beginning of the menu contains Meta Information like page title, meta description, etc.
Select any one of the meta information and start translating.
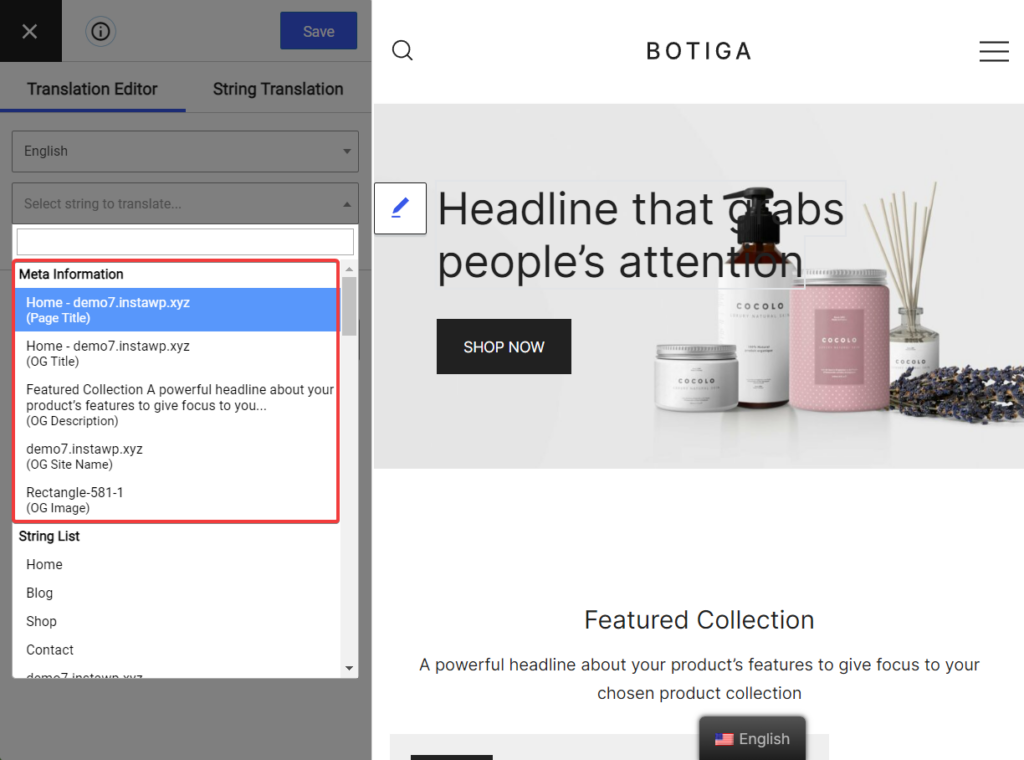
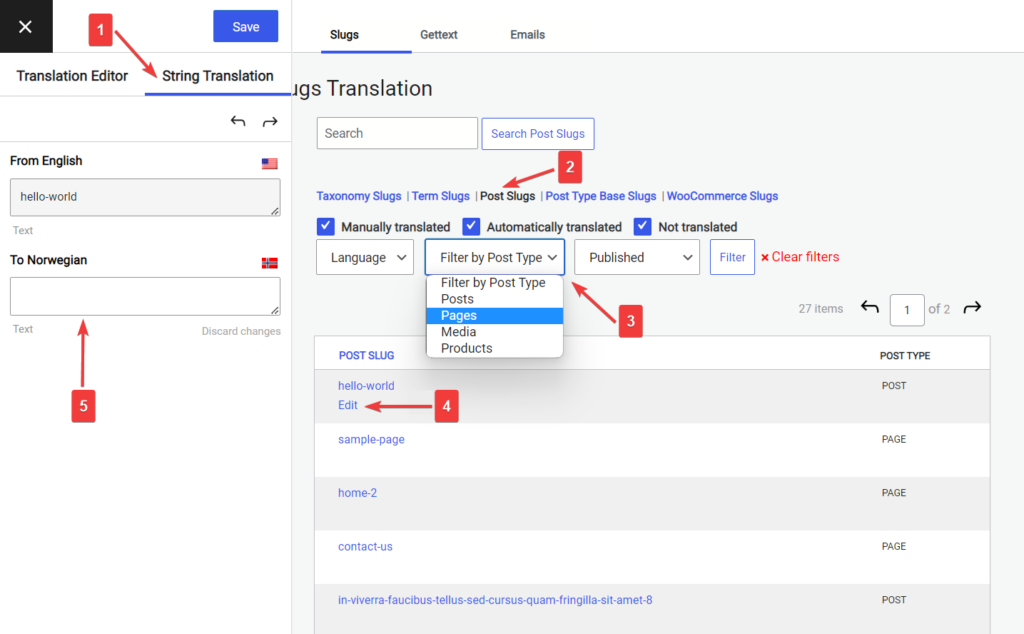
You can find the specific URL slug for the page you are currently translating within that dropdown as well. However, if you want to make things a little easier, you can tackle all the slugs on your site in one place, the String Translation interface.
In the same translation editor, go to String Translation > Post Slugs. You can use the Filter by Post Type filter to select posts, pages, media, or products.
Then click the Edit button below the slug that appears on the screen. Next, add the translated text in the editor and hit the Save button.
Step 5: Set Up a Language Switcher for Your Multi Language Website
To allow visitors to choose their preferred languages, TranslatePress adds a floating language switcher at the bottom of the screen by default.

You can style the switcher from the TranslatePress Settings page. You can change its color, location, and other design aspects of the Switcher.
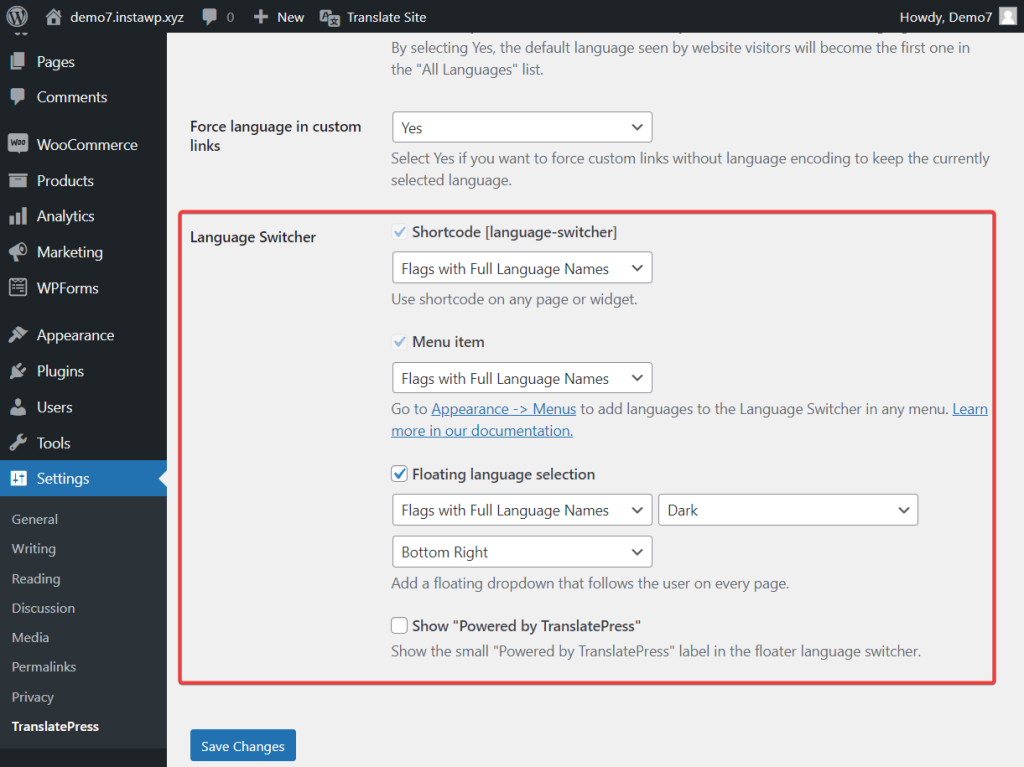
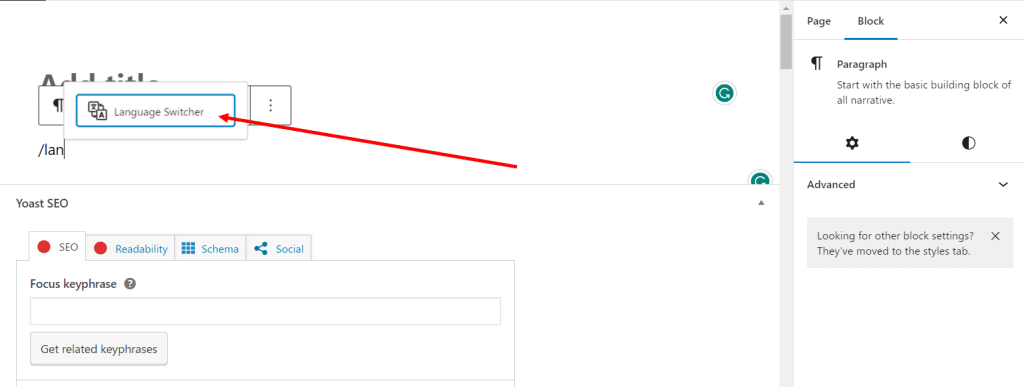
Besides the floating selector, you can also choose to display your language switcher in any menu or add it literally anywhere else on your site using the shortcode or the Language Switcher block.
Are You Ready to Create Your Multi Language Website?
Creating a multi language website in WordPress is a great way to cater to a wider audience and expand your site’s reach. Translating an entire website may seem like a lot of work but thanks to plugins like TranslatePress, creating a multi language WordPress site is super easy. All you need to do is:
- Install TranslatePress;
- Choose your translation languages ;
- Automate translation or manually translate all the posts, pages, custom post types, slugs, SEO data, images, and popups;
- Configure the language switcher;
- And familiarize yourself with the advanced settings of the plugin as it may come in handy while troubleshooting the plugin at some point.
If you have any questions about how to create a multiple-language website in WordPress, let us know in the comment section below.
Related Posts


Comments (0)