
How to build a multilingual WordPress website for beginners 2022
A step by step guide written by web developers who have built thousands of multilingual WordPress websites and helped hundreds of thousands of others create their own.
6 reasons why you’ll love this multilingual WordPress website guide
- Beginner-friendly – Even if you are not a coding expert you can create a website that is translated into as many languages as you want.
- Fast setup – You can start translating your website within minutes.
- Up-to-date – This guide is regularly updated to take into account the latest website trends
- Platform-specific – This guide is for users who are creating a WordPress website
- Guaranteed results – Hundreds of thousands of users have followed our instructions to successfully create their own multilingual website
- Free support – We are open for questions. Drop a comment below with your question and we will be happy to help
This guide is intended for anyone who has managed to create their own WordPress website and is now ready to make it multilingual. If you enjoyed following the steps in the previous guide then you will love this one.
Within this guide, we will not only show you how to translate your content but we will also take you through all aspects for making your website truly multilingual. This will include translating strings, themes, URLs and anything else which will optimize your multilingual SEO.
How to Create a WordPress Multi Language Site In 3 Steps
Step 1 – Choose the right languages for your website
Before you dive into translating your content, you must decide which and how many languages you want on your multilingual website.
Translating your website into English is an obvious first step if you are a website based in a non-English-speaking country. It will allow you to attract users from around the world who speak English as a second language.
But other languages might make more sense depending on your target market. The best way to understand your traffic is by analyzing it through Google Analytics to see where your users are coming from.
You can also use Google Adwords to explore your market and see which areas are the most lucrative.
Finally, you will need to evaluate how many languages you can maintain on your website. As great it would be to have 8 or 9 languages, can you afford to update them every time you post new content? It might be more realistic to pick one to start and see how useful it is and how you can manage it.
Step 2 – Choosing the plugin to translate your website
If you are building your multilingual website with WordPress, you will need to use a plugin.
WPML
We will be using WPML to translate our website. WPML is the most popular multilingual plugin on WordPress with more than 800,000 websites using it.

WPML comes with the following features:
- Advanced Translation Editor – The translation interface which includes features such as machine translation, a spell checker and the ability to edit without disrupting HTML.
- Translate all elements of your website – Optimize your multilingual SEO, translate strings and themes and localize your experience with features such as a currency changer.
- Compatible with major plugins – WPML works seamlessly with the likes of Yoast, WooCommerce and Contact Form 7.
- Compatible with major themes – WPML is integrated with all major WordPress themes.
- Works with major page builders – You can use WPML along with page builders such as Elementor, Divi and WPBakery.
- Choose how you want to translate – Whether it is yourself, a colleague or a translation service you can translate your content with WPML.
Follow these steps to download and install WPML.
You will also need the following add-on WPML plugins:
- WPML String Translation – To translate interface strings directly from within WordPress.
- WPML Translation Management – To manage your translation work.
- WPML Media Translation – To control which images are displayed for which language.
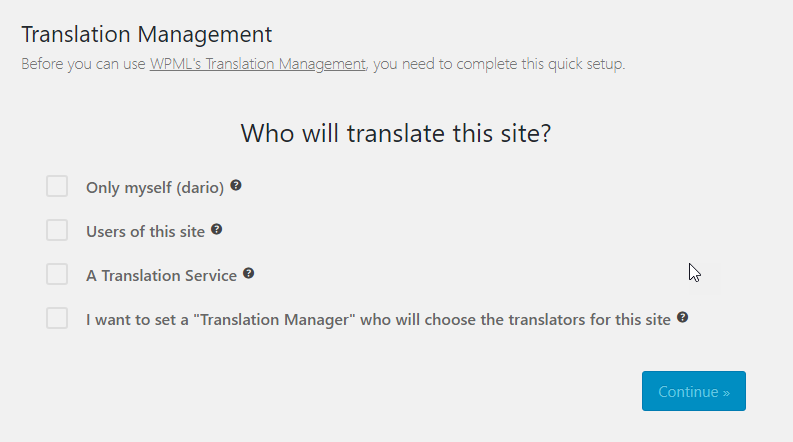
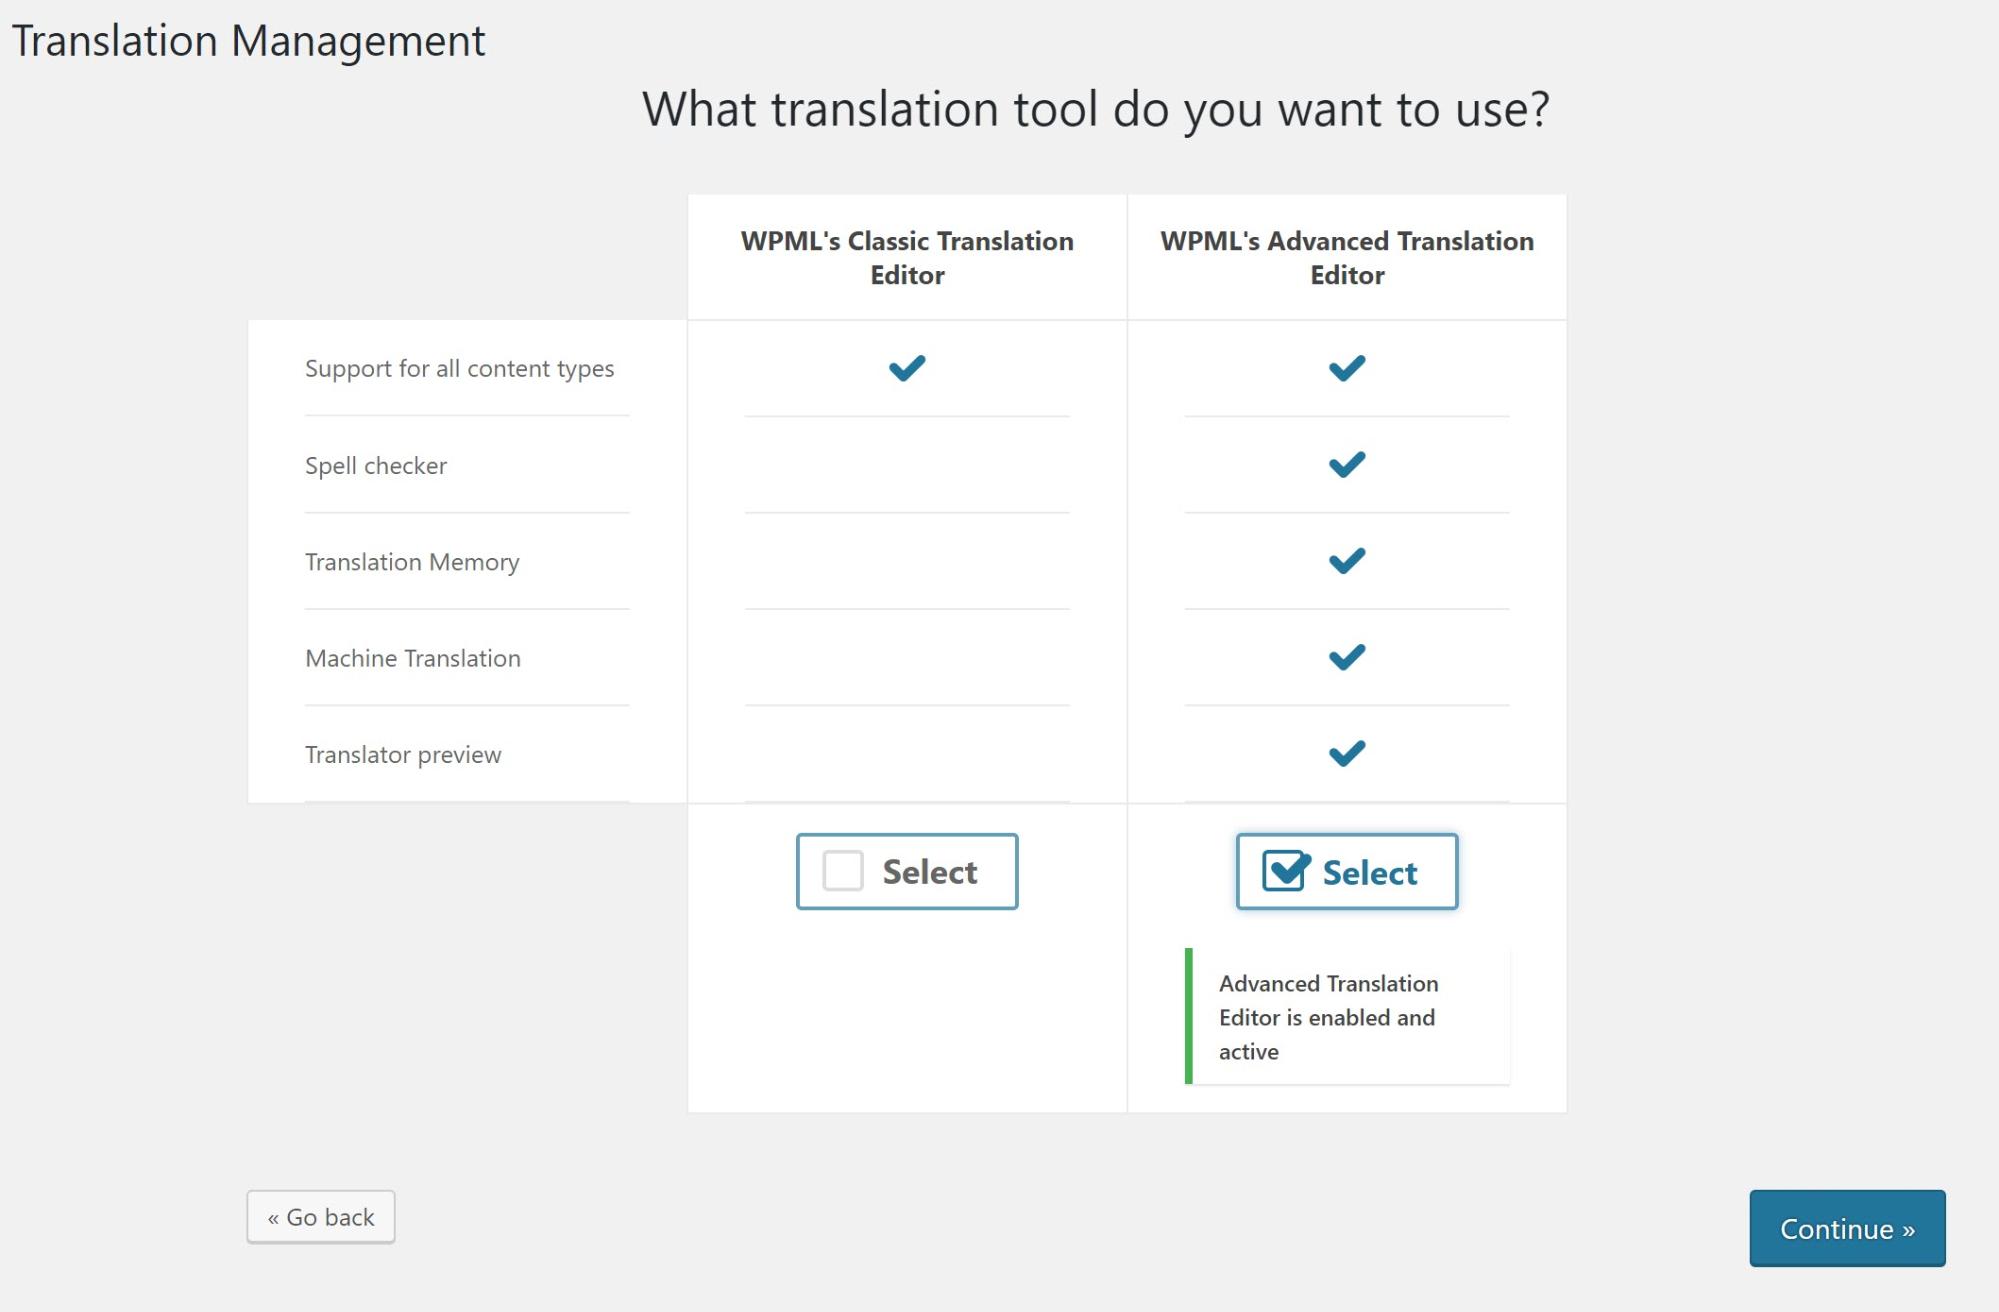
Once you install and activate WPML there will be a translation wizard which will help you select your languages and decide how you want to translate everything. Make sure you select to activate translation management and the Advanced Translation Editor.
Step 3 – Setting up your multilingual website
Now that we have our plugin we need to set up our website so that it is ready for our translated content.
Picking a compatible theme
If you were following the how to make a WordPress website guide then you will already be aware of the best type of theme which works for you. If not then you can check out the best free WordPress themes.
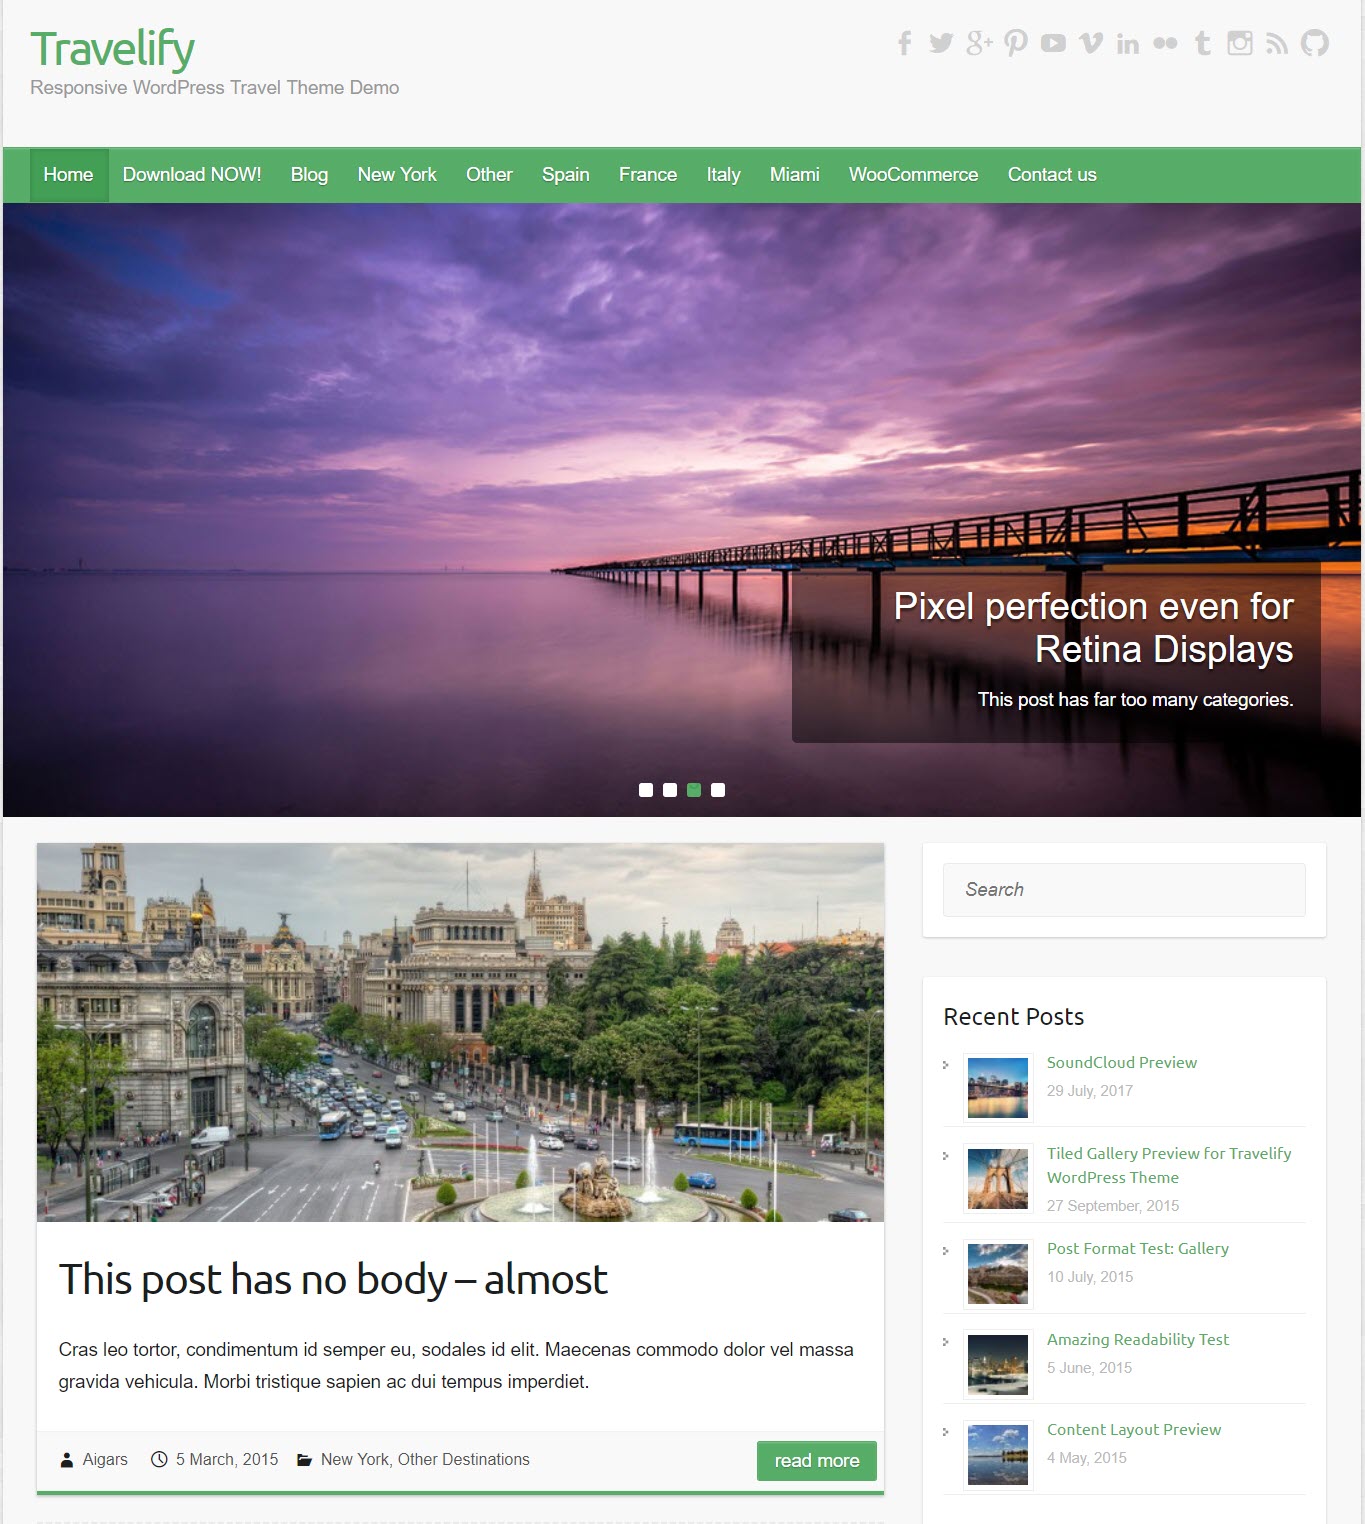
Before you decide on the theme make sure it is compatible with WPML. A number of great Colorlib themes such as Travelify are completely integrated with WPML. If you need inspiration, check out this list of WPML compatible WordPress themes.
Select your languages
When you install WPML you are taken through a translation wizard which lets you select which languages you want for your website. But you can change them later by heading to WPML -> Languages and under Site languages select the languages you want.
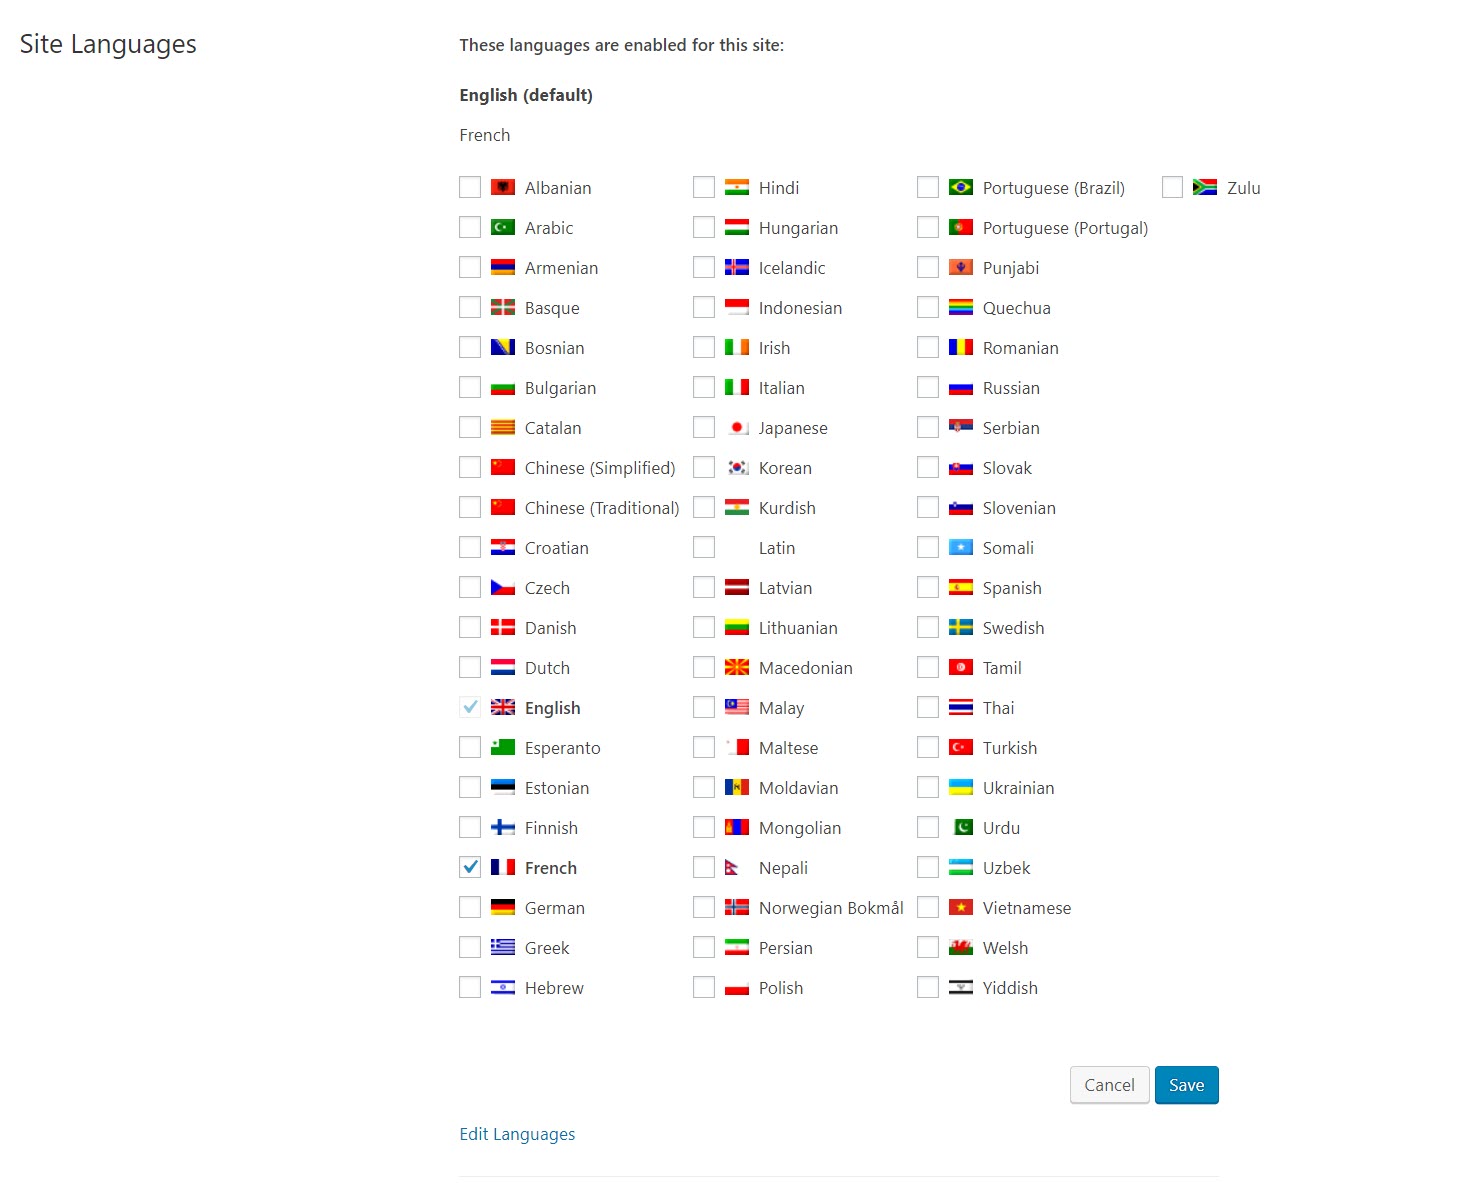
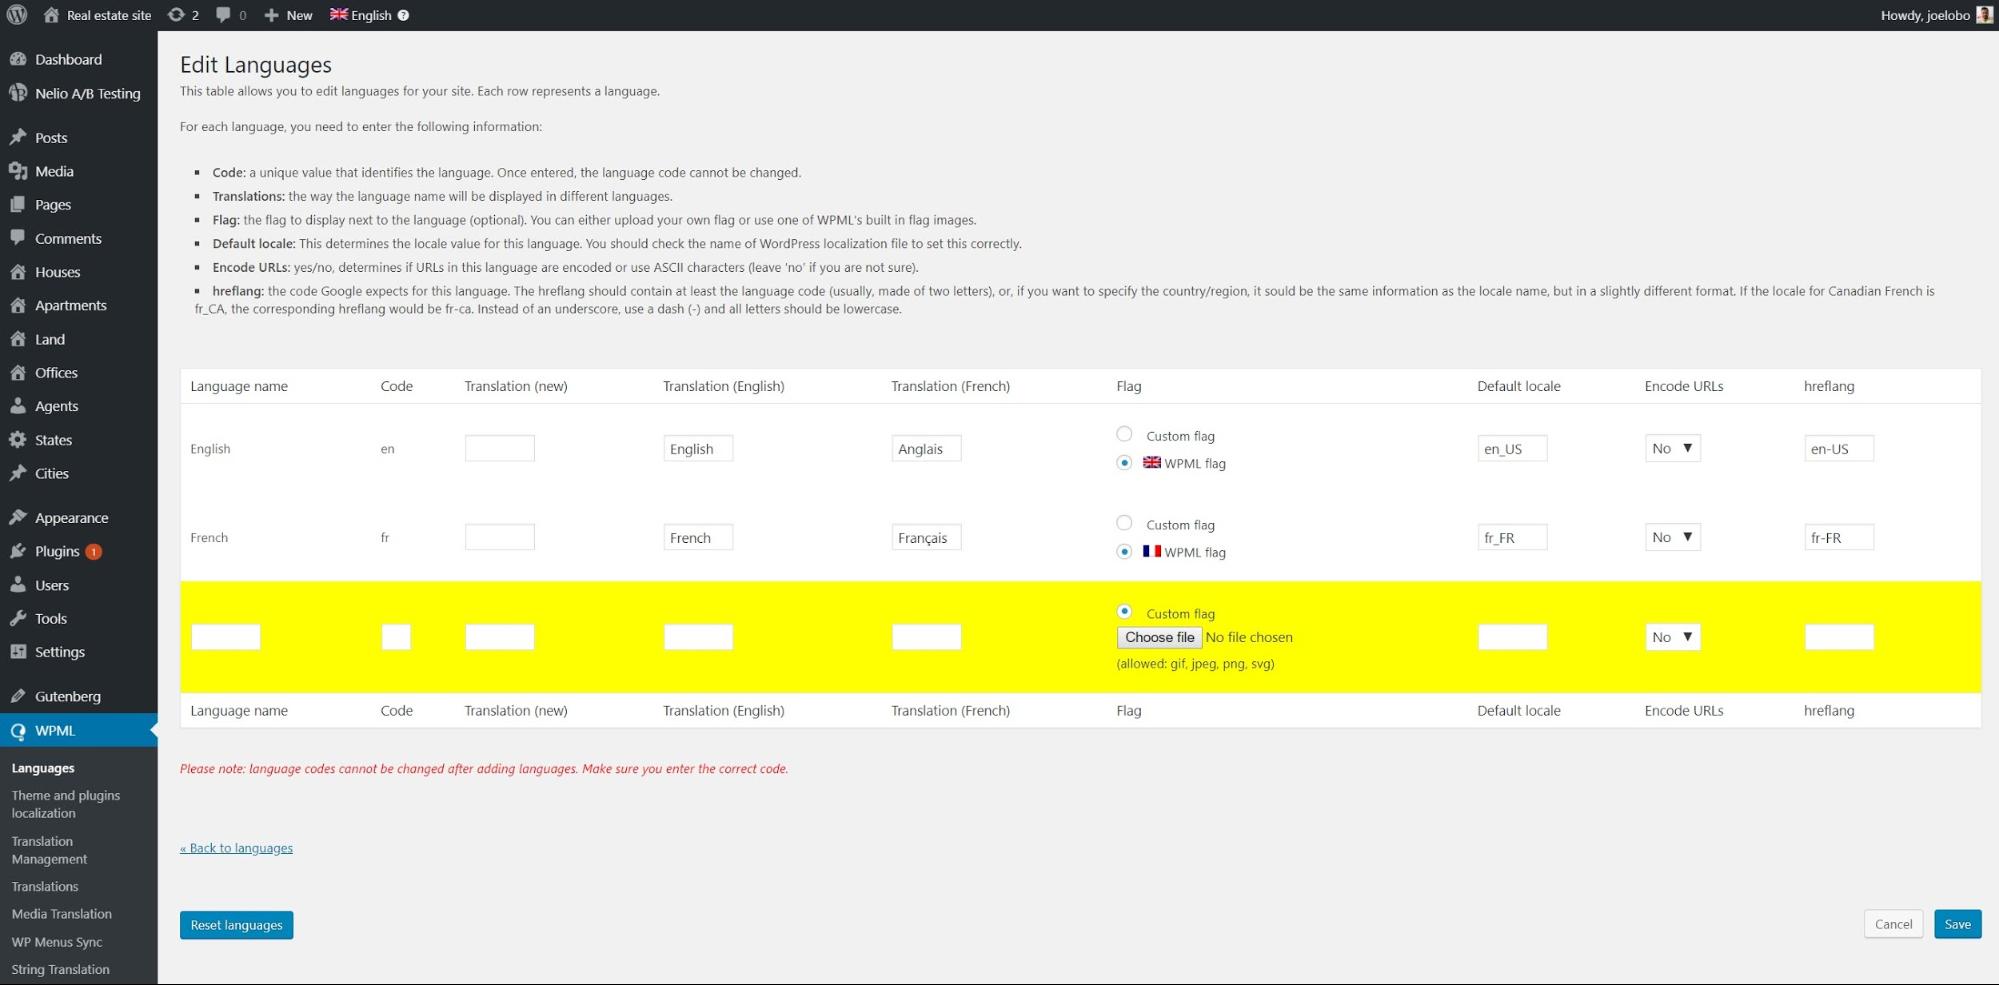
If your language does not appear in the list, you can add another manually by clicking Edit Languages then Add Language and filling in the details.
Under Menu language switcher you can edit how your language switcher looks on the front-end. Click the pencil icon and you can adjust:
- Where the language switcher appears
- Whether flags appear
- If you want the name of the language in one specific language or in each native language
- The order of the languages
And many other customization options.
Decide how you will translate your content
There are three ways for you to translate your content. You can select each of these options as part of the first step in the WPML translation wizard.
On the next step you can activate Advanced Translation Editor which is the best and easiest way to translate your content.
Click on one of the options below depending on how you want to translate your content and we’ll take you to the tailor-made instructions.
- Translate yourself
- Assign individuals to translate
- Hire a professional translation service
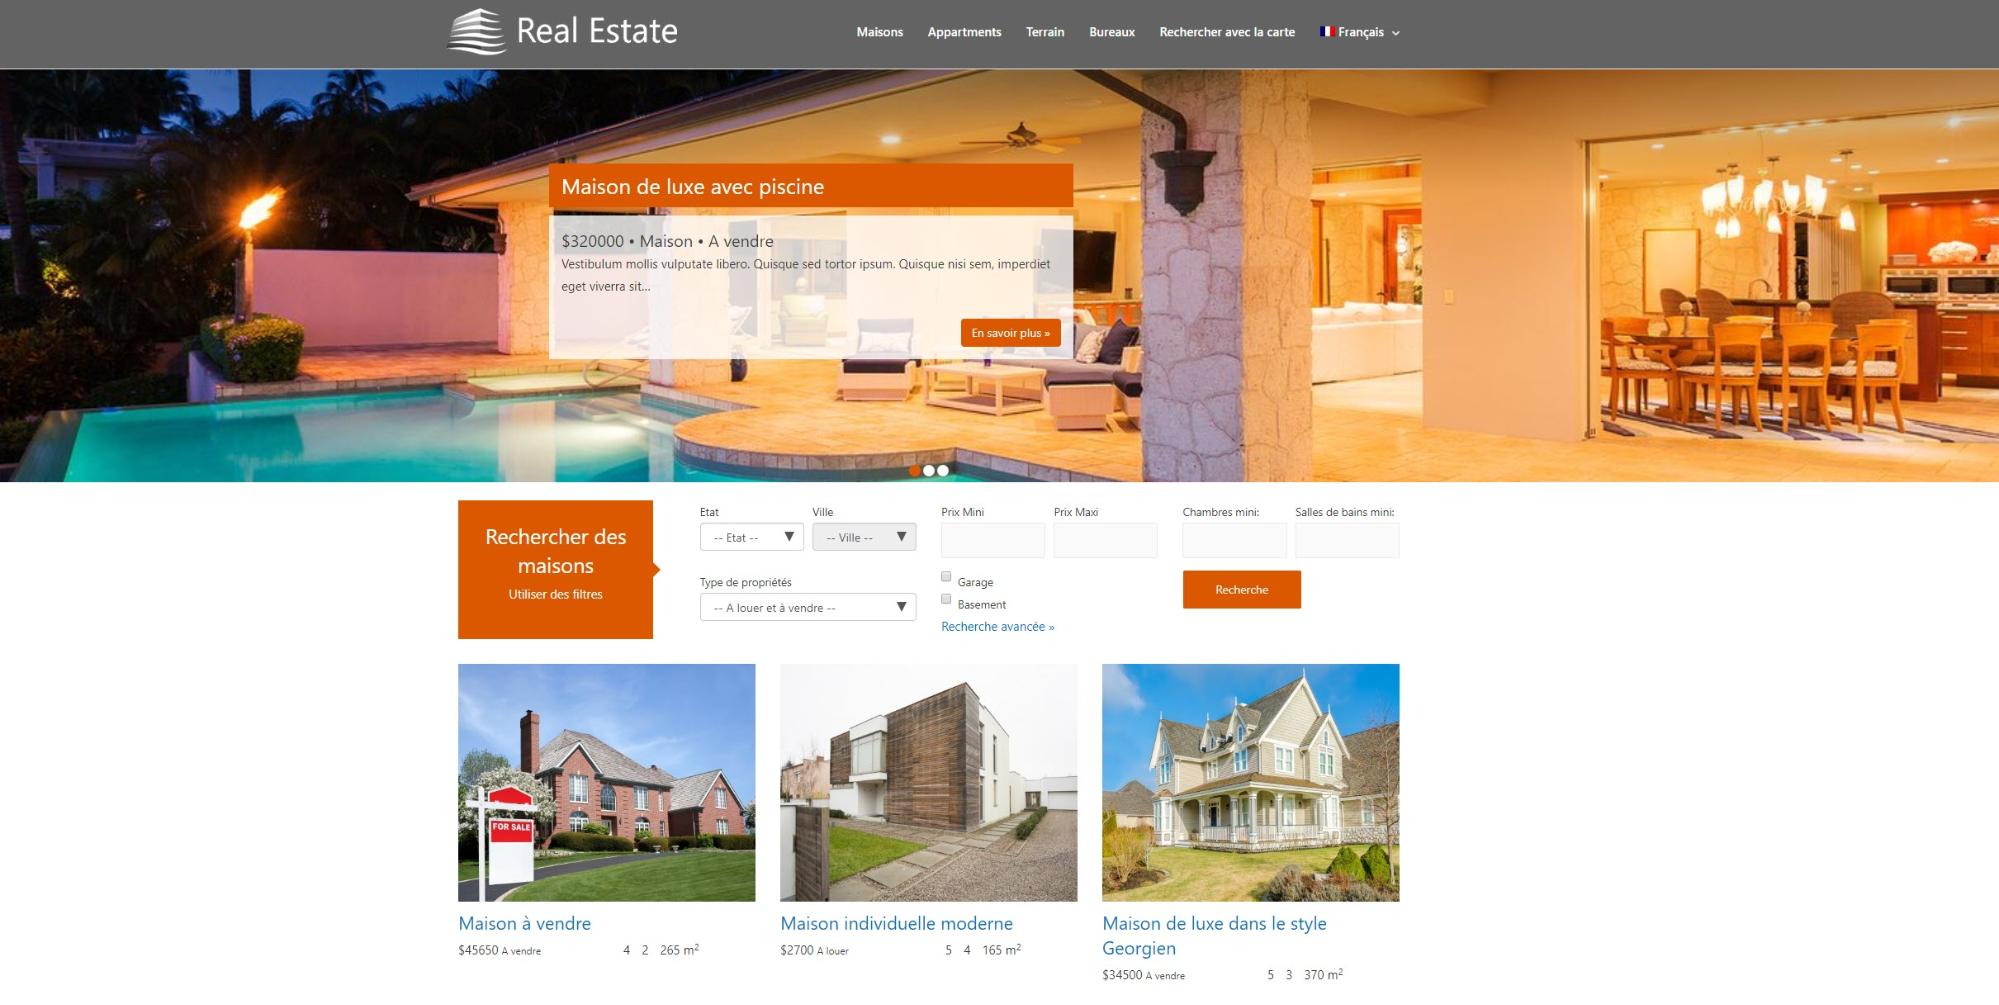
Any screenshots you see below come from our demo real estate website which we built using Toolset.
Translating yourself
Below you can find the steps you can follow to translate your content yourself.
Keep on top of your translations
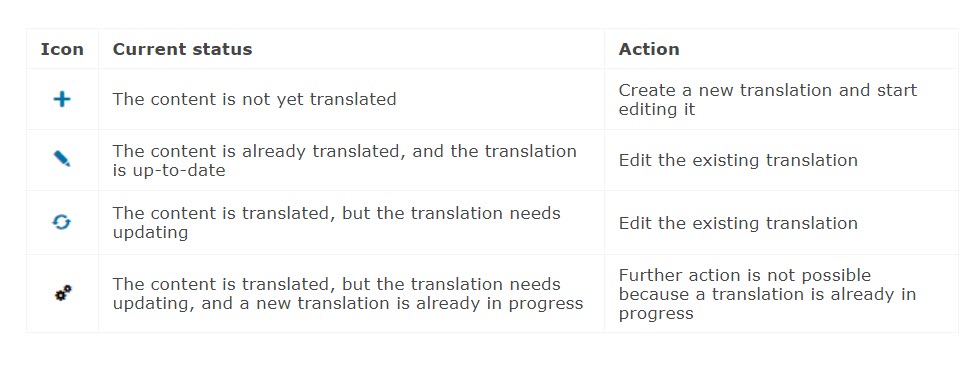
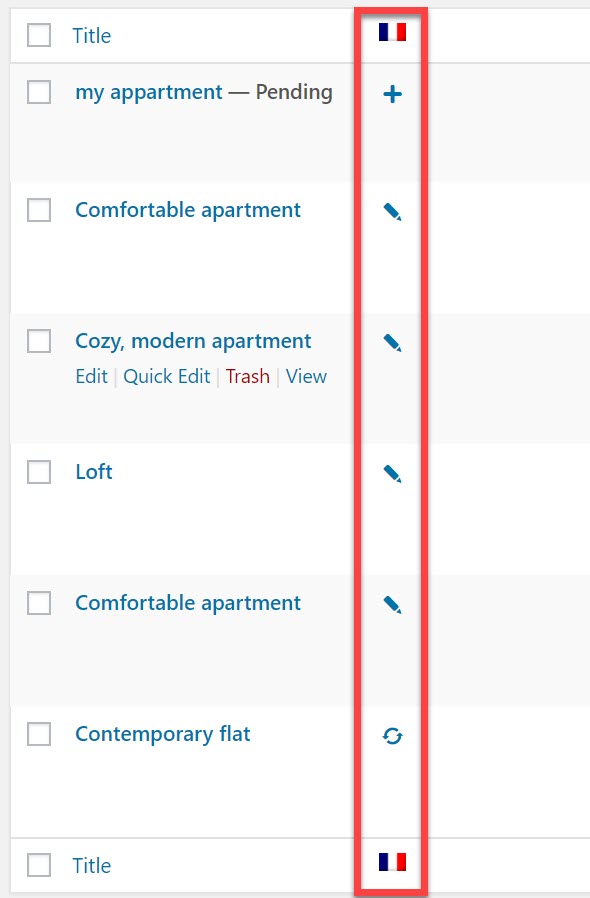
If you are translating content on your own you can keep on top of your translations by referring to the icons next to each of your posts on the WordPress admin.
Each icon tells you something about the status of your translation:
Translate your posts and pages
Now that we have activated our languages and Advanced Translation Editor we can start to translate our content.
- Head to the post or page that you want to edit on your WordPress back-end. You can now see a column for your translations on the admin screen. For example, in our demo site, we have a column for our French translations.
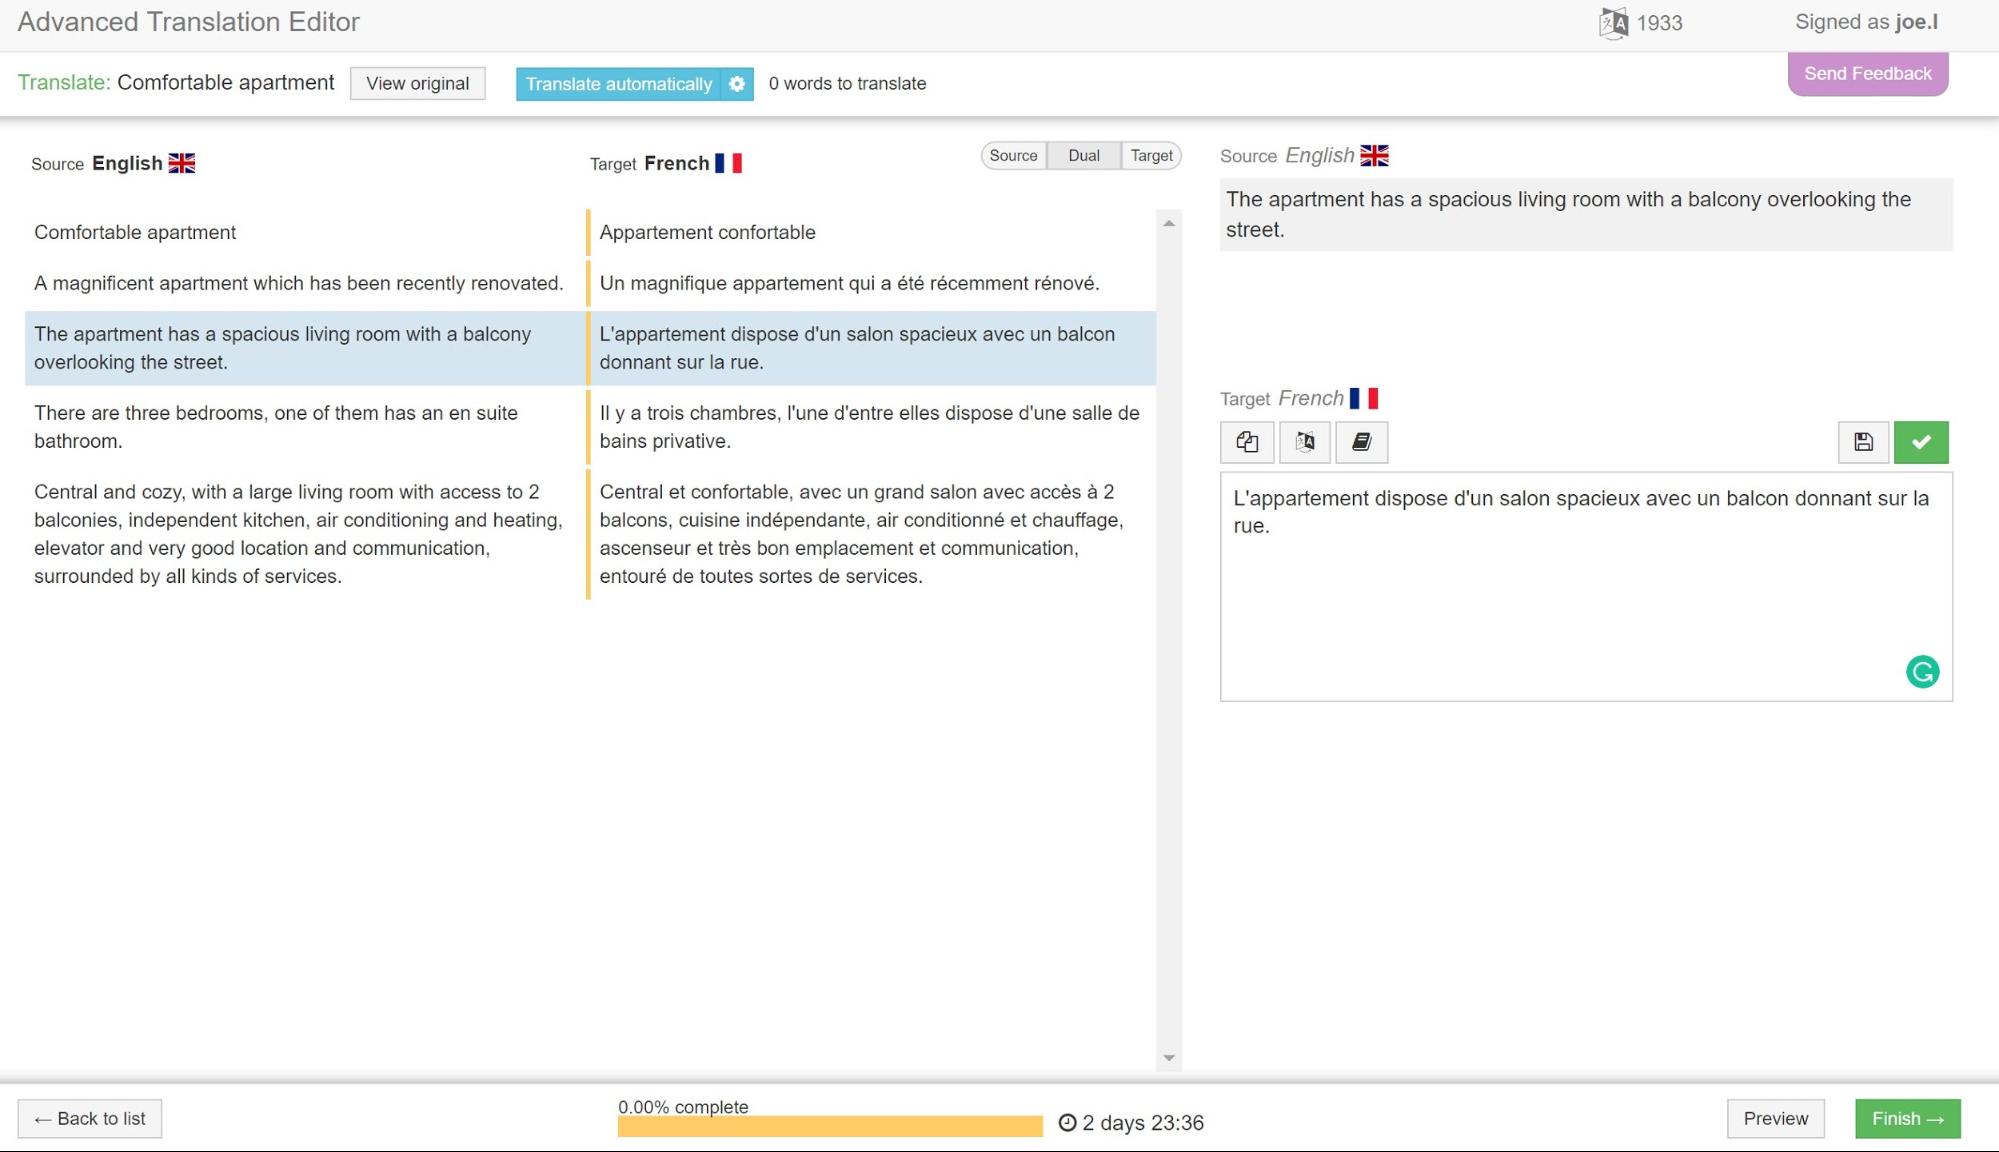
- Let’s translate one of our Apartments posts on our demo site. I will click on the plus icon for Comfortable apartment to start translating it to French.
- You will now be taken to the Advanced Translation Editor where you can add your translations. Click on Machine translation to automatically add translations. Note: WPML initially provides you with a free quota of 2000 words for machine translation before you have to pay. Check out its machine translation quota for more information.
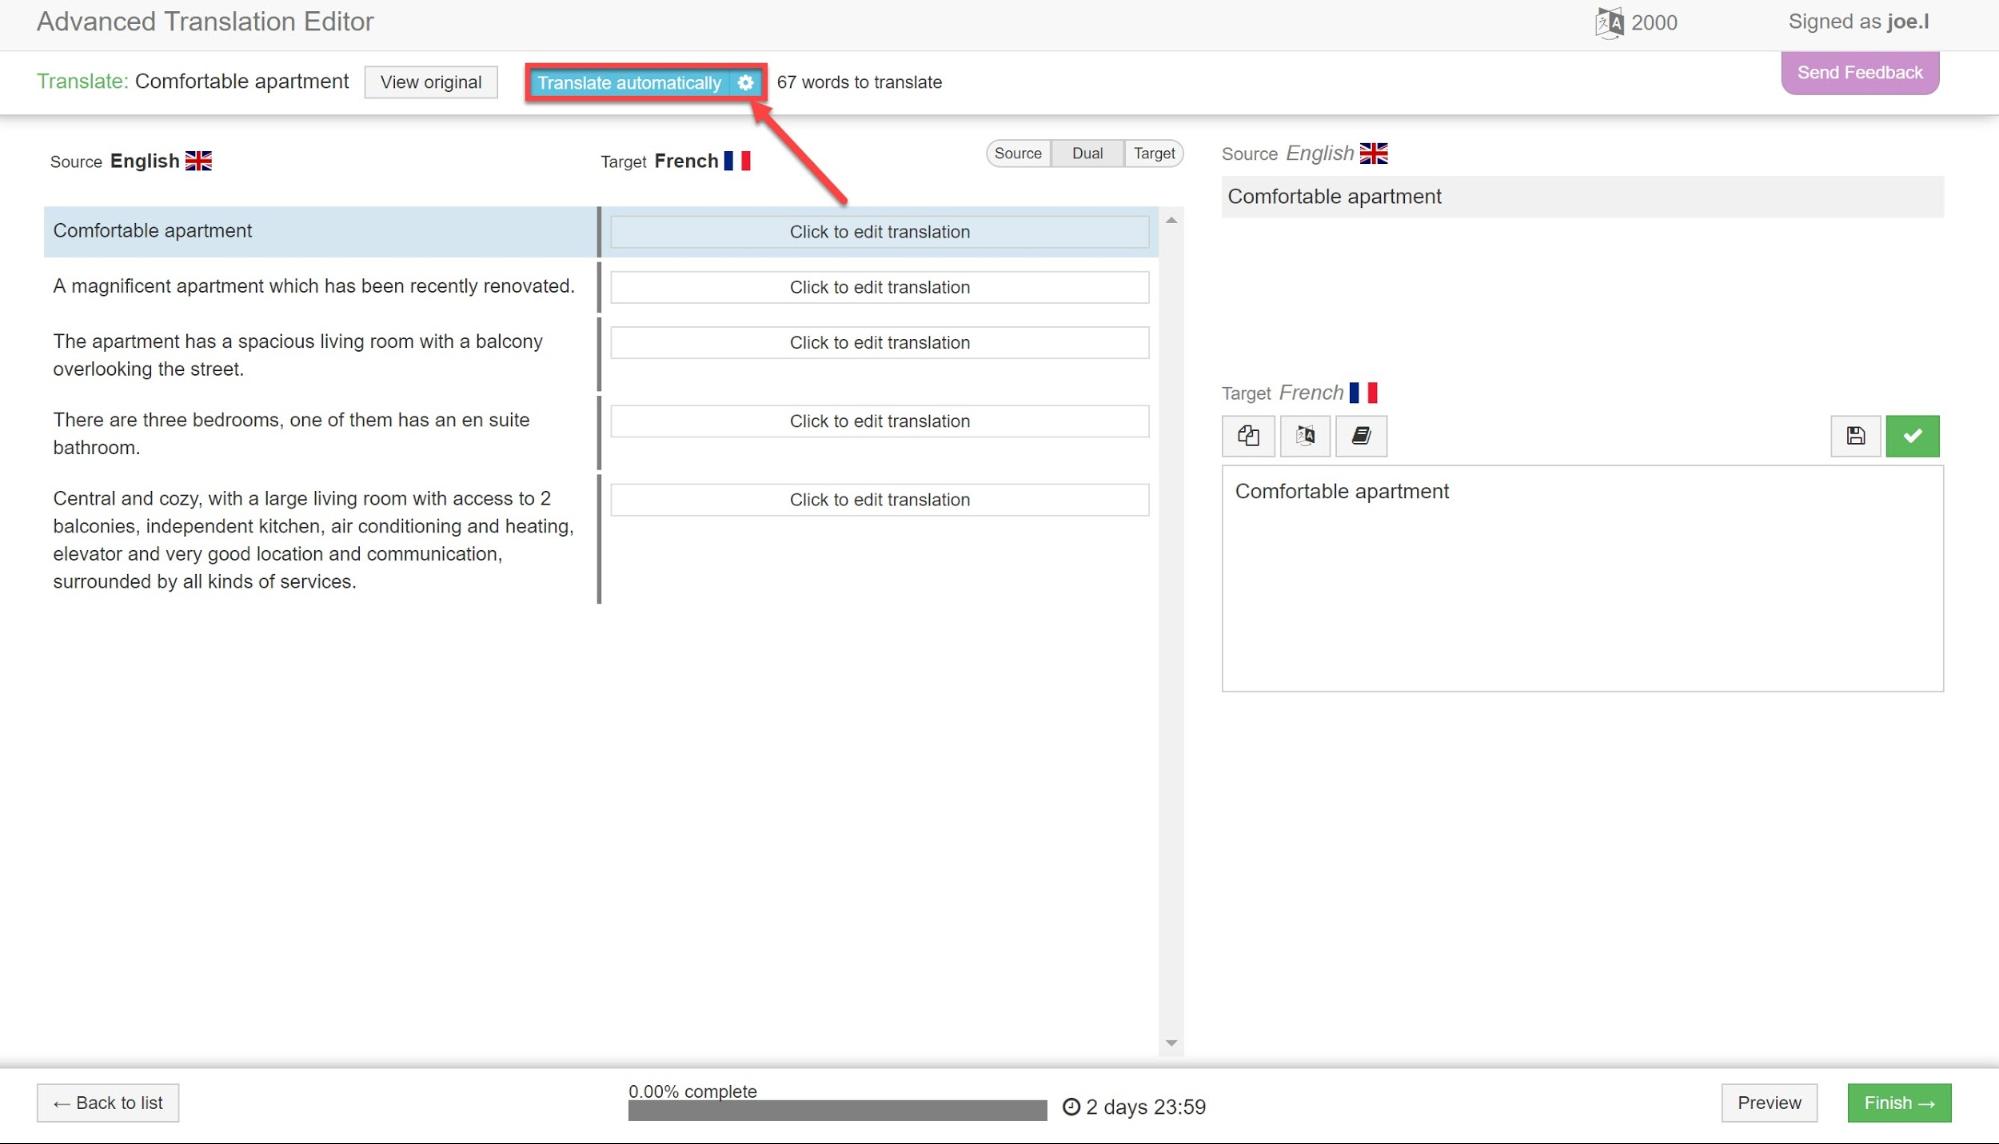
- Do not click finish! It is far more likely embarrassing errors will appear if you rely solely on machine translation. Instead, you can go through each sentence and make sure the translation is completely correct by editing in the text box. When you are finished with each sentence, click the green text box to mark it as complete.
- Now you can click Finish and Complete on the next screen.
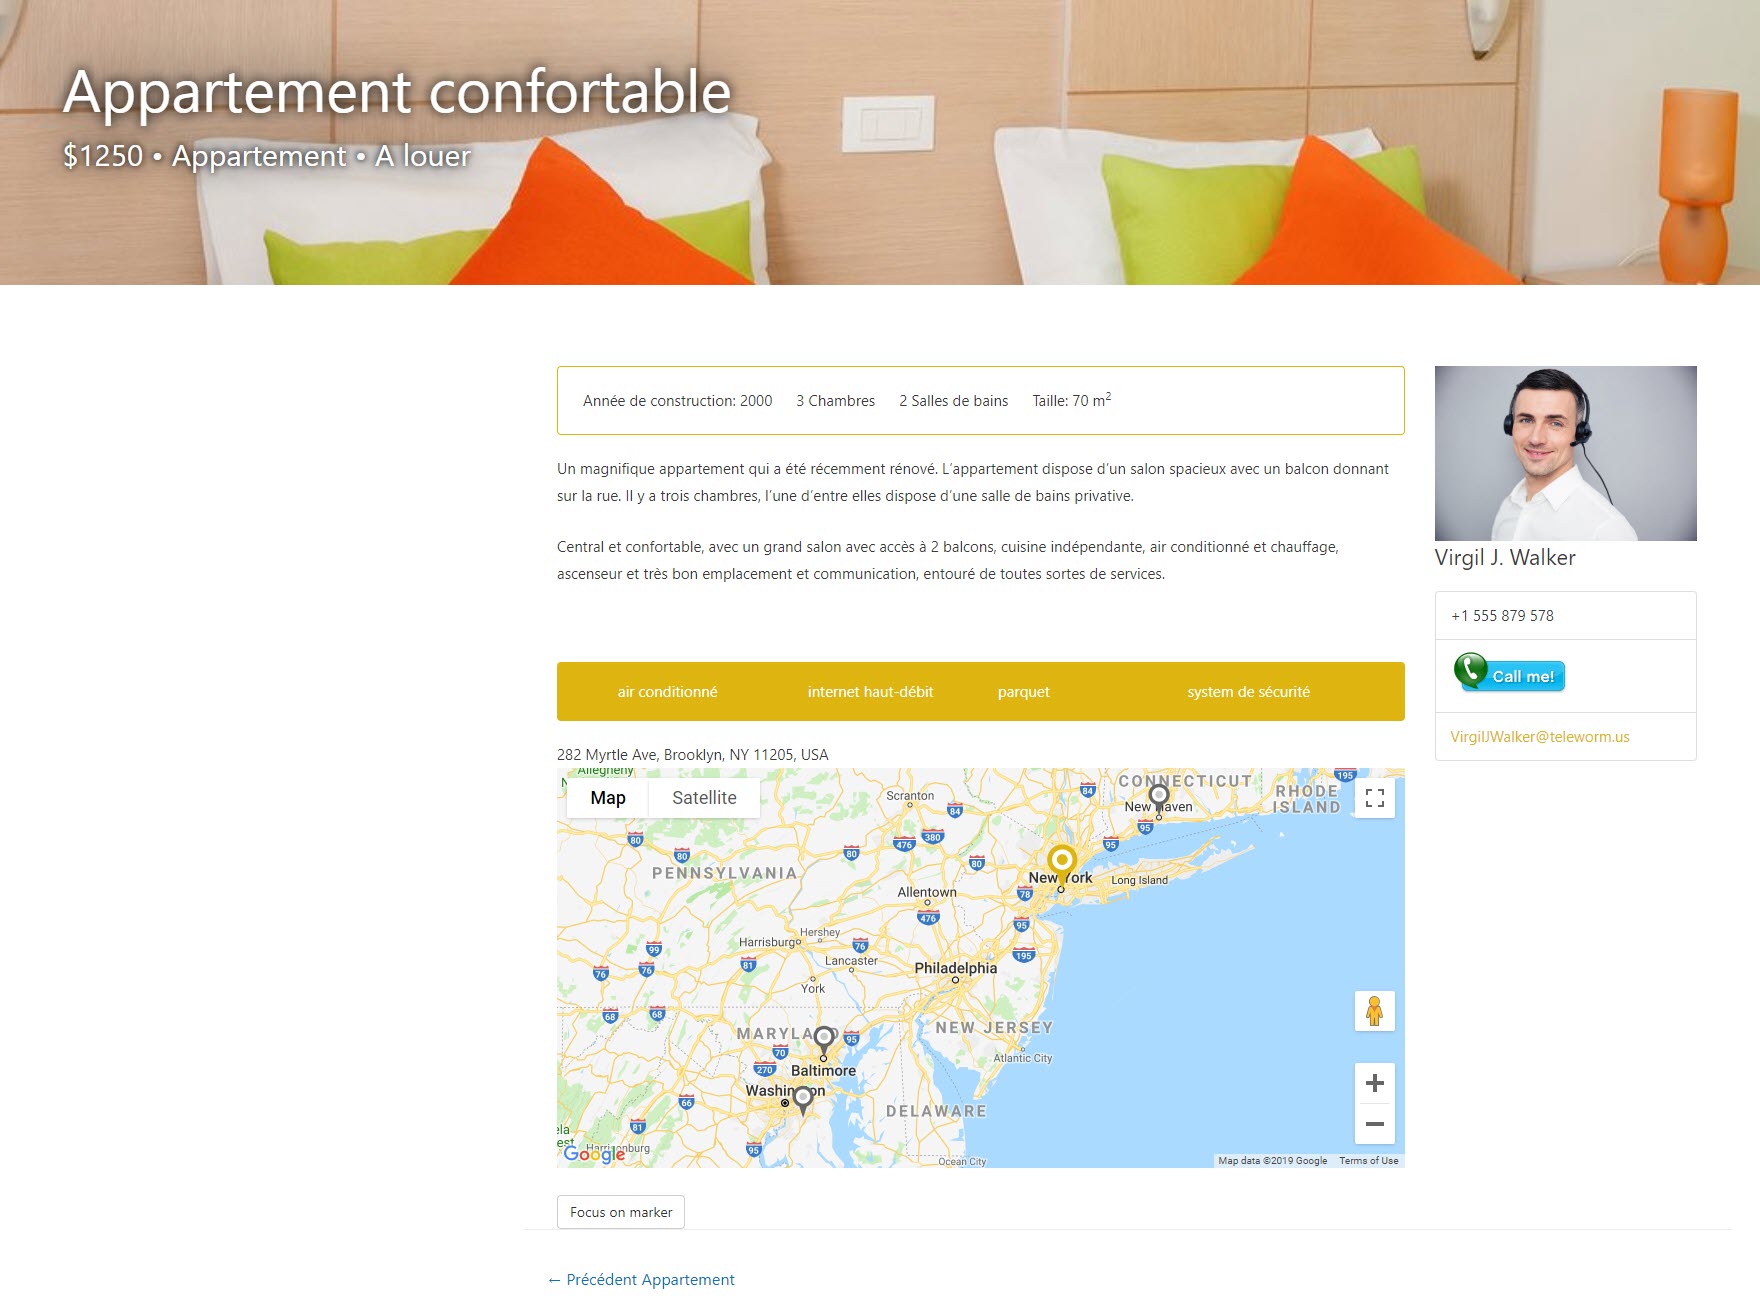
- On the front-end, you can see that your text has now been translated.
Translate your taxonomies
You can use taxonomies to group your posts under different categories. Check out the guide to WordPress categories for more information.
- First, we need to allow our taxonomies to be translated. Head to WPML -> Settings.
- Under Taxonomies translation change your taxonomies to Translatable. You can choose a fallback option for if you have not translated your taxonomies. You can either show the default language or not show it at all.
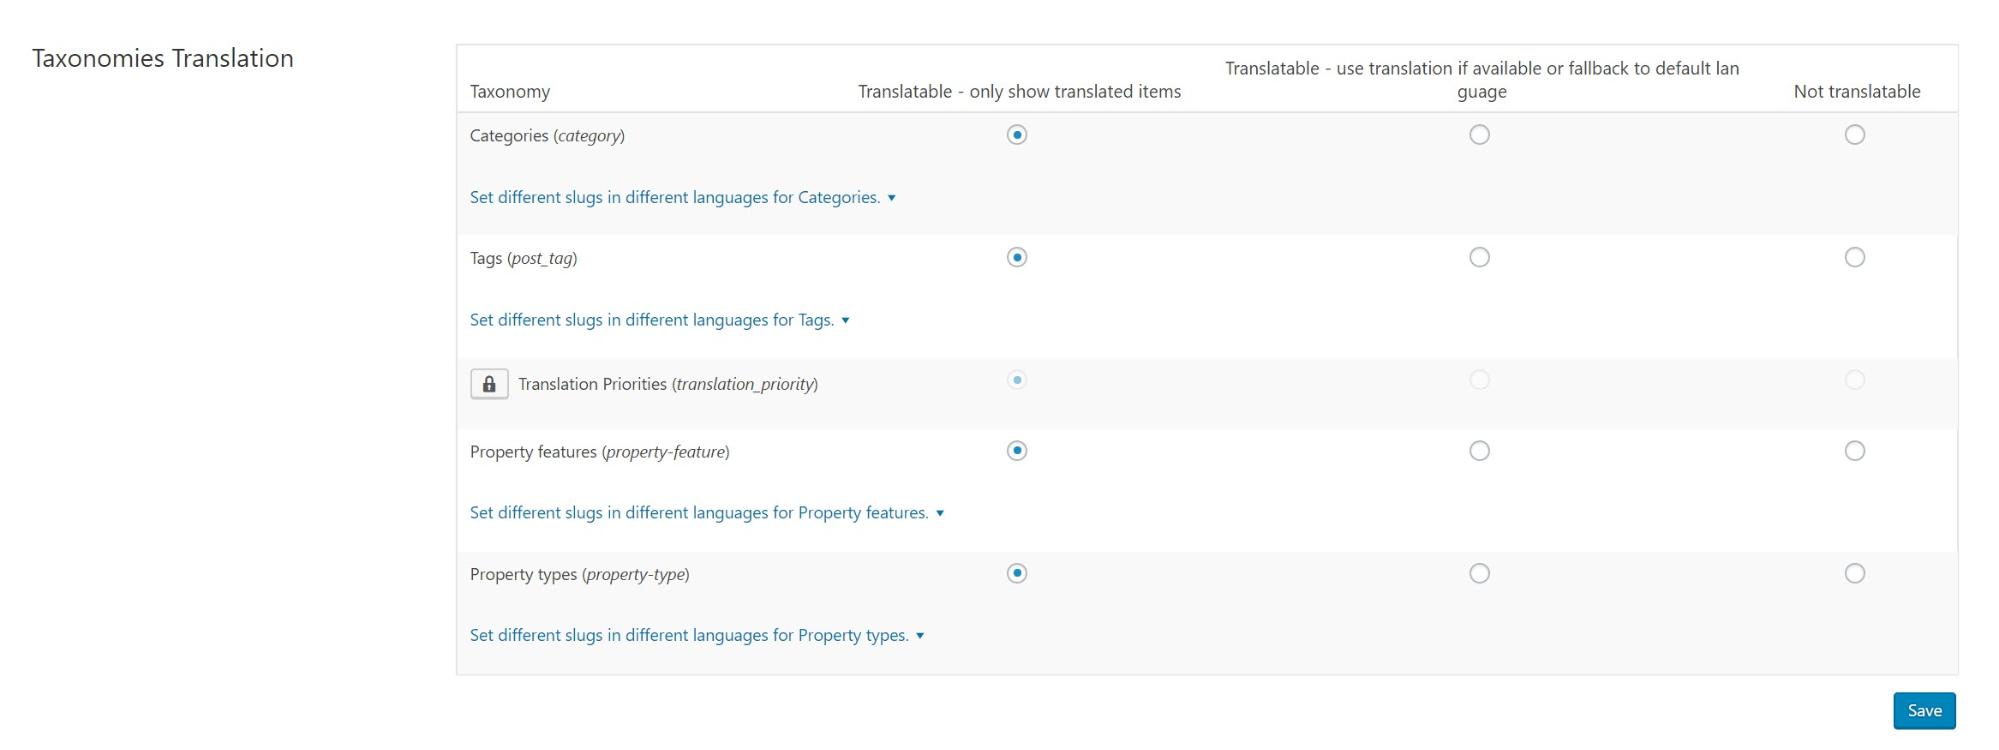
- Go to WPML -> Taxonomy translation. At the top of the page you can see a drop-down menu with a list of your taxonomies. On our demo site, we have selected our Property types taxonomies.
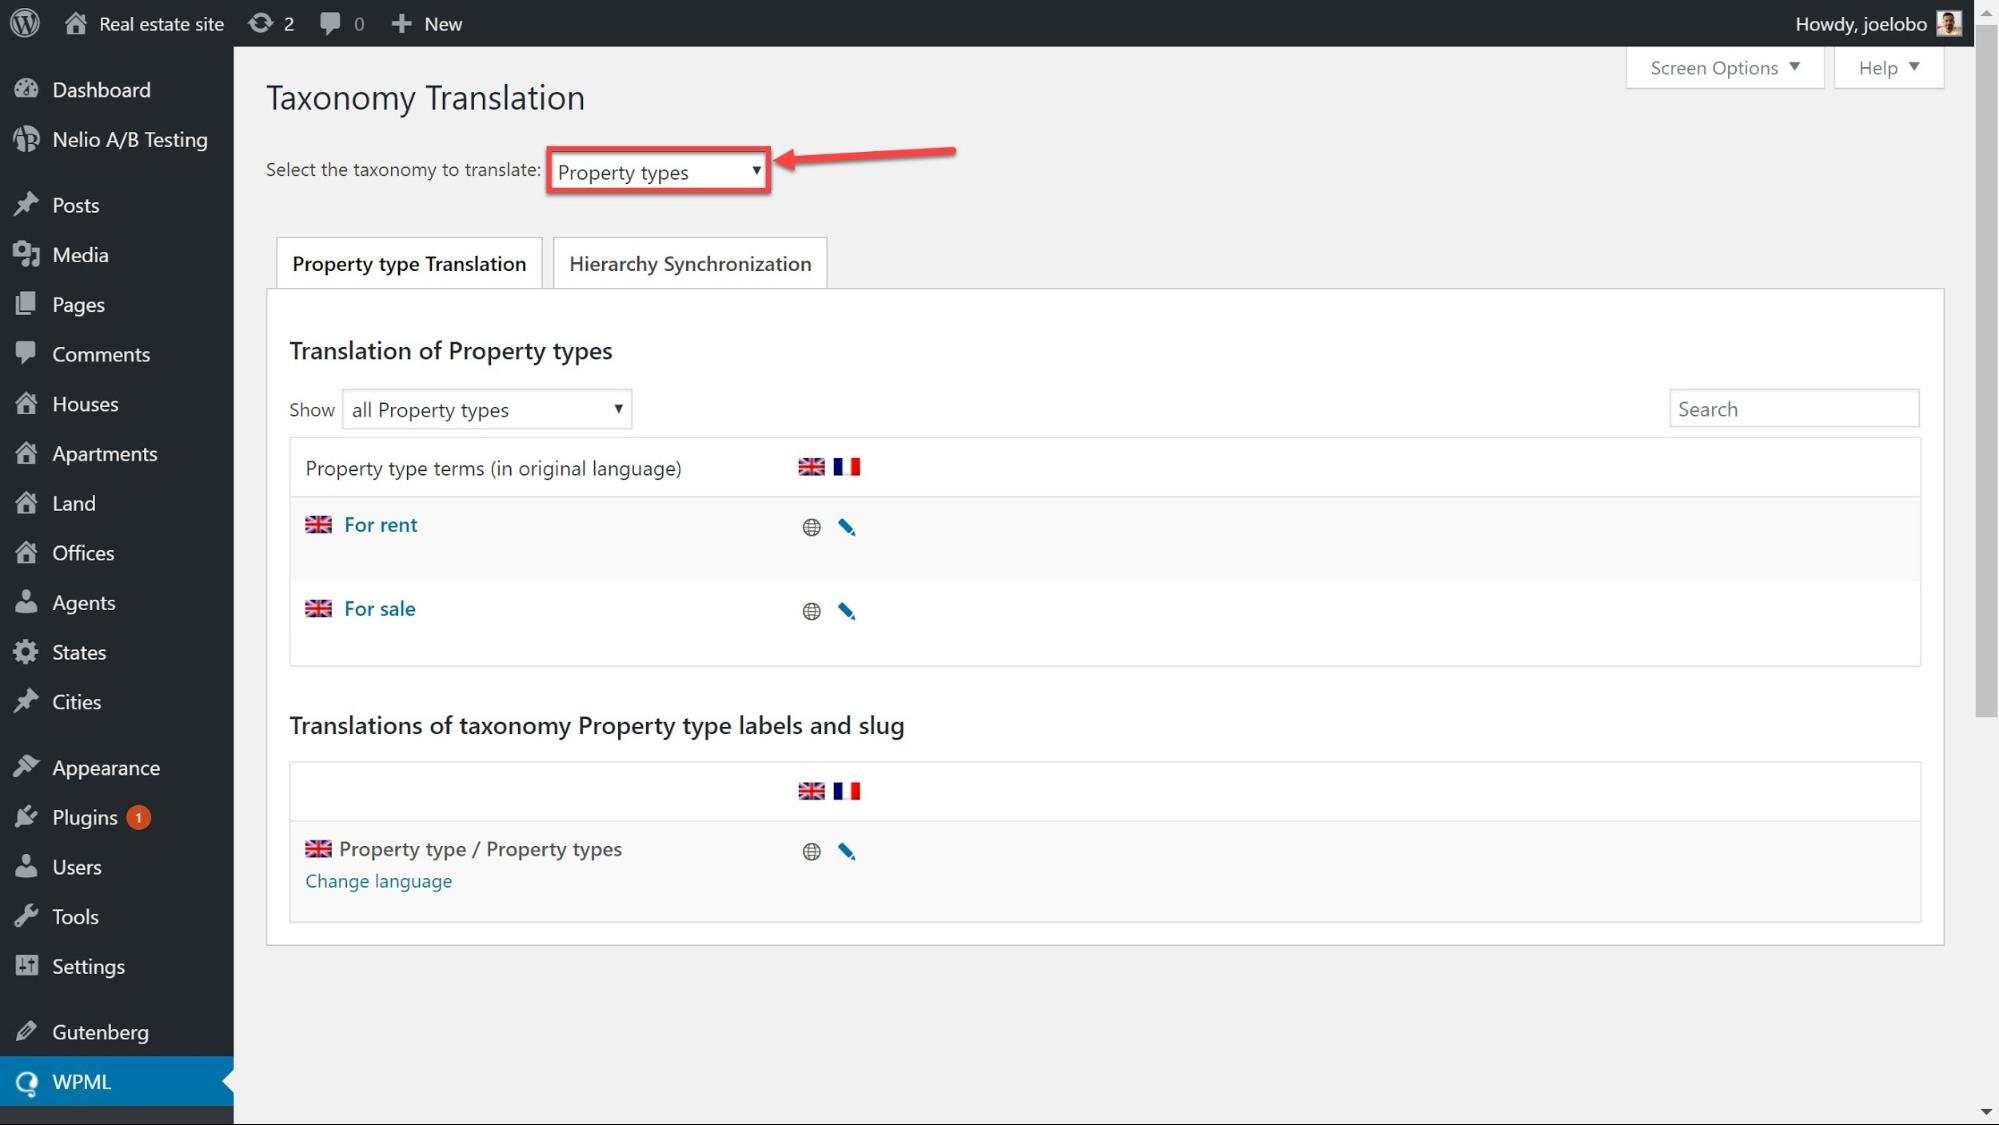
- Select the taxonomy you want to translate. You can now type in the Name, Slug and Description of each taxonomy.
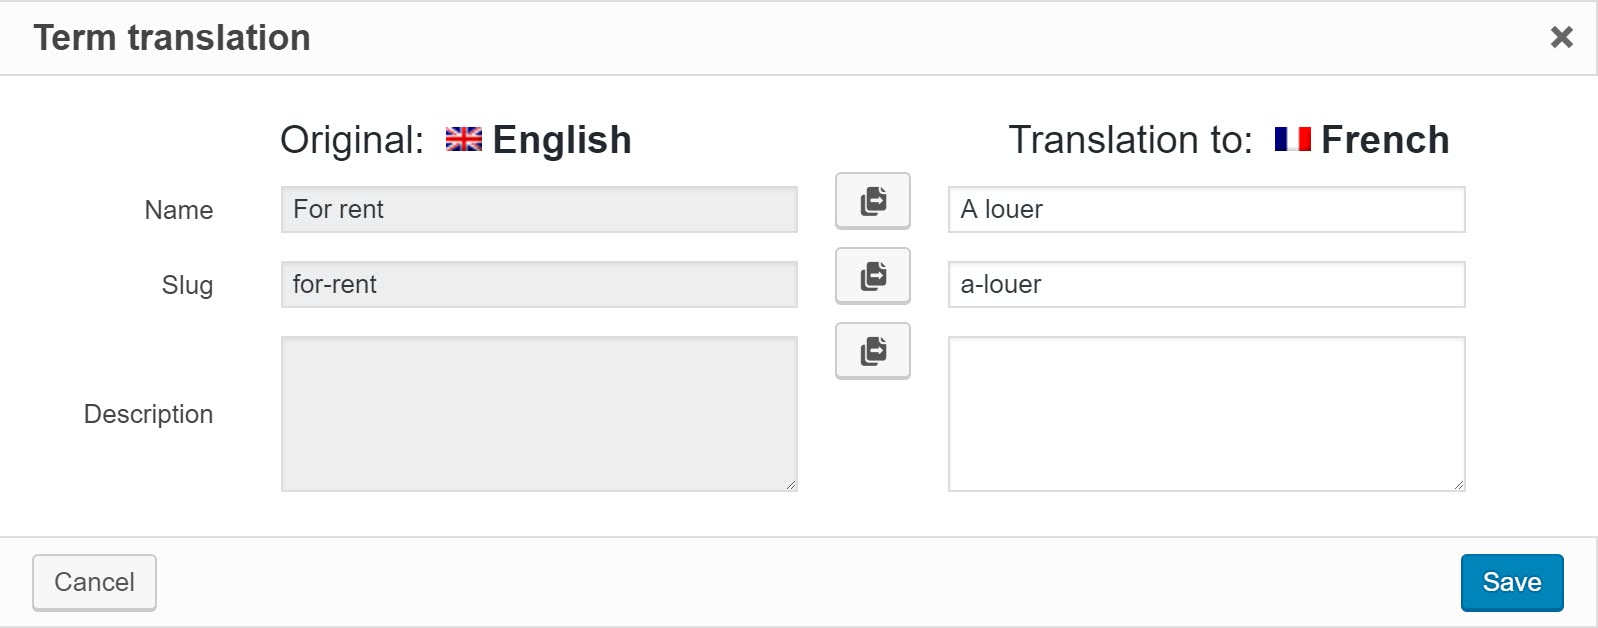
- Click Save and your taxonomy will be translated.
Translate your custom fields
Custom fields provide additional information for each of your posts – such as the number of bathrooms for a property.
- Just like with our taxonomies, we need to make our custom fields translatable. Head to WPML -> Settings and go to Custom Fields Translation. Set your custom fields to Translate.
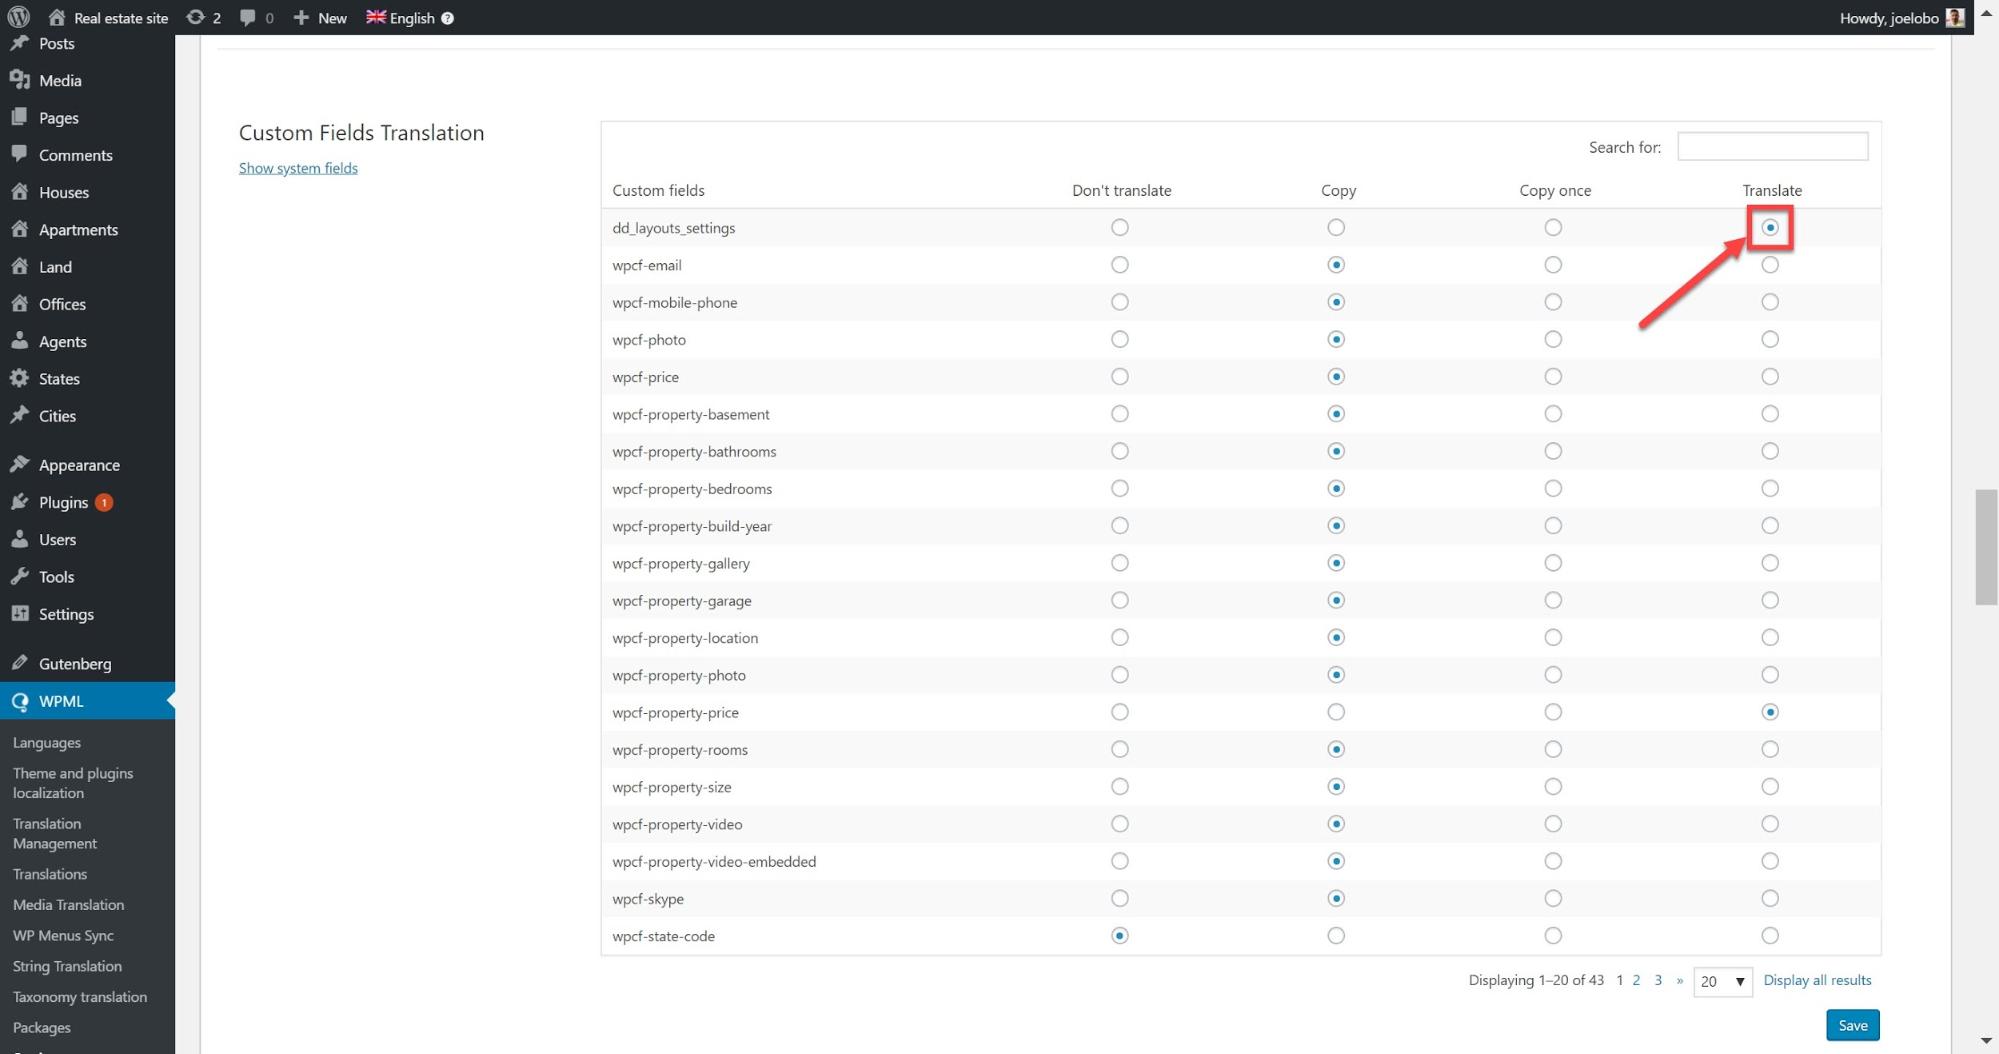
There are two other options worth explaining:
- Copy – the value of the field is copied from the original language and kept in synchronization with it.
- Copy once – the value of the field is copied from the original language but it can be changed later. After the first copy, it will not be kept in synchronization with the original language.
- Your custom fields will now appear as part of your content on Advanced Translation Editor when you click to translate it.
Translate images and other media
You can use WPML Media Translation to translate the meta texts (image descriptions) of images or to replace images for different languages.
- Head to WPML -> Media Translation and filter the results to find the images you want to translate. In our demo case, we will select from English to French as we want to translate into French.
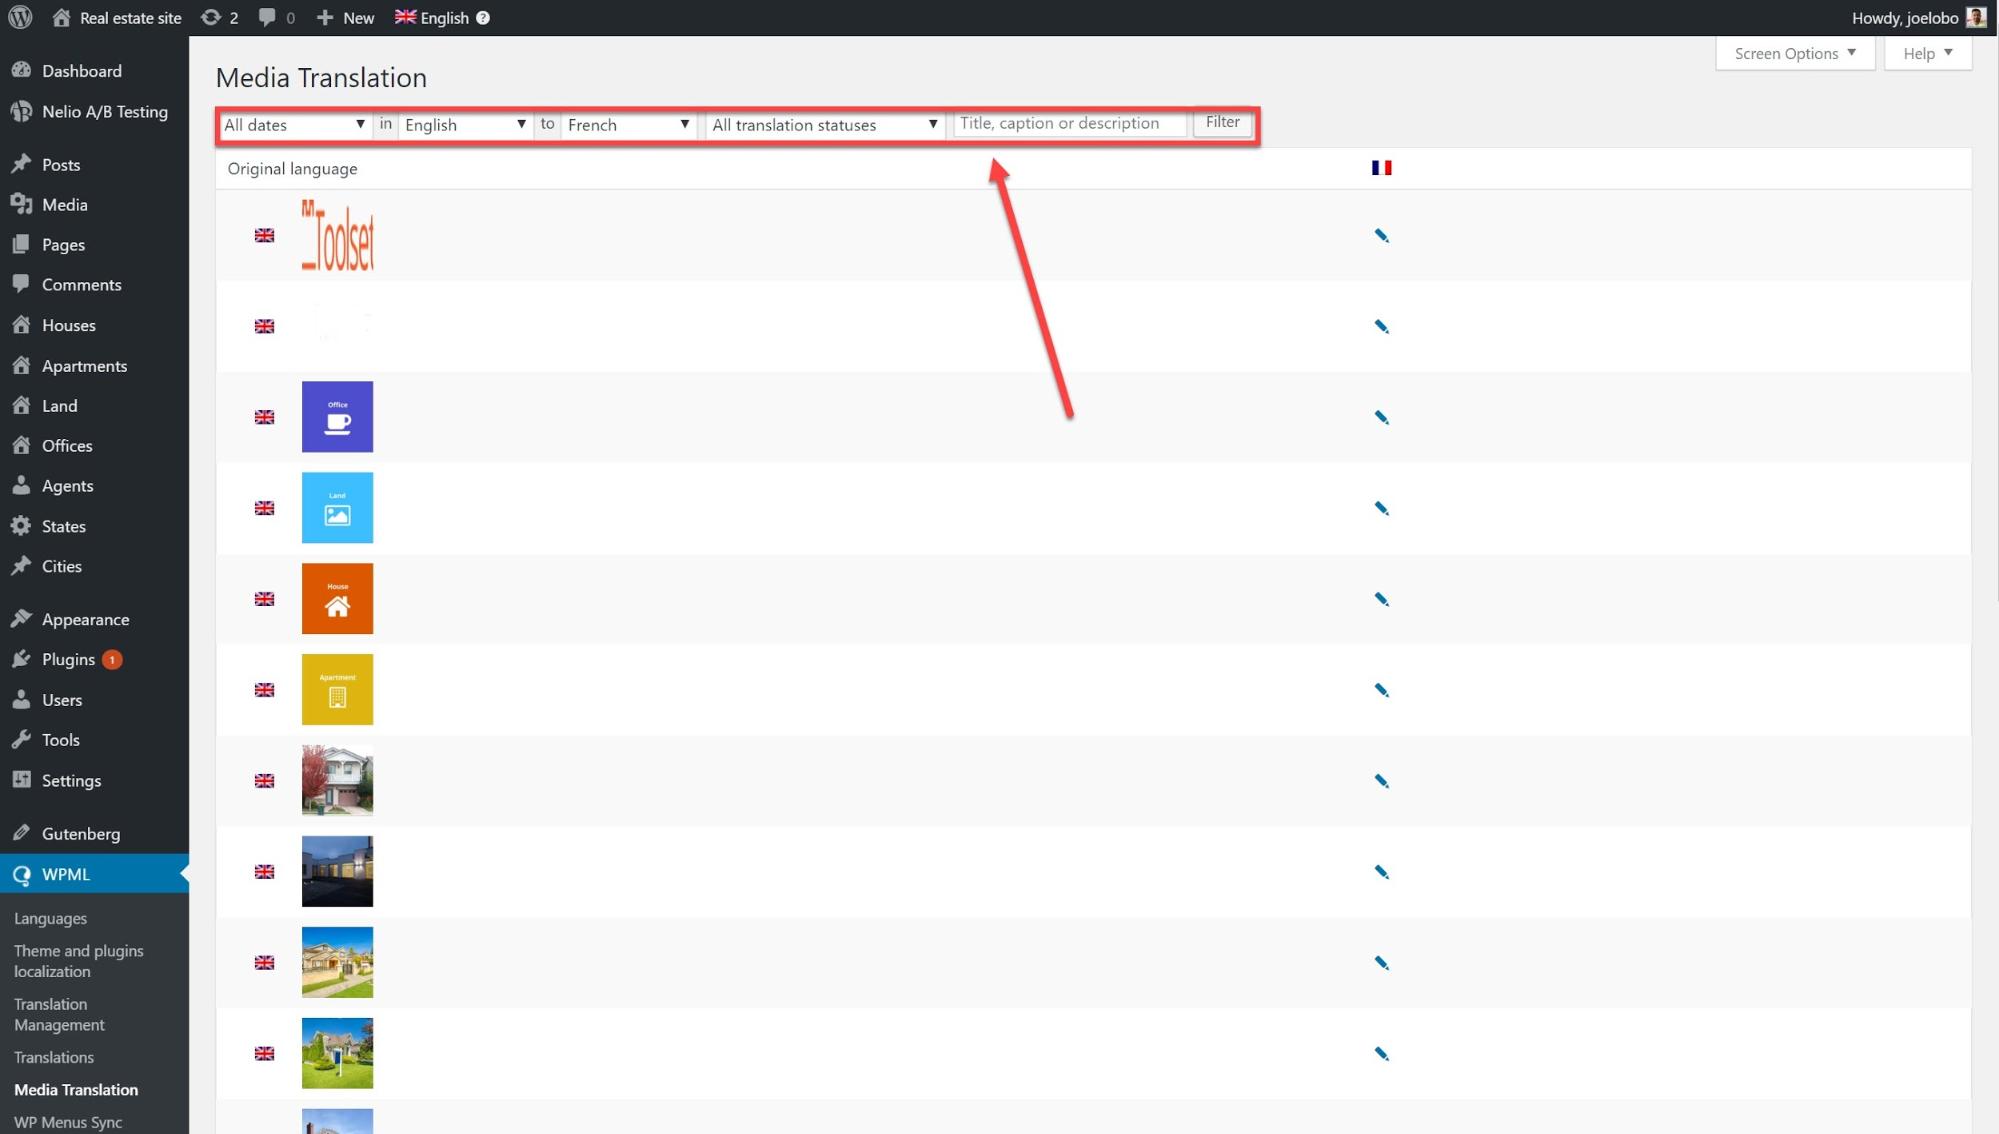
- Click on the pencil icon for the image that you want to translate.
- You can now replace the image with another one and translate the meta text for the image.
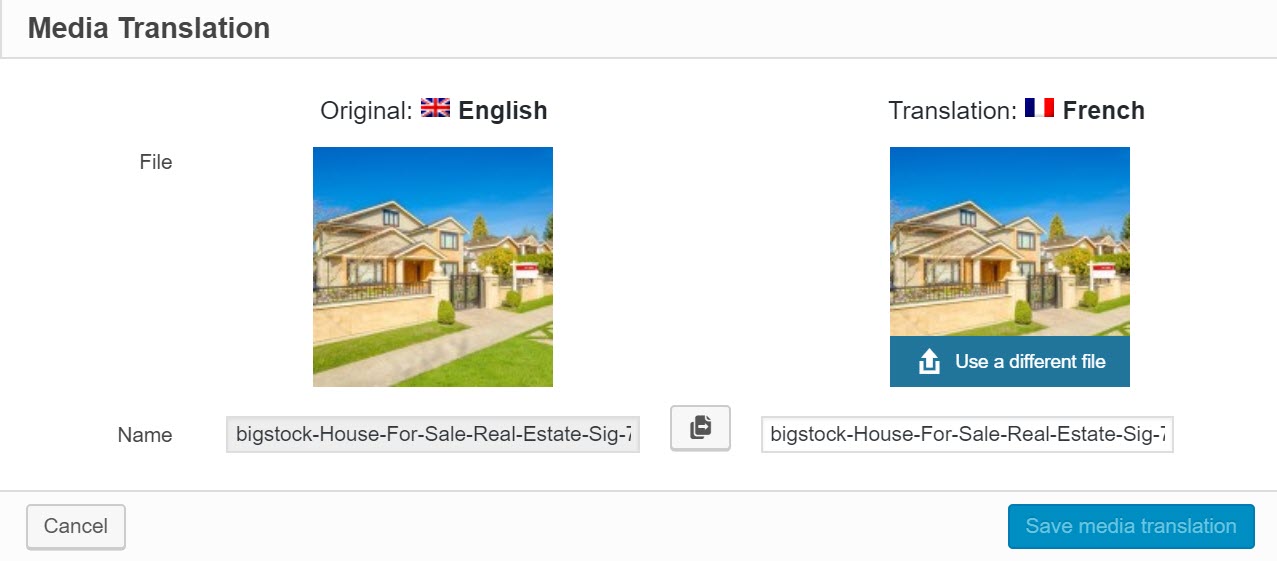
- Click Save media translation and your post will be updated with the new image and meta text.
Translate your menus
You can also translate WordPress menus and create new ones for different languages. There are two ways to translate them.
Translate menus manually
- Go to Appearance -> Menus and click on the plus icon for the language you want to translate into.
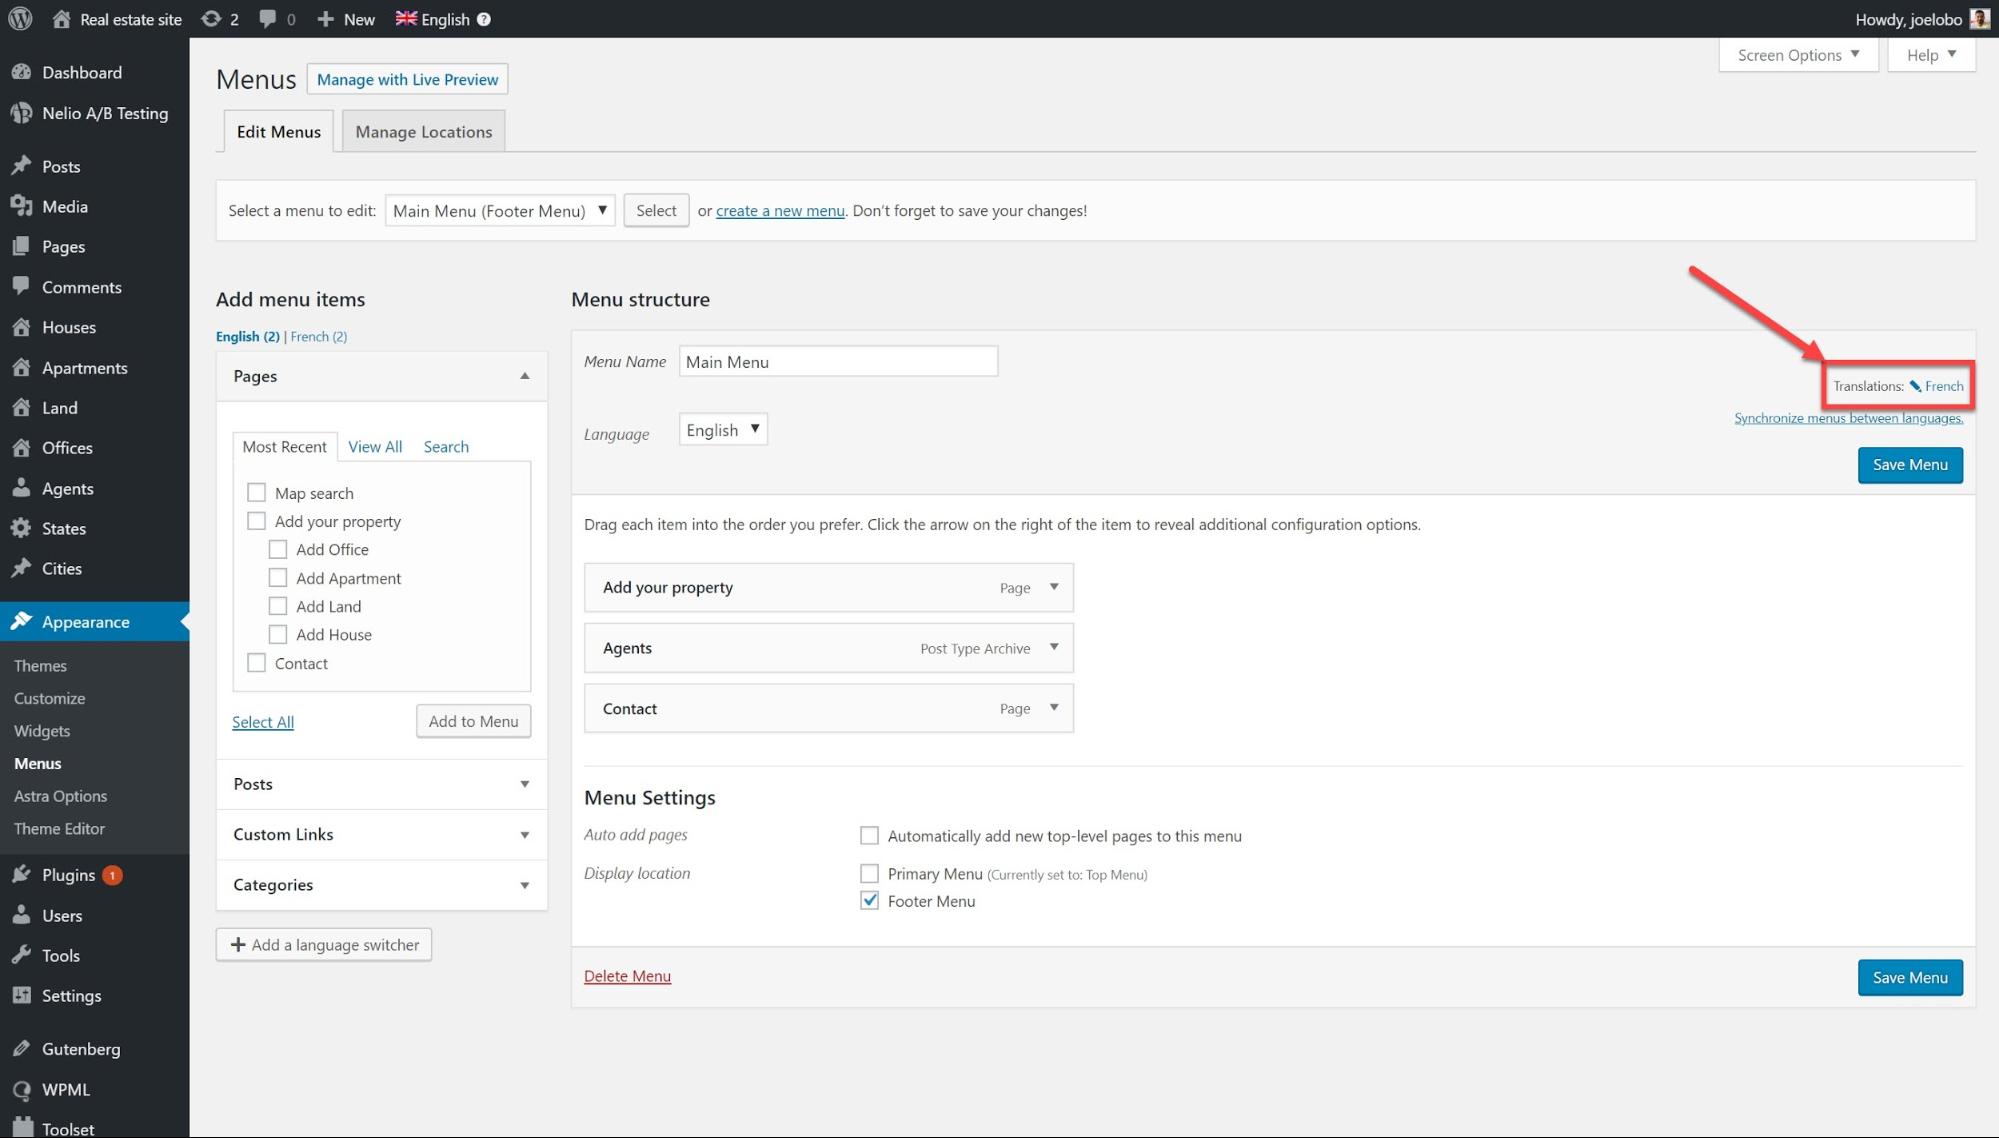
- Click on the arrow to the right of each of the menu items and a drop down will appear. Here you can add your translations.

Automatic menus sync
By using the menu sync tool you can keep your menus in different languages synchronized. You can also retain any menu items you added manually when you sync your menus.
- Head to WPML -> WP Menus Sync
- Click on Synchronizer
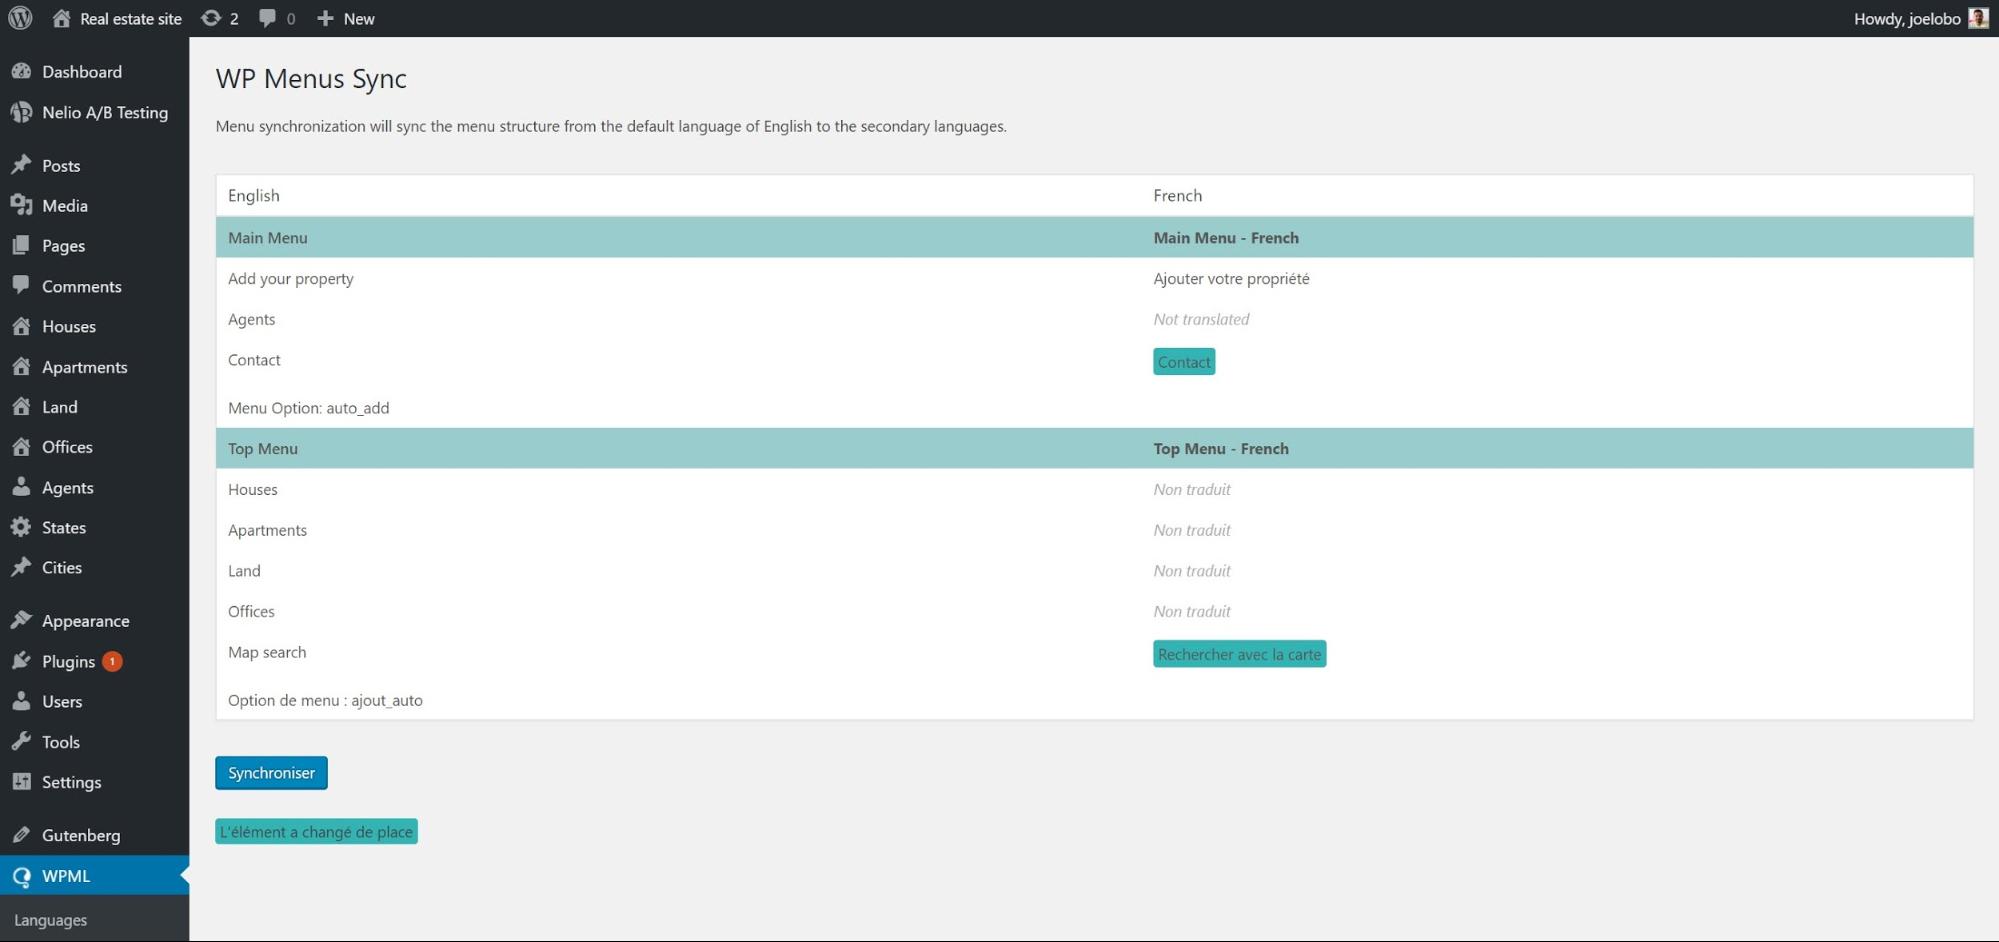
- You can now see how your menus will be changed when they are synced. Click the options you are happy with and click Apply changes.
Your menus have now been synchronized.
Translate your widgets
A widget is a simple way to display information on your pages. Widgets are useful because they do not take up too much space. For example, you might have a calendar widget which provides you with the days of the month.
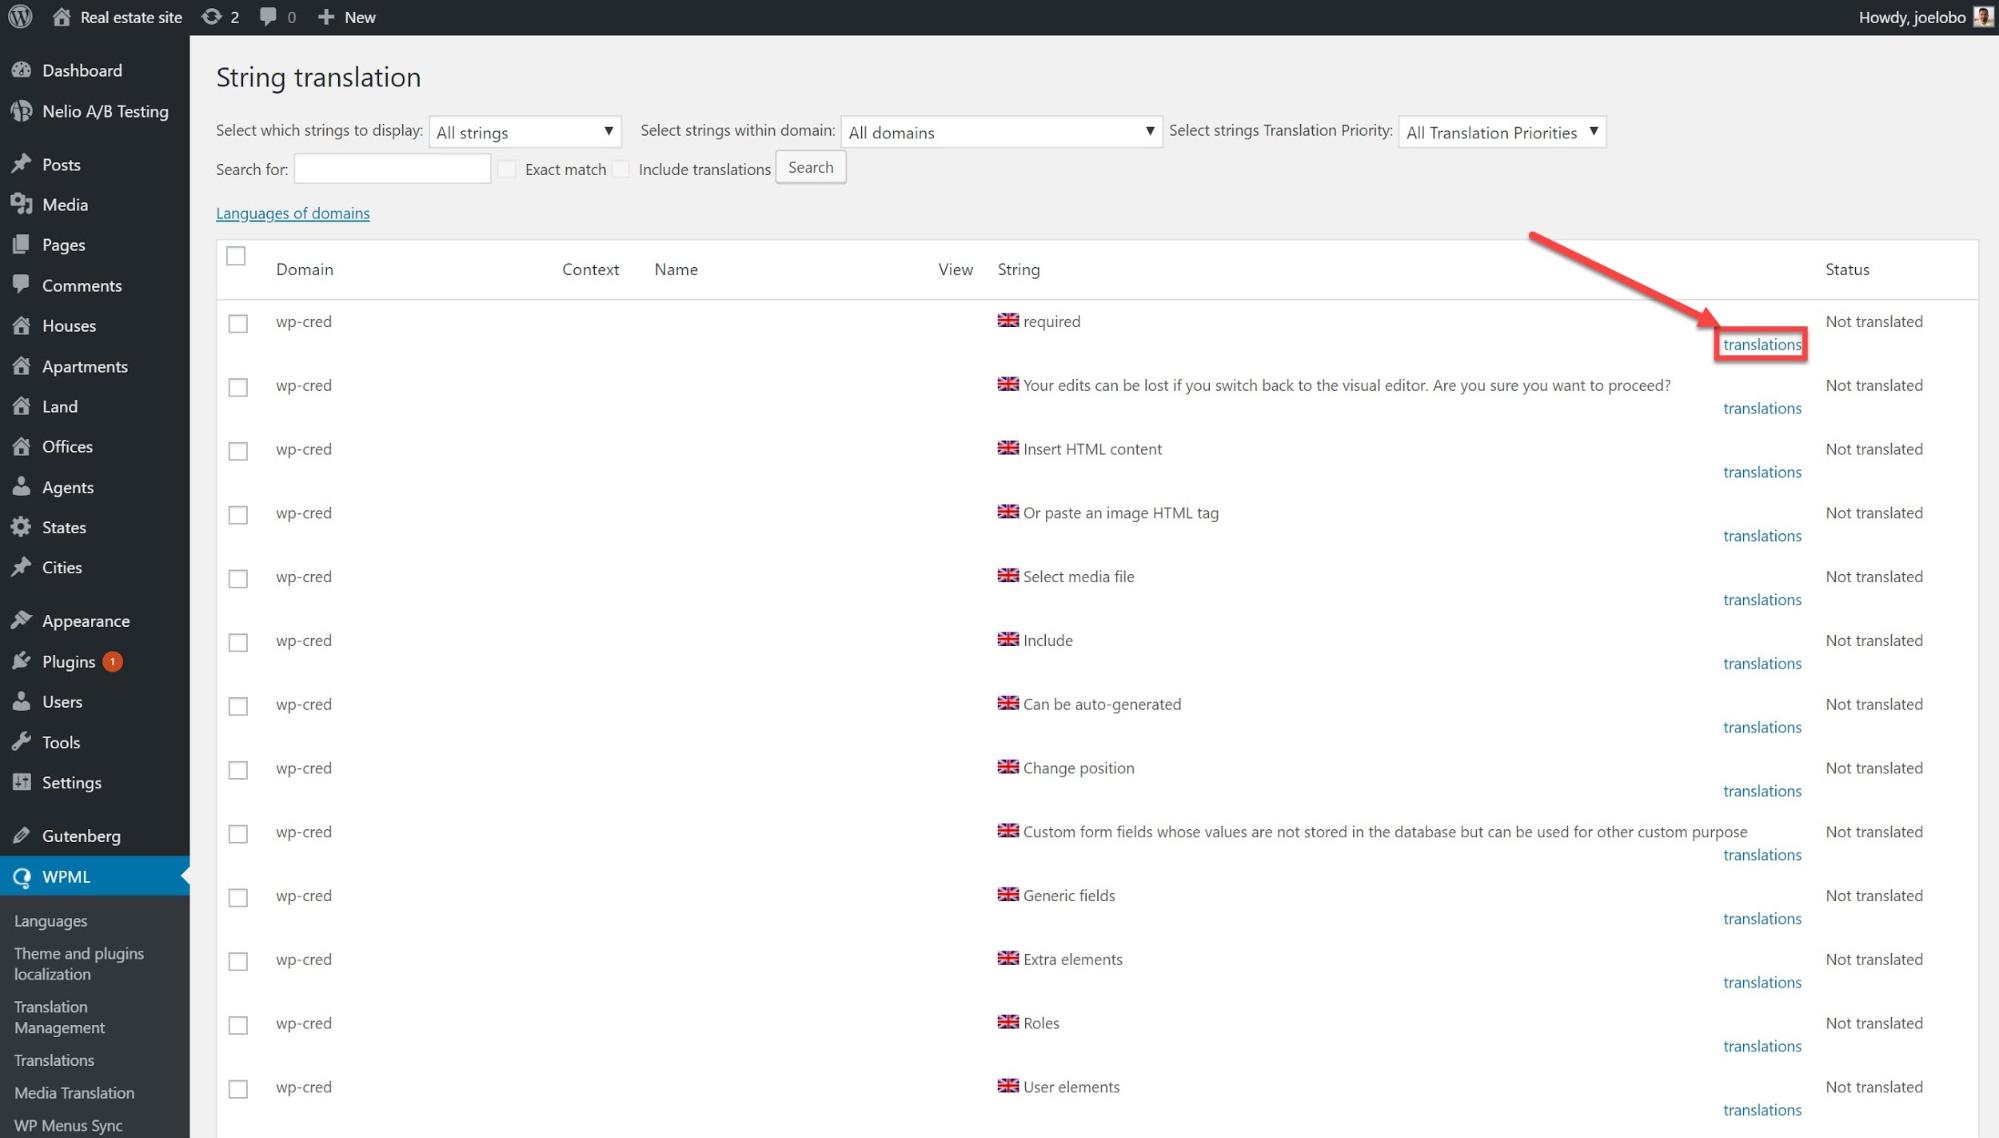
- Go to WPML -> String Translation and under the Select strings within domain dropdown menu select Widgets.
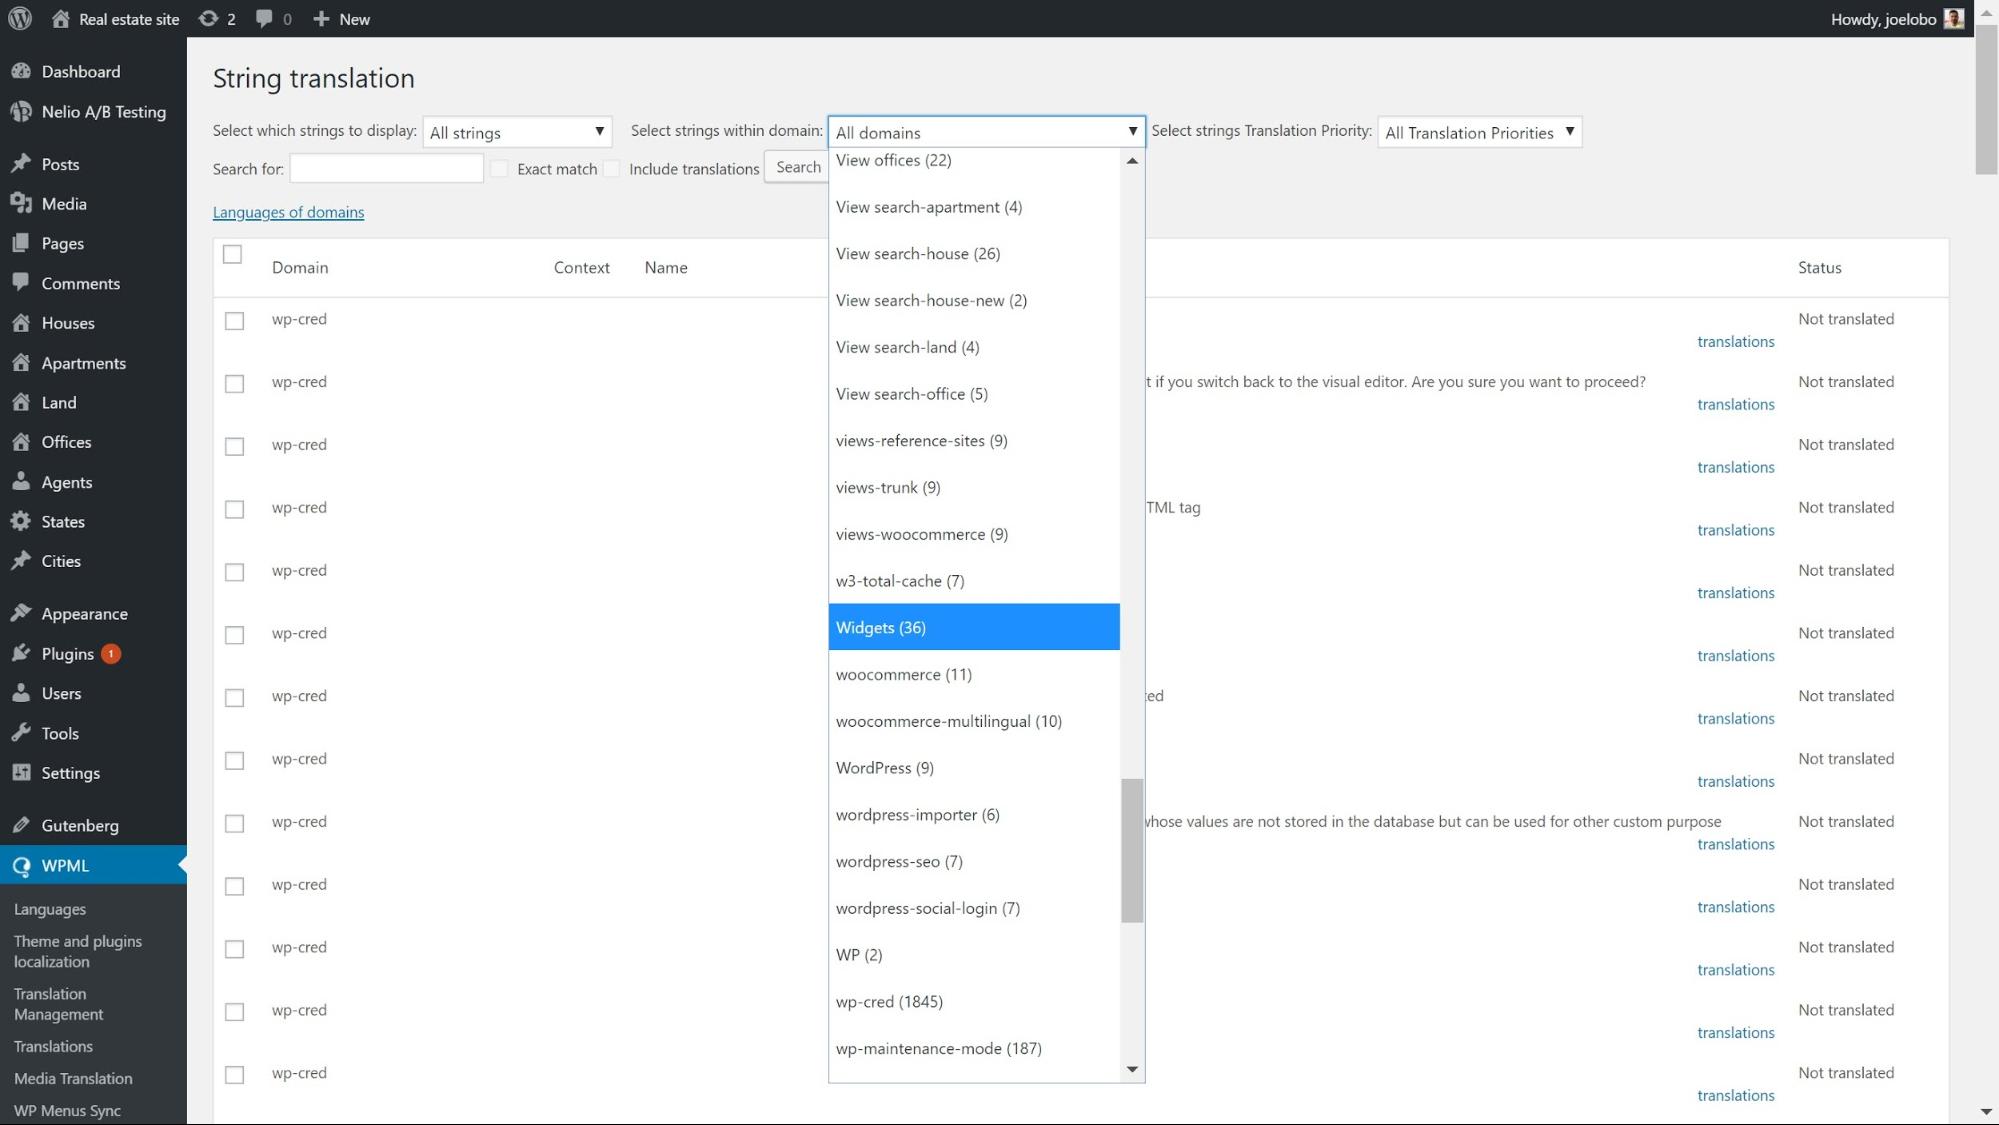
- Select Translations next to the widget string you want to translate and a box will appear.
- Enter the translation, click Translation is complete and then Save.

There is a chance the widgets you want to translate do not appear by default under String Translation. But you can activate them easily.
- Under String Translation, scroll to the bottom and select Translate texts in admin screens.
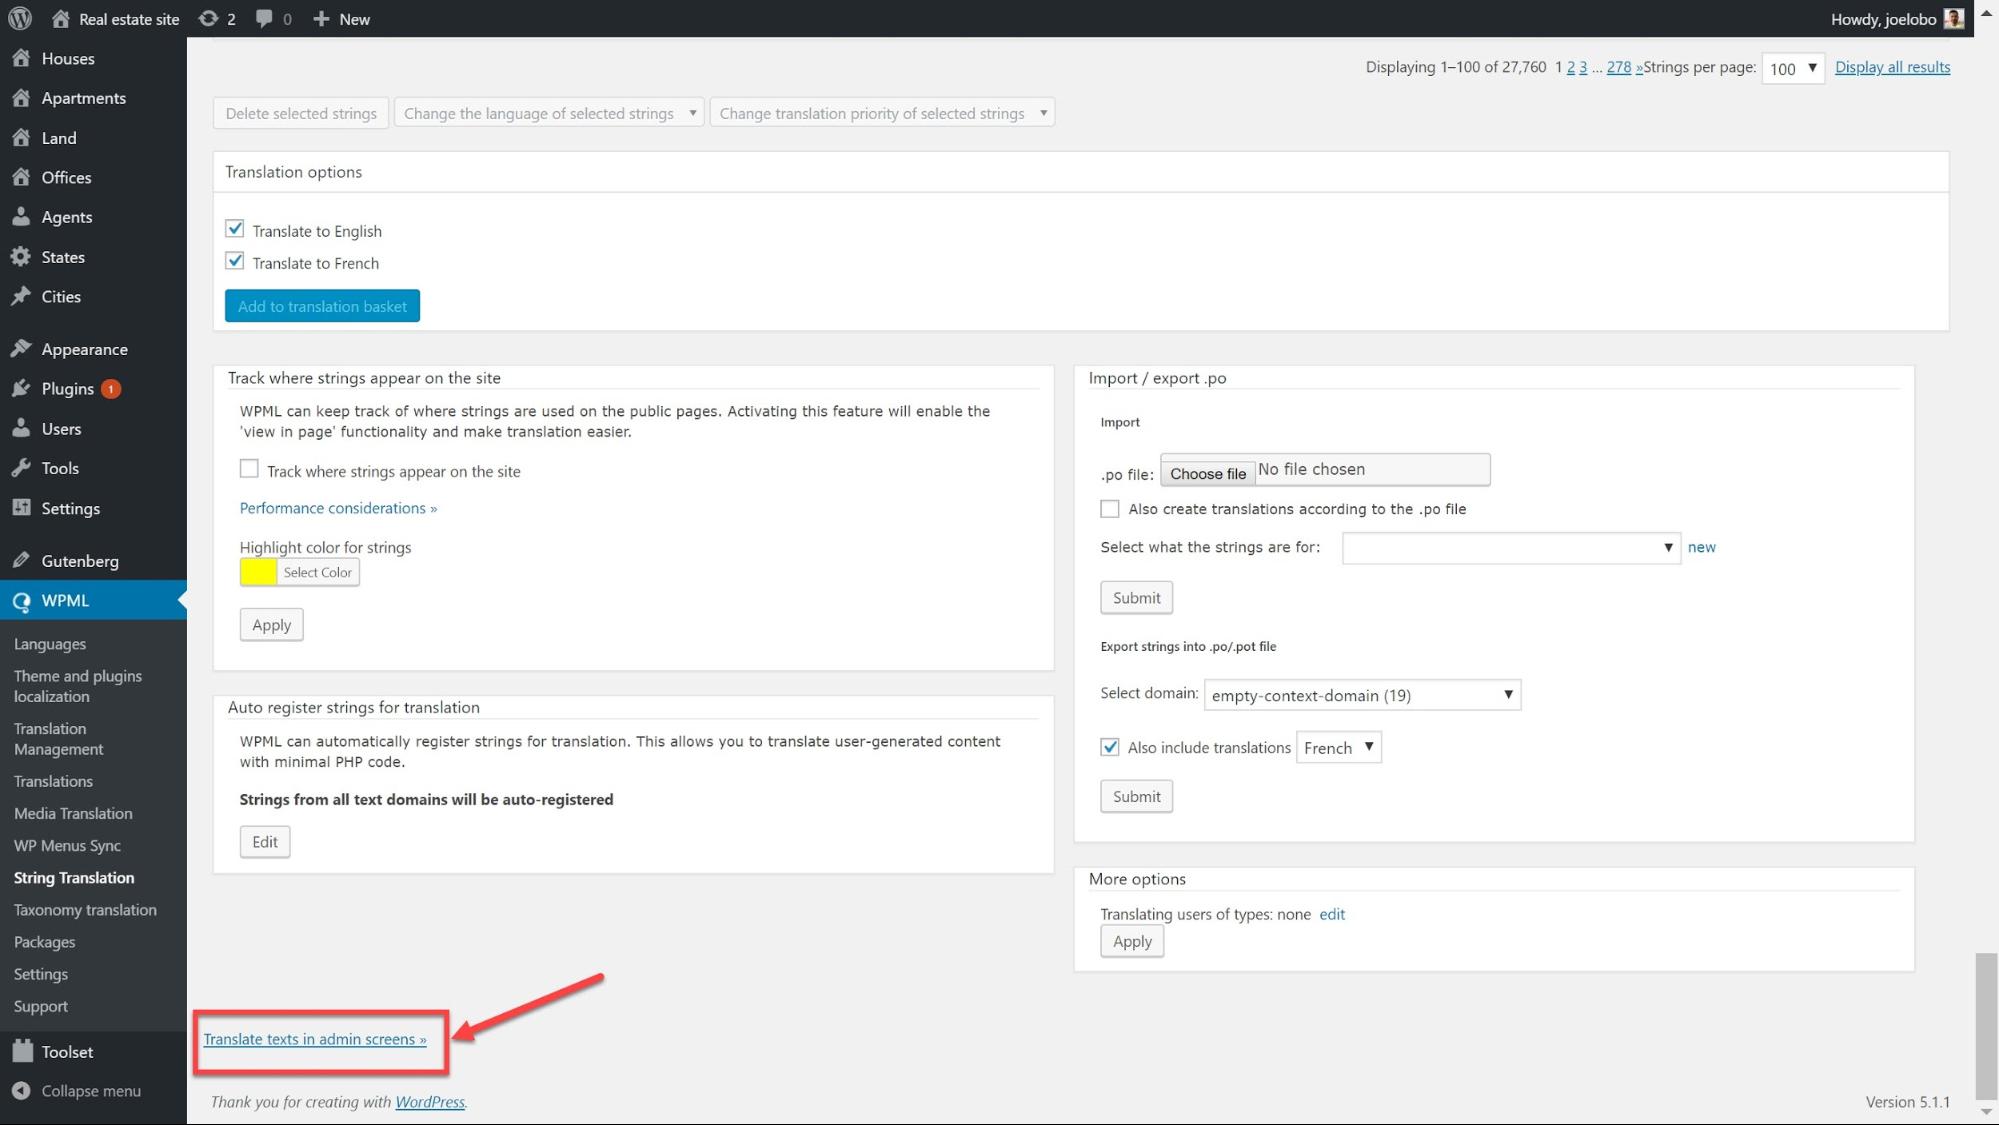
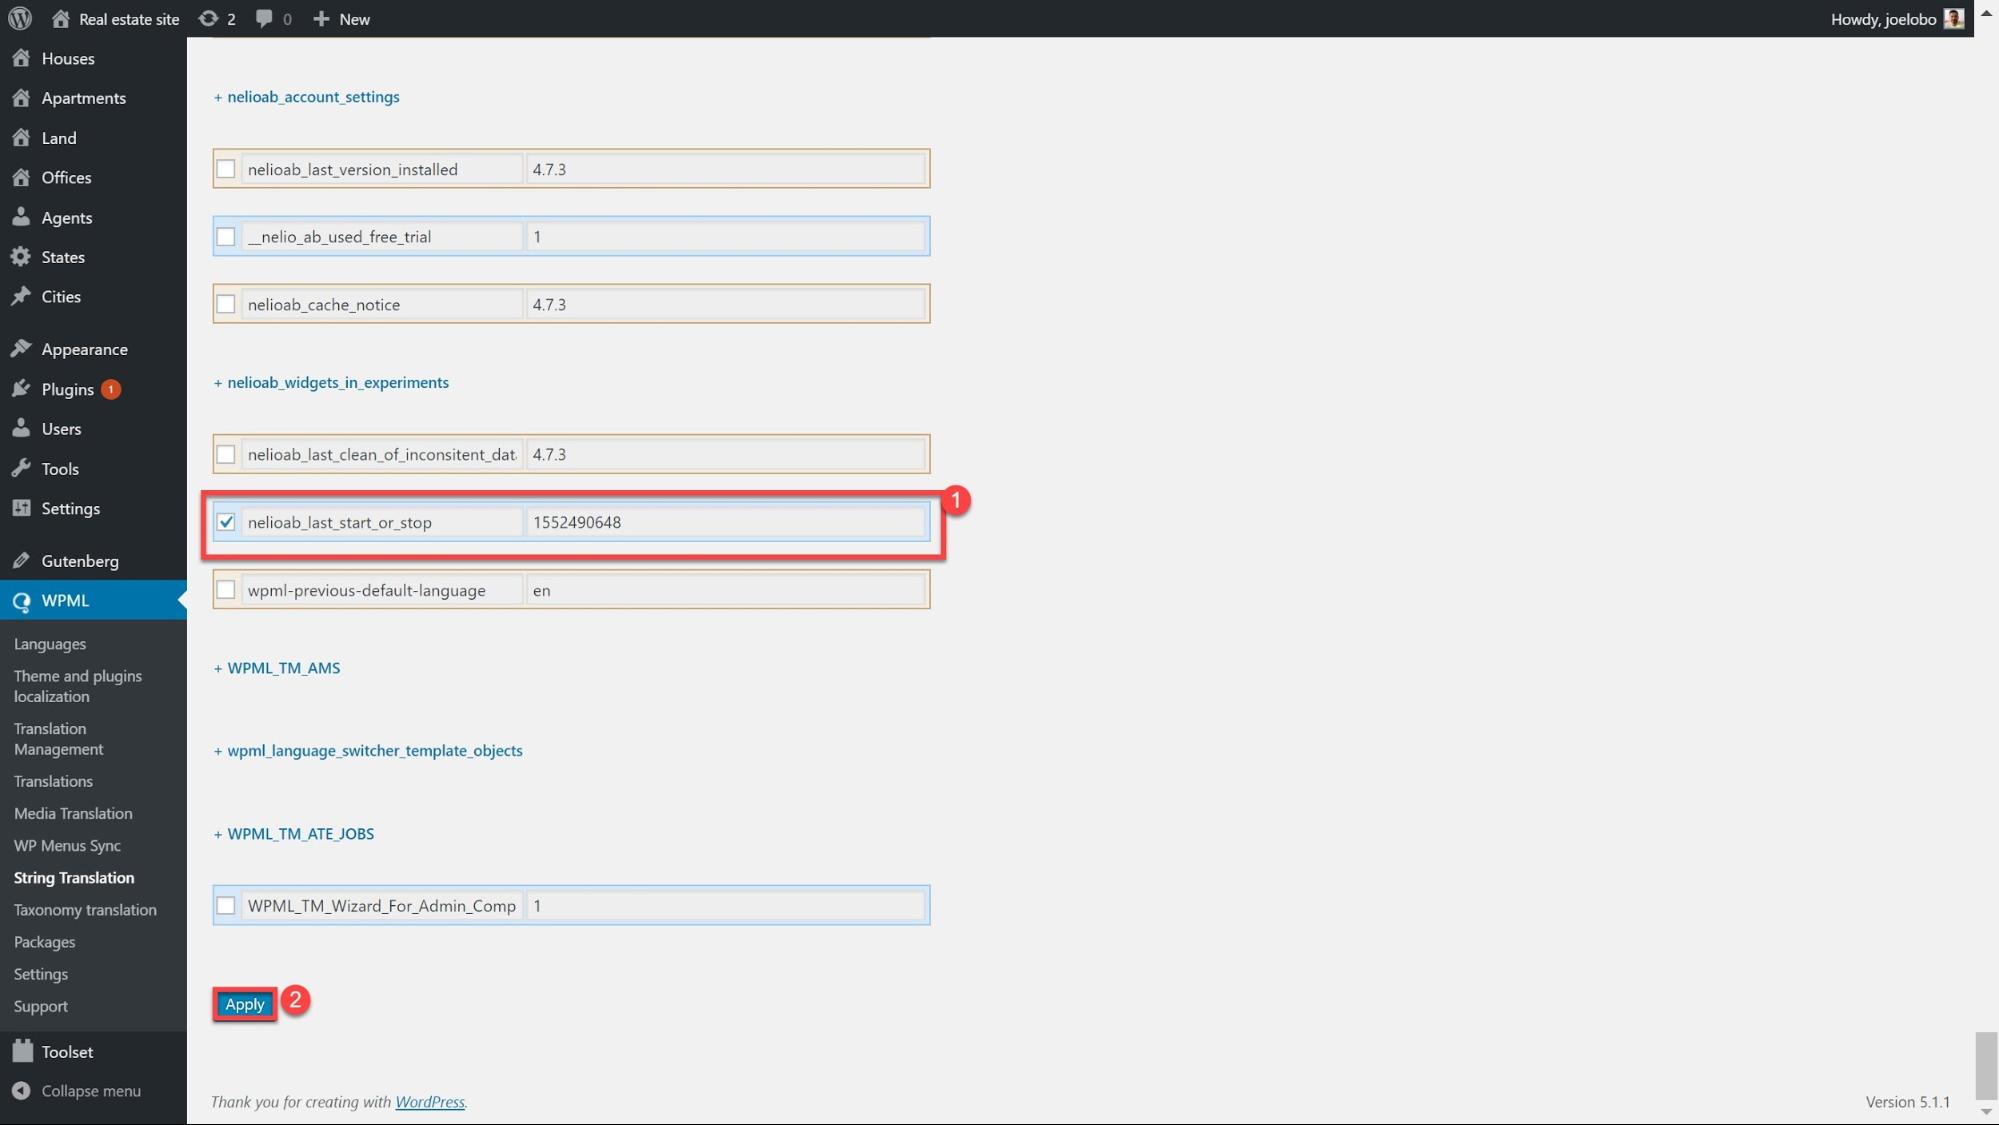
- Find all of the widgets that you want to activate and click on the boxes next to them.
- Scroll to the bottom of the page and click Apply. Now you can translate them under String Translations just like with the default ones.
Translate URLs
Translating your URLs allows you to improve your SEO by adding unique URLs for custom content in different languages. For example:
- /houses/my-green-house/
- /casas/mi-casa-verde/
There are two steps to completely translating your URLs as in our example above. First, we’ll look at translating the page name (the non-bold part) followed by the custom post type (the bold part).
Translating page names

Under the post type or page, click the Edit option next to the Permalink and type in the translation.
Translate your custom post type

You can register custom post types manually using PHP but if you are not an experienced coder you can use plugins to do this. On our real estate demo website, we created our custom post types using Toolset which allows us to declare our custom post types.
- Under WPML -> Settings head to Post types translation and select the post type you want to translate. Here we have selected all of our custom post types.
- You can now search your custom post types on WPML -> String translation and translate them there.

Once you click Save they will appear as translated in your URLs.
Translate your themes and plugins
Whatever themes and plugins you install on your site will come with their own texts which will need to be translated to give you a completely translated website.
- We first need to decide how we want to translate our themes and plugins. On WPML -> Theme and plugins localization you can find these three options:
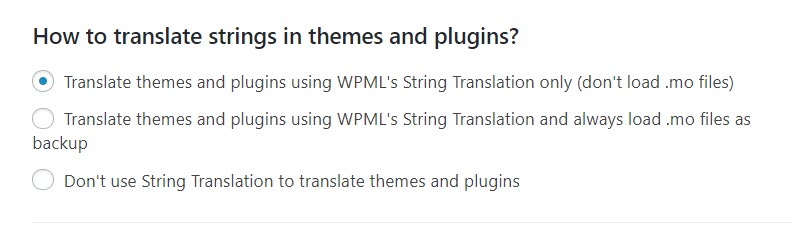
For our demo site, we will use String Translation without loading the .mo files to optimize our website’s performance. .mo translations provide a fallback option if there are some strings that you have not yet translated but .mo files can slow your website down.
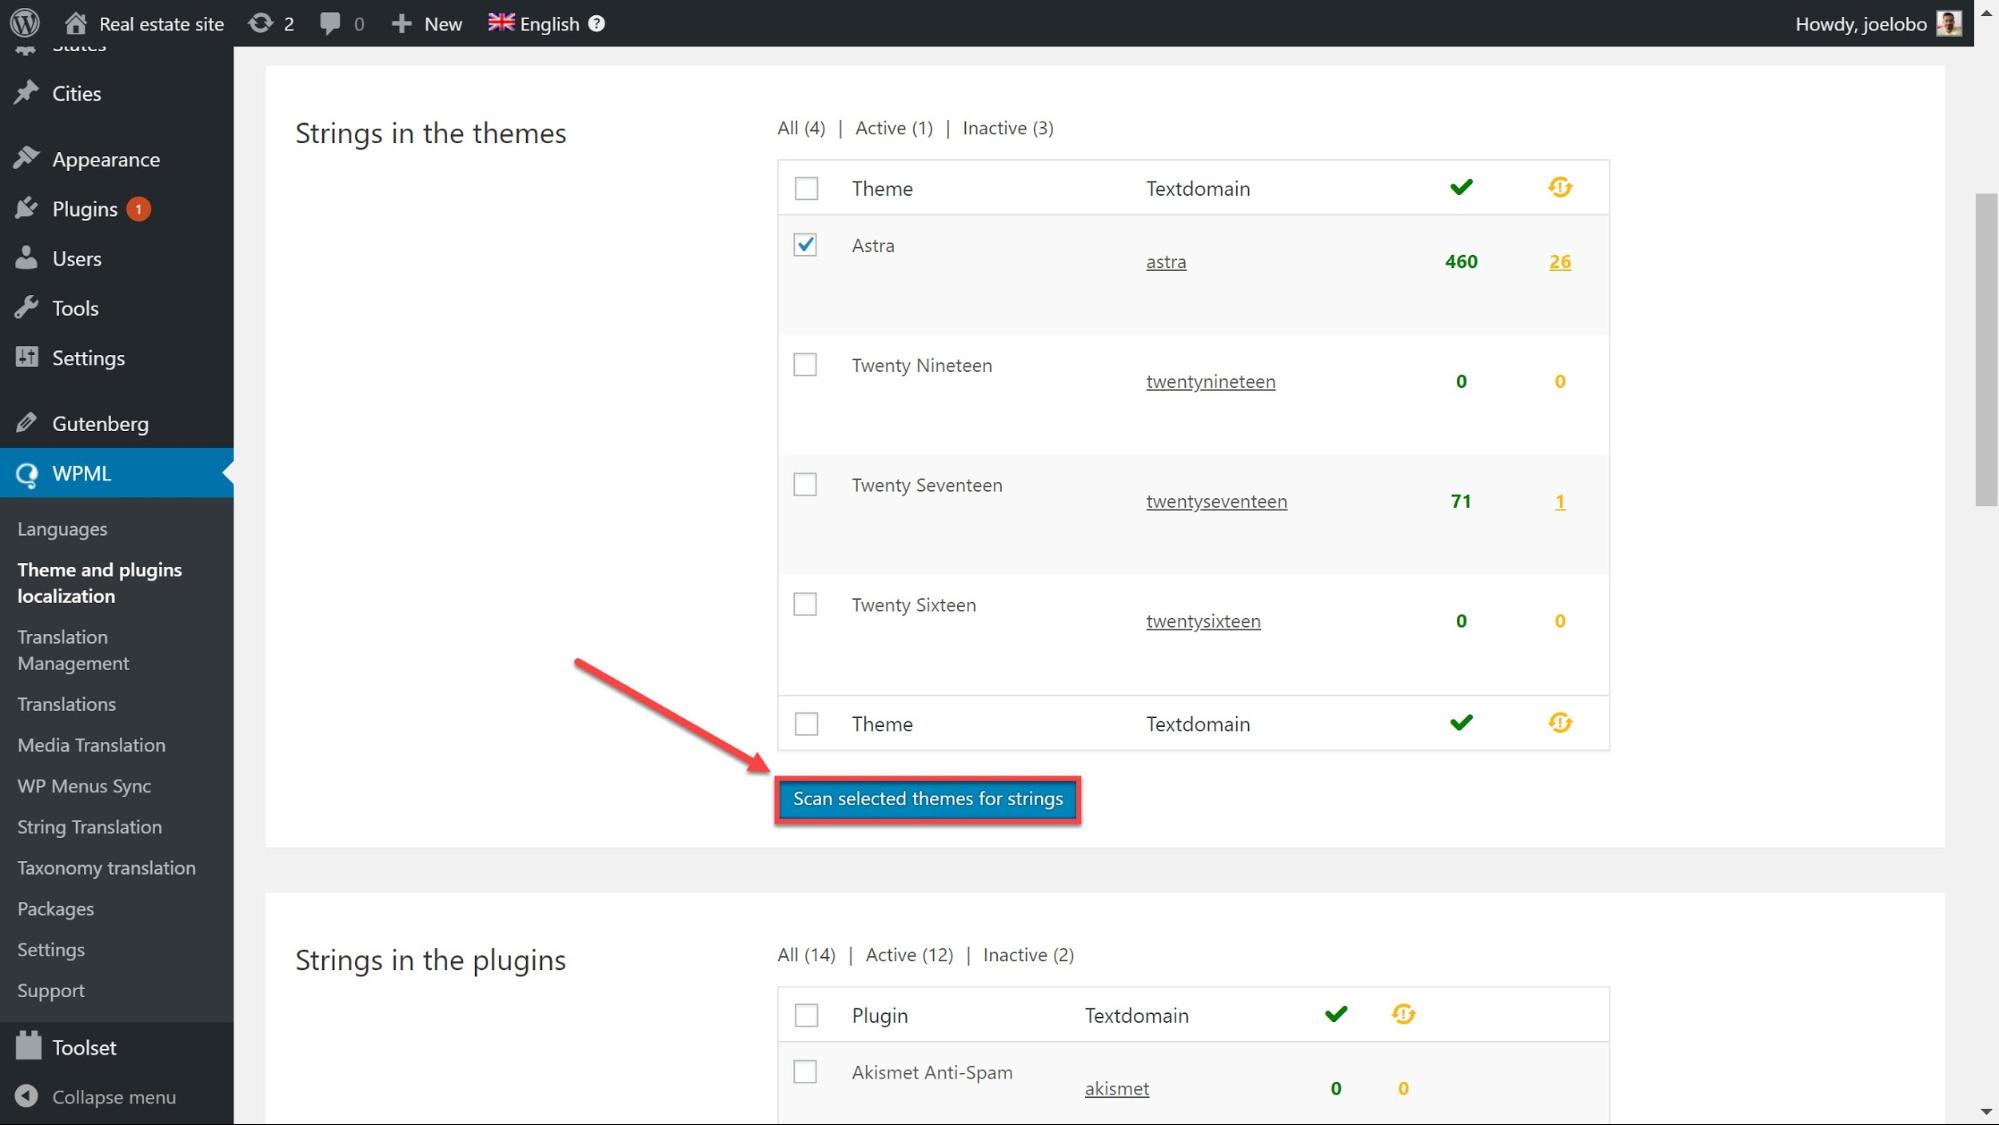
- We will now scan our themes/plugins for any strings that need to be translated. Below on the same page under Strings in the themes, select the theme you want and click Scan selected themes for strings. We can do the same for plugins in the section below which is called Strings in the plugins.
Below we have scanned our Astra theme:
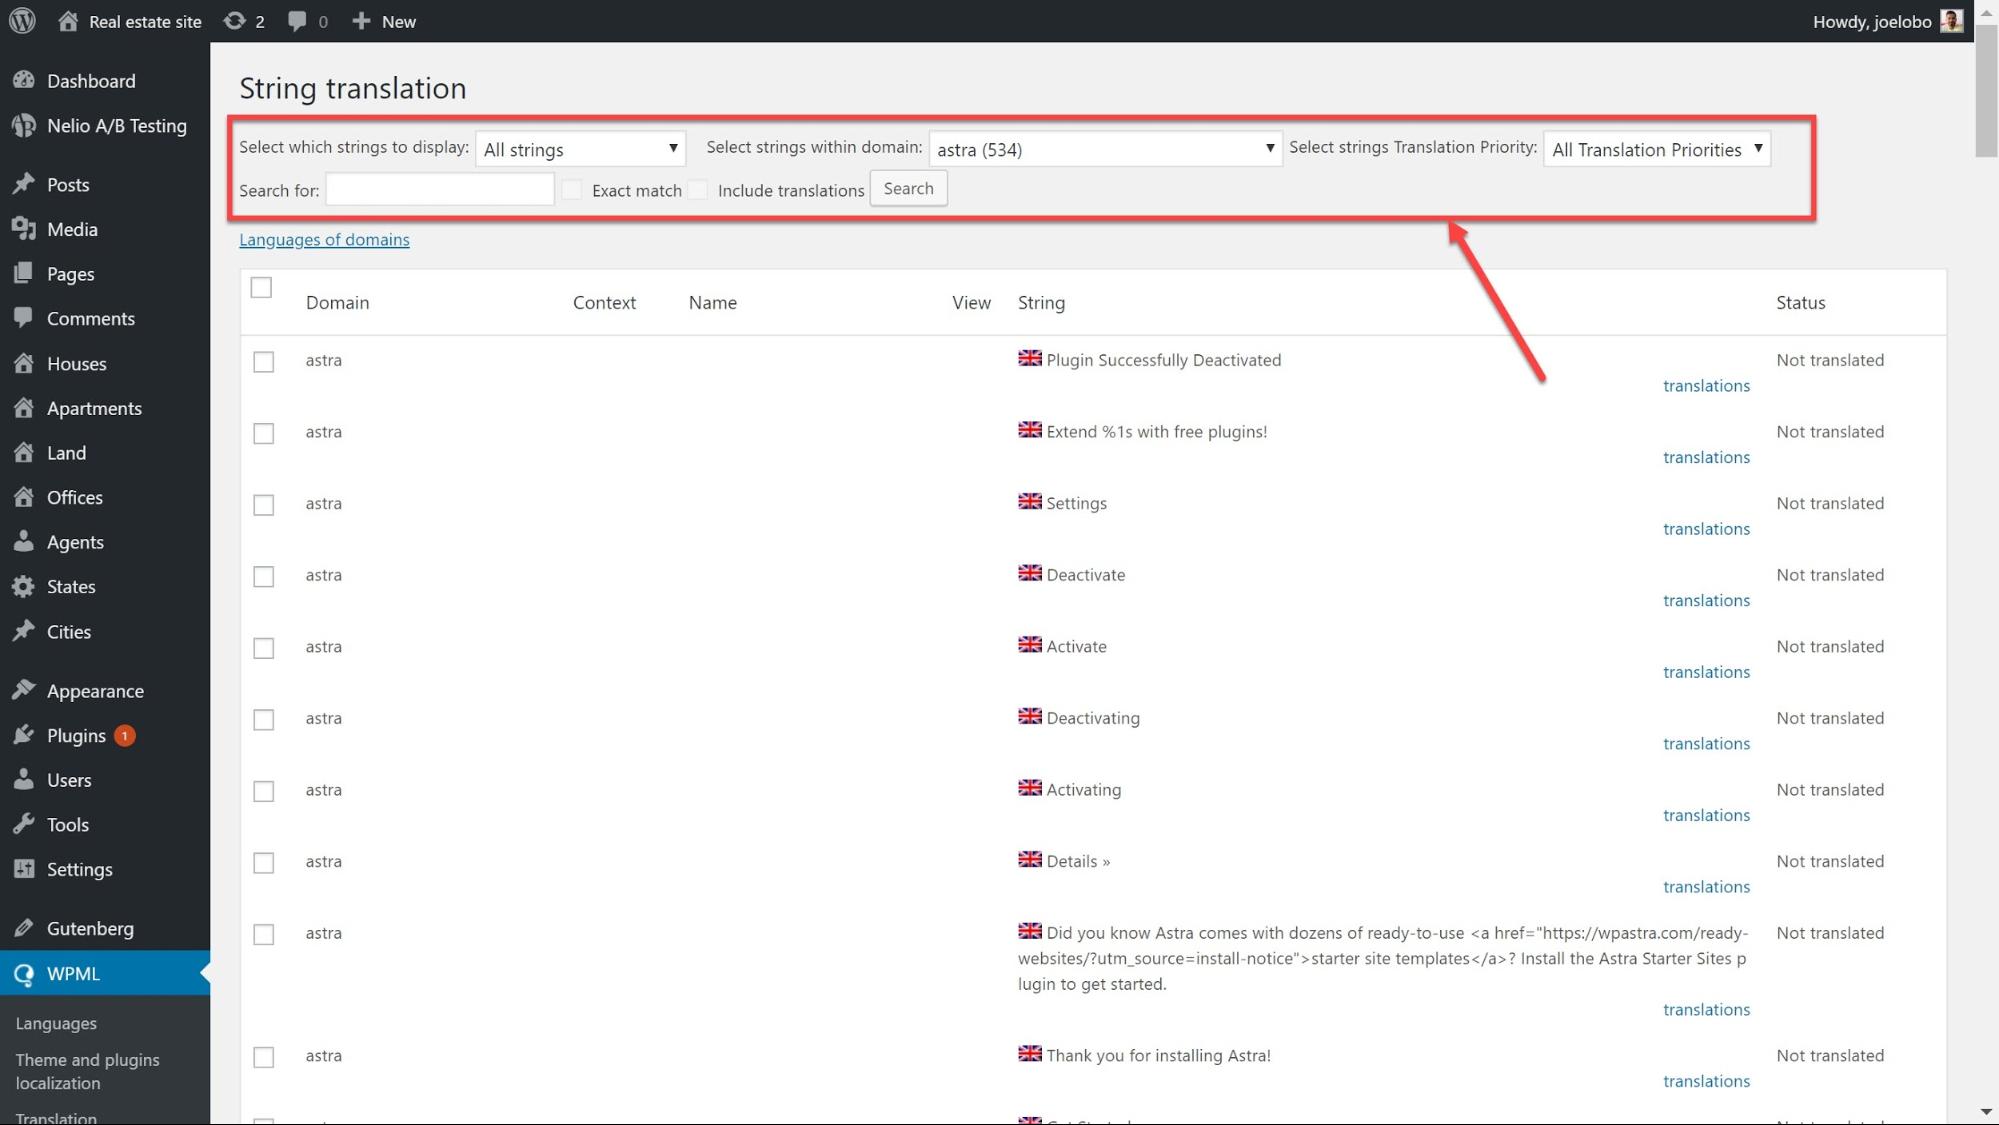
- Head to WPML -> String Translation and use the Select strings within domain drop-down to find the theme or plugin which you just scanned. You can now see all of the strings which need translating. We can now translate the strings just like we have in the previous tasks above.

Translate your admin strings
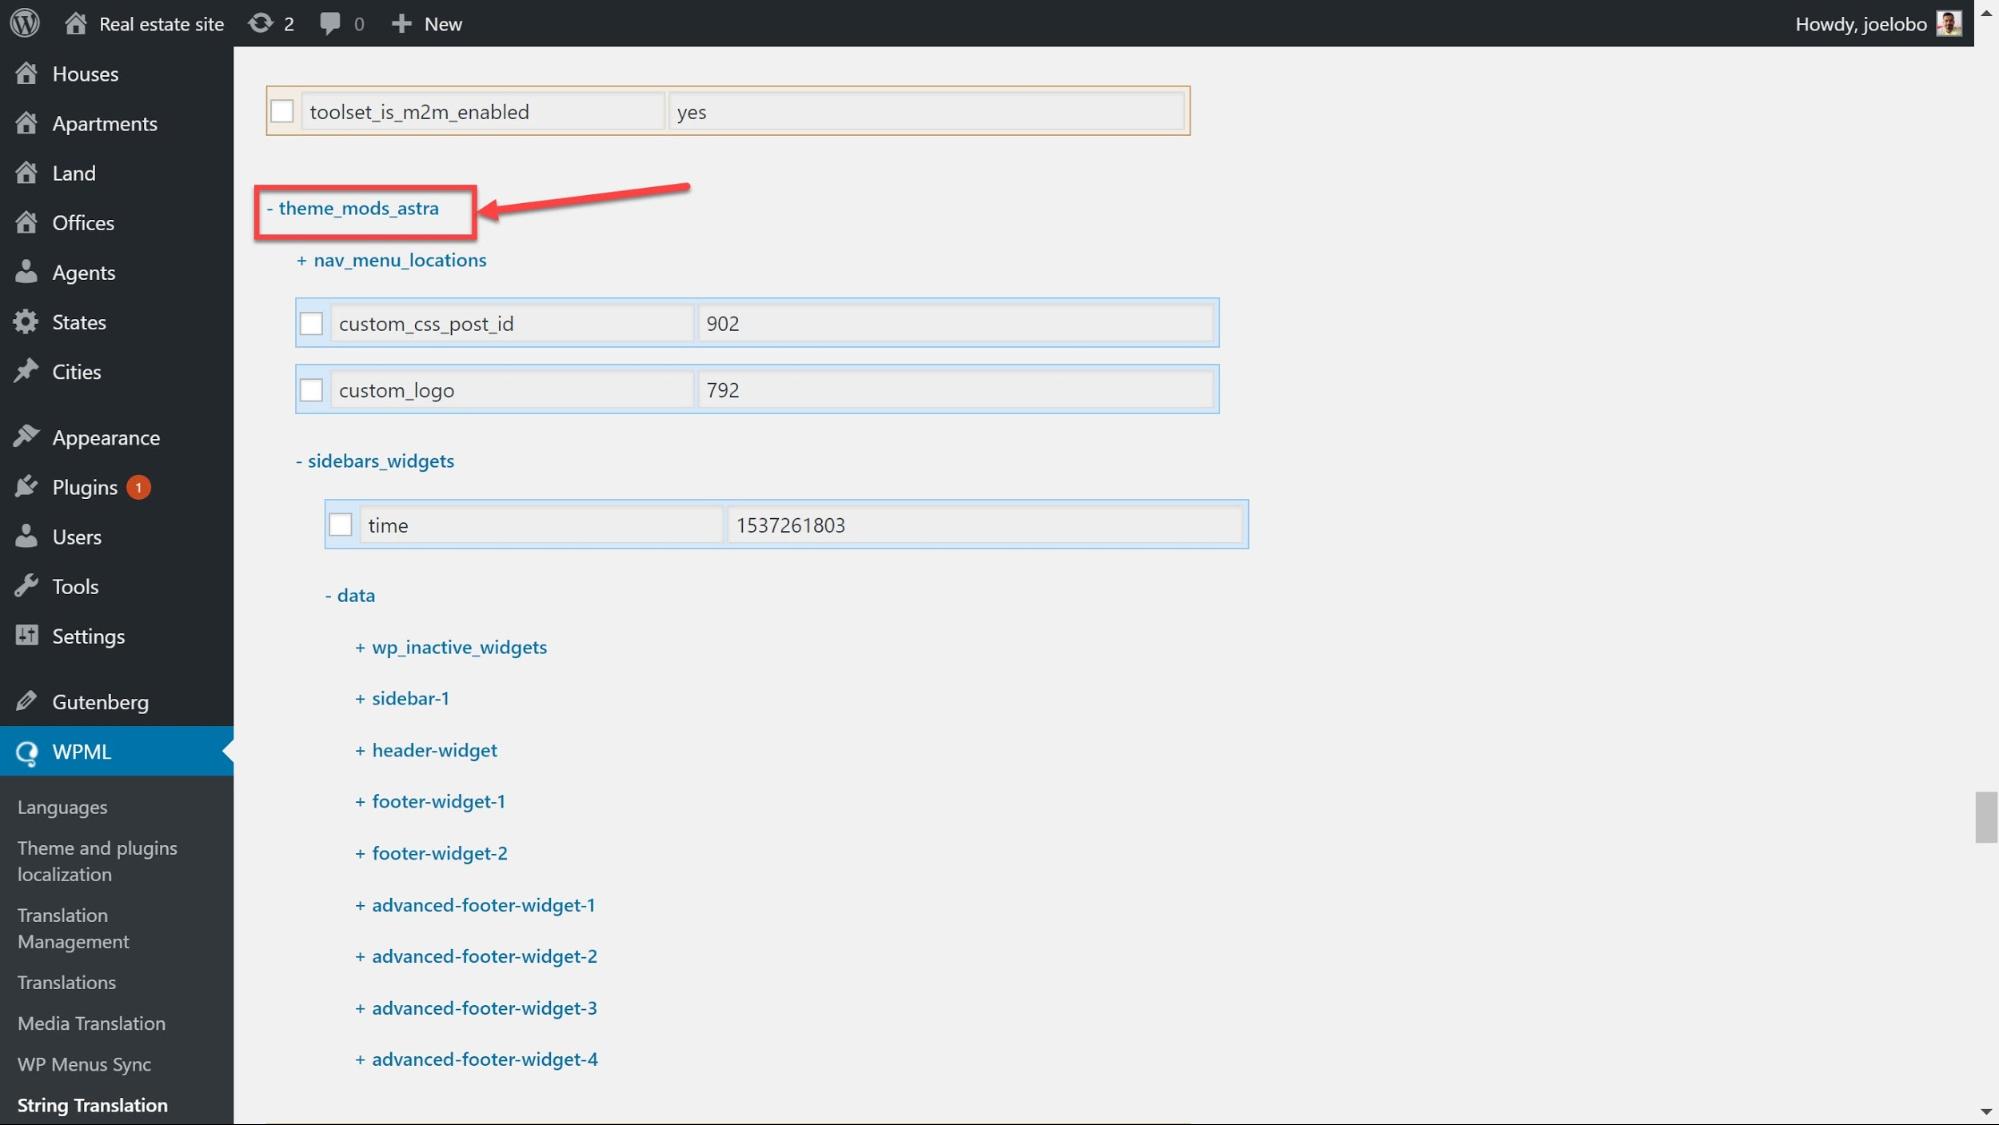
The final elements to translate are your theme options – such as your Favicon or a theme’s own slider. Just like for our widgets we might need to activate the strings before we can translate them.
- Under String Translation, scroll to the bottom and select Translate texts in admin screens.
- Search for the option that matches what you are looking for. Theme options can usually be found under – theme_mods_{themename}. As we are using the Astra theme, we can find ours under theme_mods_astra. Here we can select the theme options that we want to make available to translate.
- Once you have chosen the strings you want to translate, click Apply at the bottom of the page.
- We can now translate our theme options just like the other strings we have previously translated under WPML -> String Translations.
Assign individuals to translate
This section is for if you want individuals to translate your content for you using their WordPress logins.
Activate Advanced Translation Editor
Just like if you were translating on your own, we first need to activate Advanced Translation Editor for our individual translators.
You can activate it in the WPML translation wizard when you install the plugin but you can also set it up later.
- Head to WPML -> Settings on your WordPress dashboard.
- Under How to translate posts and pages select Use WPML’s Advanced Translation Editor.

Set up users on your WordPress
You can use the WPML translation wizard to assign roles to individual translators. But you can also make changes once you complete the wizard.
- Go to WPML -> Translation Management and click on Translation Roles where you can see the roles assigned to all of your website’s users. Here you can either add a translator or a translation manager who will keep track of all the tasks.

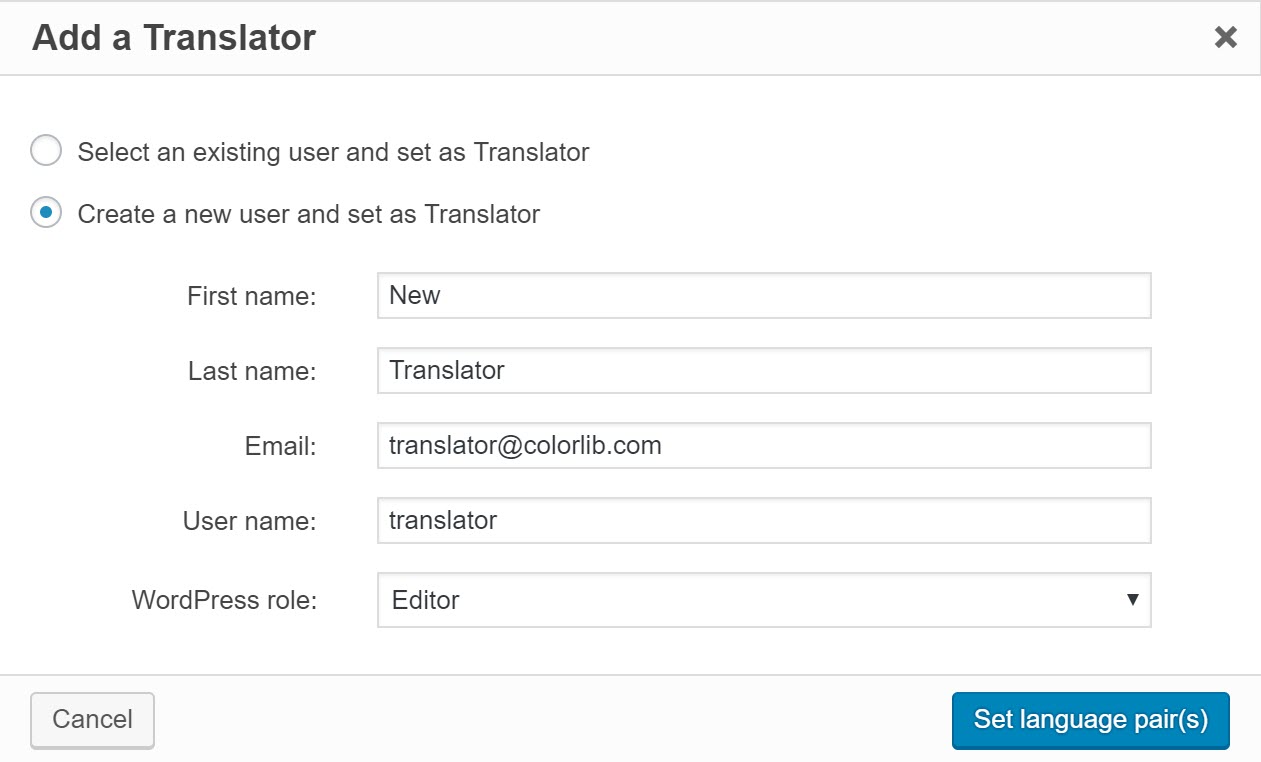
- To add a translator click Add a Translator, fill in the user’s details and click Set language pairs.
- Select which languages your translator will be working with and click Save.

You have now added a new user to translate content.
Send content for translation
Now that you have set up your users and their roles, you can assign translation jobs to them.
- Go to WPML -> Translation Management.
- On the Translation Dashboard, and select the content that you want to translate using the filters at the top of the page. We will translate some of our posts under the Houses custom post type. Notice how you can also select if you want to translate the media for each post.

- Scroll to the bottom of the page and under Select translation options, select the language you want to translate into. Click Add selected content to translation basket.

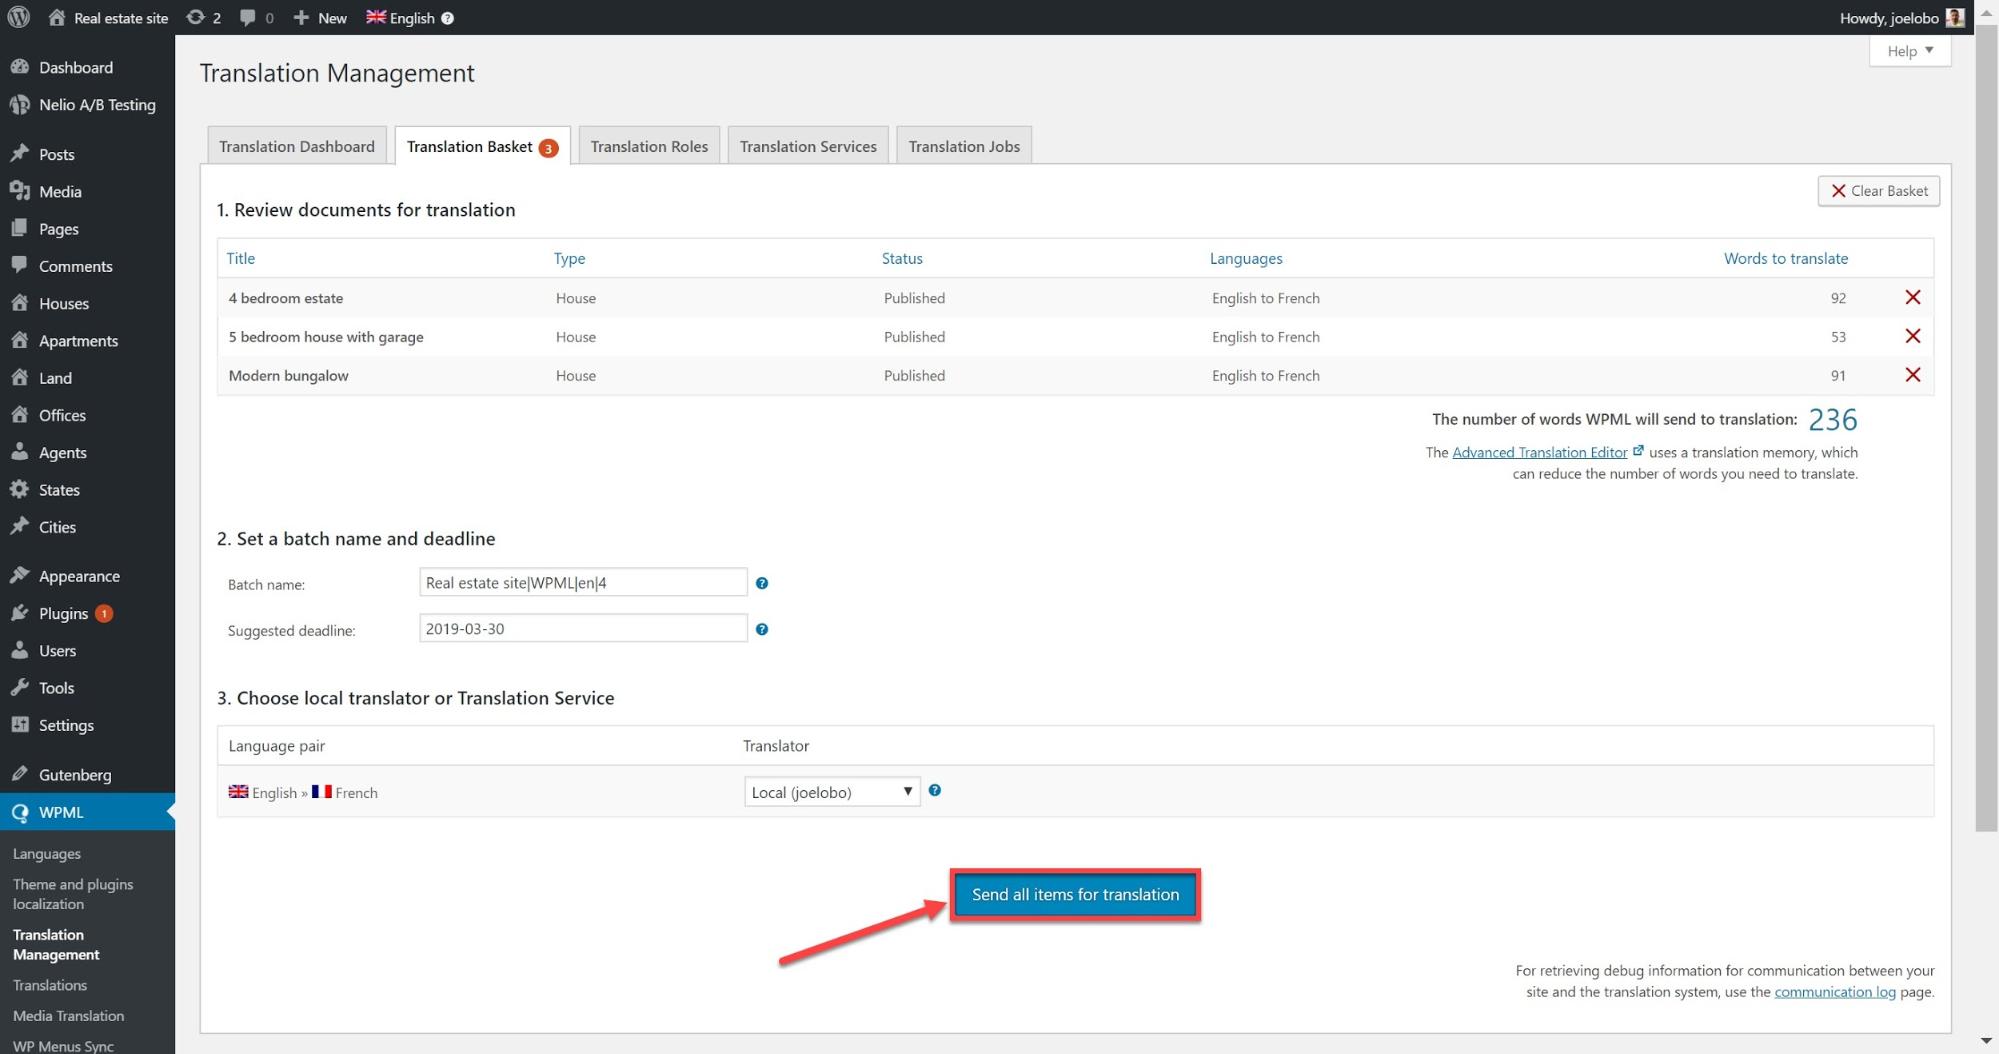
- Click on Translation basket at the top of the page where you can review the content you have selected including the number of words, the batch name and the deadline.

- Click Send all items for translation at the bottom to create the job. Your users will now receive an email notification with information about the job.
Send strings for translation
Sometimes you will need to send texts which do not belong on any particular page such as widget titles or a site’s tagline for translation.
- On WPML -> String Translation search for the strings you want to translate using the filter at the top of the page.
- Select the strings you want to translate and at the bottom click on Add to translation basket.
- Go to the WPML -> Translation Management page and click the Translation Basket tab. There, click to send the basket for translation.
Check the status of translation jobs
Now that you have sent off your content for translation you can see the status of your jobs to keep track of when they will be ready.
- Go to WPML -> Translation Management and click on Translation jobs
- Use the filter at the top of the page to select which jobs you want to check. For example, you can select In progress to see which ones are currently being translated and how much of it is complete.

Assign a translation service
You can hire a professional translation service and assign all of your translation jobs to them.
What you should look for in a translation service
There are a number of key aspects to consider before you contract your work to a translation service.
- What size websites they work with – Some services tend to specialize in larger projects while others concentrate on smaller websites.
- What areas they specialize in – Some services might have expertise in translating different industries so will be better prepared for any jargon you might have as well as a better understanding of your audience.
- The languages they work in – A translation company might specialize in certain types of languages. If you plan on adding a number of languages it will be worth making sure they have translators which can work in them.
- Where they are based – You might prefer to work with a translation company which is based in your timezone.
- Which plugins they integrate with – Check whether your translation service is integrated with the plugin you are using. For example, WPML is integrated with a number of translation services which we can select from.
Connect your website to your translation service
- Sign up with the translation service you have selected. They will provide you with an API token which you will need.
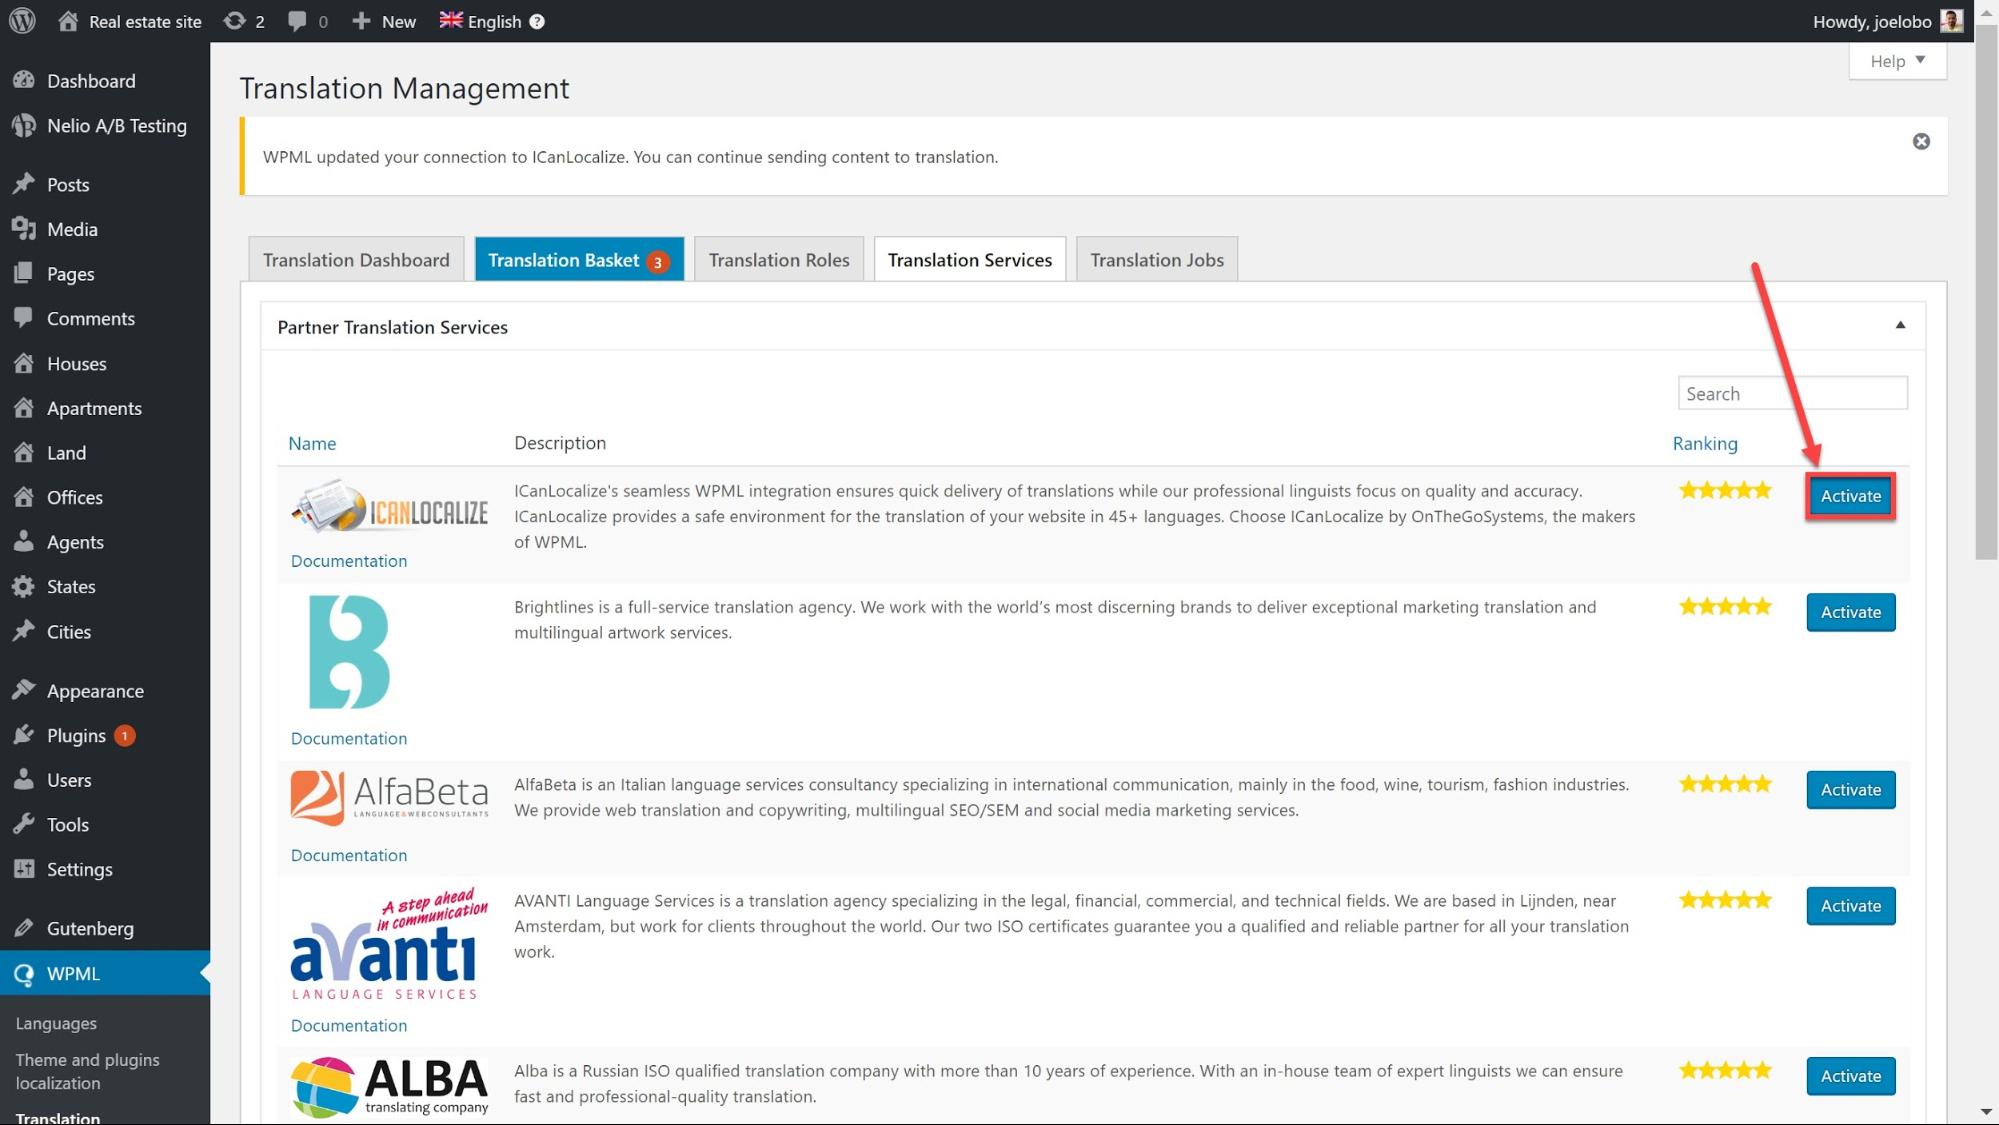
- Go to WPML -> Translation Management and click on Translation Services.
- Look for the translation service you have selected and click Activate.
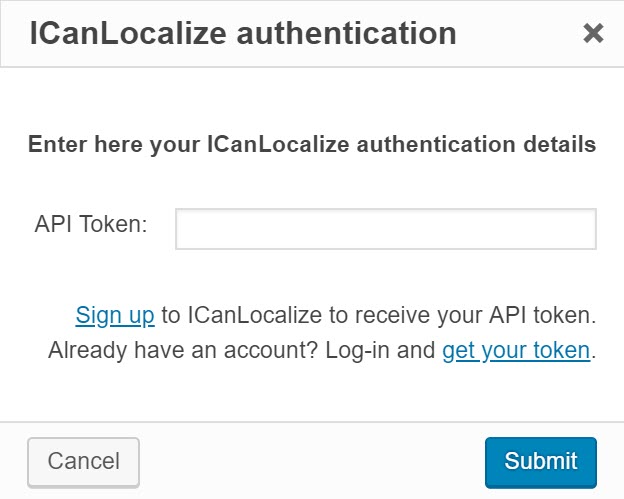
- Click Authenticate and enter your API token. Click submit and your translation service is now connected to your website.
Send content for translation
Now that you are connected with a translation service you can start to send them jobs.
- Go to WPML -> Translation Management.
- On the Translation Dashboard, select the content that you want to translate using the filters at the top of the page. We will translate some of our posts under the Houses custom post type. Notice how you can also select if you want to translate the media for each post.
- Scroll to the bottom of the page and under Select translation options, select the language you want to translate into. Click Add selected content to translation basket.
- Click on Translation basket at the top of the page where you can review the content you have selected including the number of words, the batch name and the deadline.
- Click Send all items for translation at the bottom to create the job. Your translation service will now receive an email notification with information about the job.
- Your translation service will provide you with a quote based on the batch, with instructions on how to authorize the translation.
Receiving completed translations
As soon as the translation service finishes the job, your translations will be ready for your website.
Your translations can either be delivered automatically or they can be manually fetched from your WordPress admin panel.
- Go to WPML -> Settings and under the Translation pickup mode check the option you prefer:

If you choose to deliver translations automatically, the completed jobs will appear on your website straight away.
- If you opt for manually fetching content, you can head to WPML -> Translation Management and click on Check status and get translations at the top of the page.
Start translating now!
Now that you have the three paths outline, it is time to choose one and get translating!
Let us know your experiences creating a multilingual website in the comments below. And if you have any problems we’ll be happy to help out!
Suppose you are running an eCommerce store with WordPress. In that case, you should look into more details on how to translate WooCommerce because not many translation plugins can translate it without purchasing extra add-ons.
Related Posts


Comments (0)