
Pato documentation
Everything you need to take a restaurant site from install to open, in the order you will need it, with a screenshot or a short animation for every step. Pato is a free block theme for restaurants, cafés, bakeries and bars.
Written for Pato 1.1.1 on WordPress 7.1. Every screenshot is from a fresh install.
On this page
- The short version
- Install Pato
- Start from one of six restaurants
- Change dishes and prices
- Find your way around a page
- Bookings: the reservation form
- Opening hours, address and map
- Logo, header, footer and navigation
- Colours and fonts
- Dark mode
- Page templates
- Selling gift cards and more
- Contact forms
- Updates
- Keyboard shortcuts
- If something is not where you expect
The short version
If you read one section, read this one. Each step links to the full explanation further down.
- Install and activate Pato. It builds your pages and your menu on its own. Install Pato
- Import the starter site closest to your place from Appearance → Starter sites. Starter sites
- Put in your own dishes and prices. Click the text on the page and type over it. Dishes and prices
- Add your logo and check the menu links. Logo, header and navigation
- Change the opening hours, address and map. Opening hours and map
- Send yourself a test booking and make sure the email arrives. Bookings
- Pick colours and fonts if the starter’s are not yours. Colours and fonts
None of it needs code, a page builder or a plugin.
Install Pato
Download the zip with the button at the top of this page. Do not unzip it — WordPress installs the zip file itself.
- In your dashboard, go to Appearance → Themes and click Add New Theme.
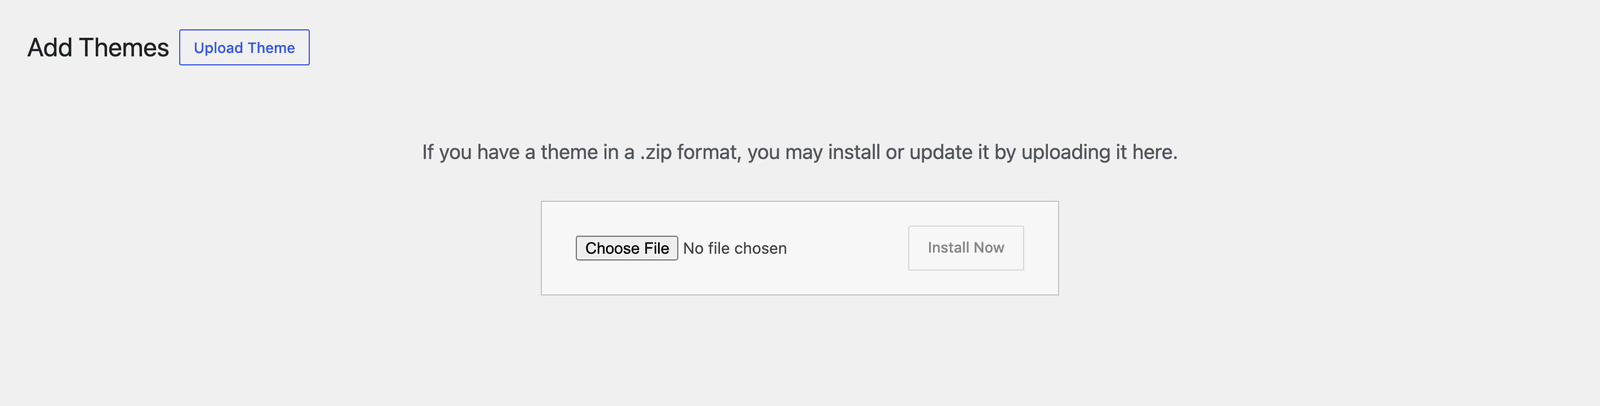
- Click Upload Theme at the top of the screen.
- Click Choose File, pick
pato.zip, then click Install Now. - When WordPress reports the theme is installed, click Activate.
Pato needs WordPress 6.6 or newer and PHP 7.4 or newer, and is tested up to WordPress 7.1. Tools → Site Health → Info shows both versions.
What happens when you activate it
On a site that has not been built yet, Pato creates seven pages — Home, Menu, Reservation, About, Gallery, Contact and Blog — and fills each with real content. It sets Home as the front page and Blog as the posts page, and builds a navigation menu that links them all.
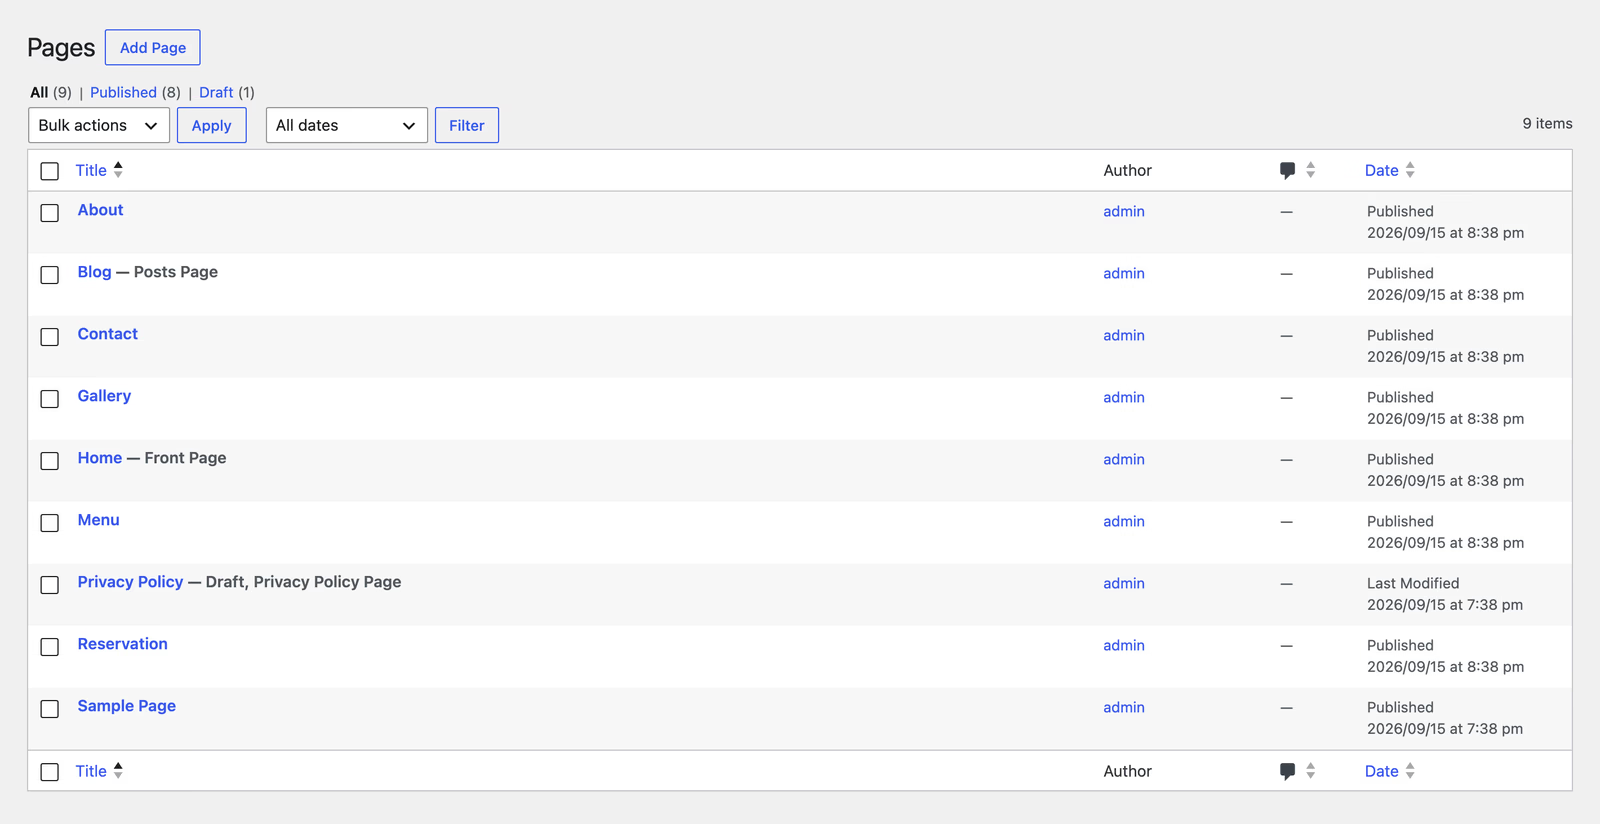
Privacy Policy and Sample Page come with WordPress, not with Pato. Delete Sample Page whenever you like.
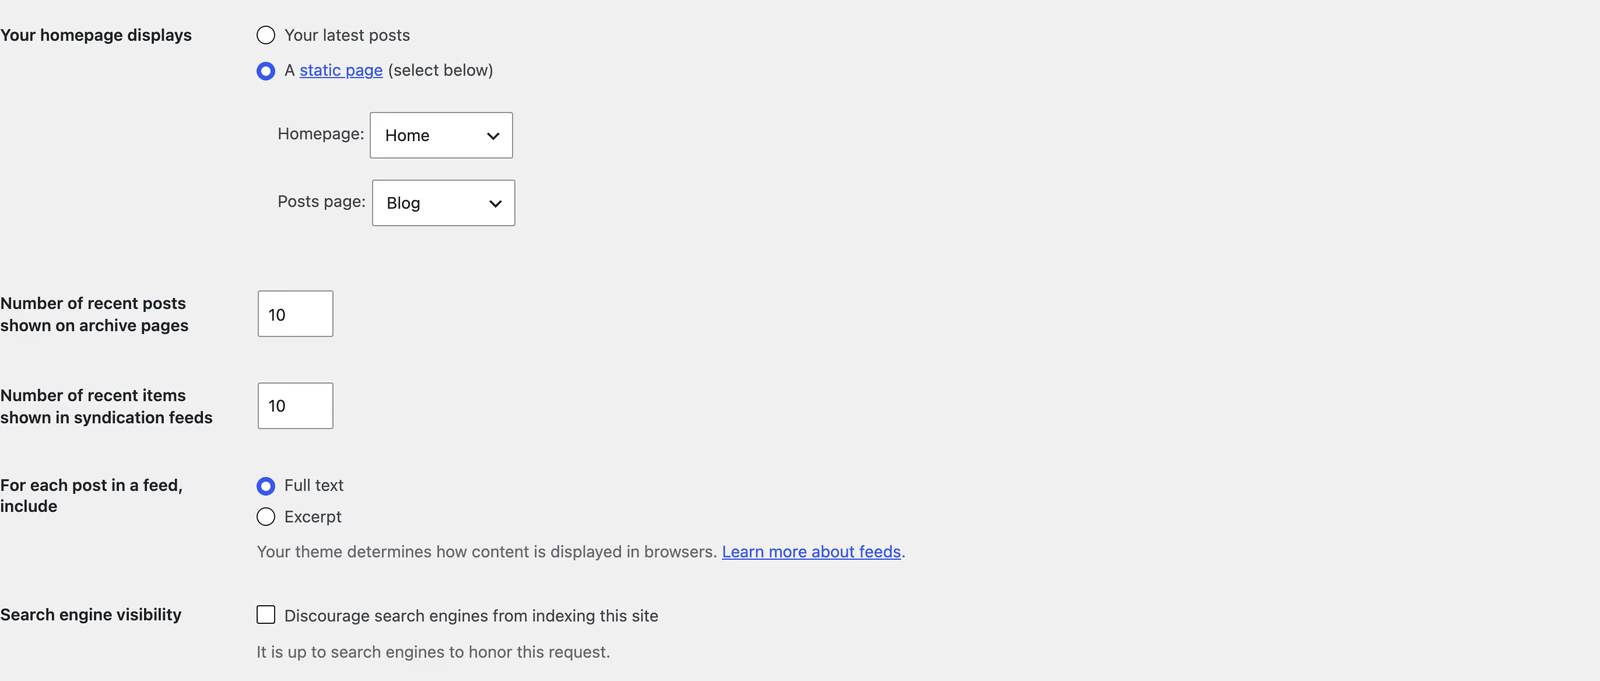
Already had pages? Then Pato builds nothing, so it can never overwrite a site you have been working on. Import a starter site instead (next section) — that works on any site — or point your front page at an existing page in Settings → Reading:
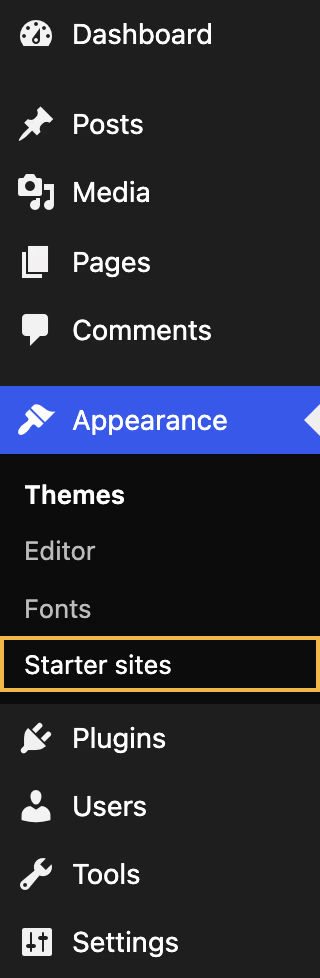
Where Pato lives in the dashboard
Pato is a block theme, so there is no Customizer and no theme options panel. It adds exactly one screen, Appearance → Starter sites. Everything else — header, footer, colours, fonts, templates — is in Appearance → Editor. Fonts is WordPress’s own font library, where you can add a typeface of your own.
Start from one of six restaurants
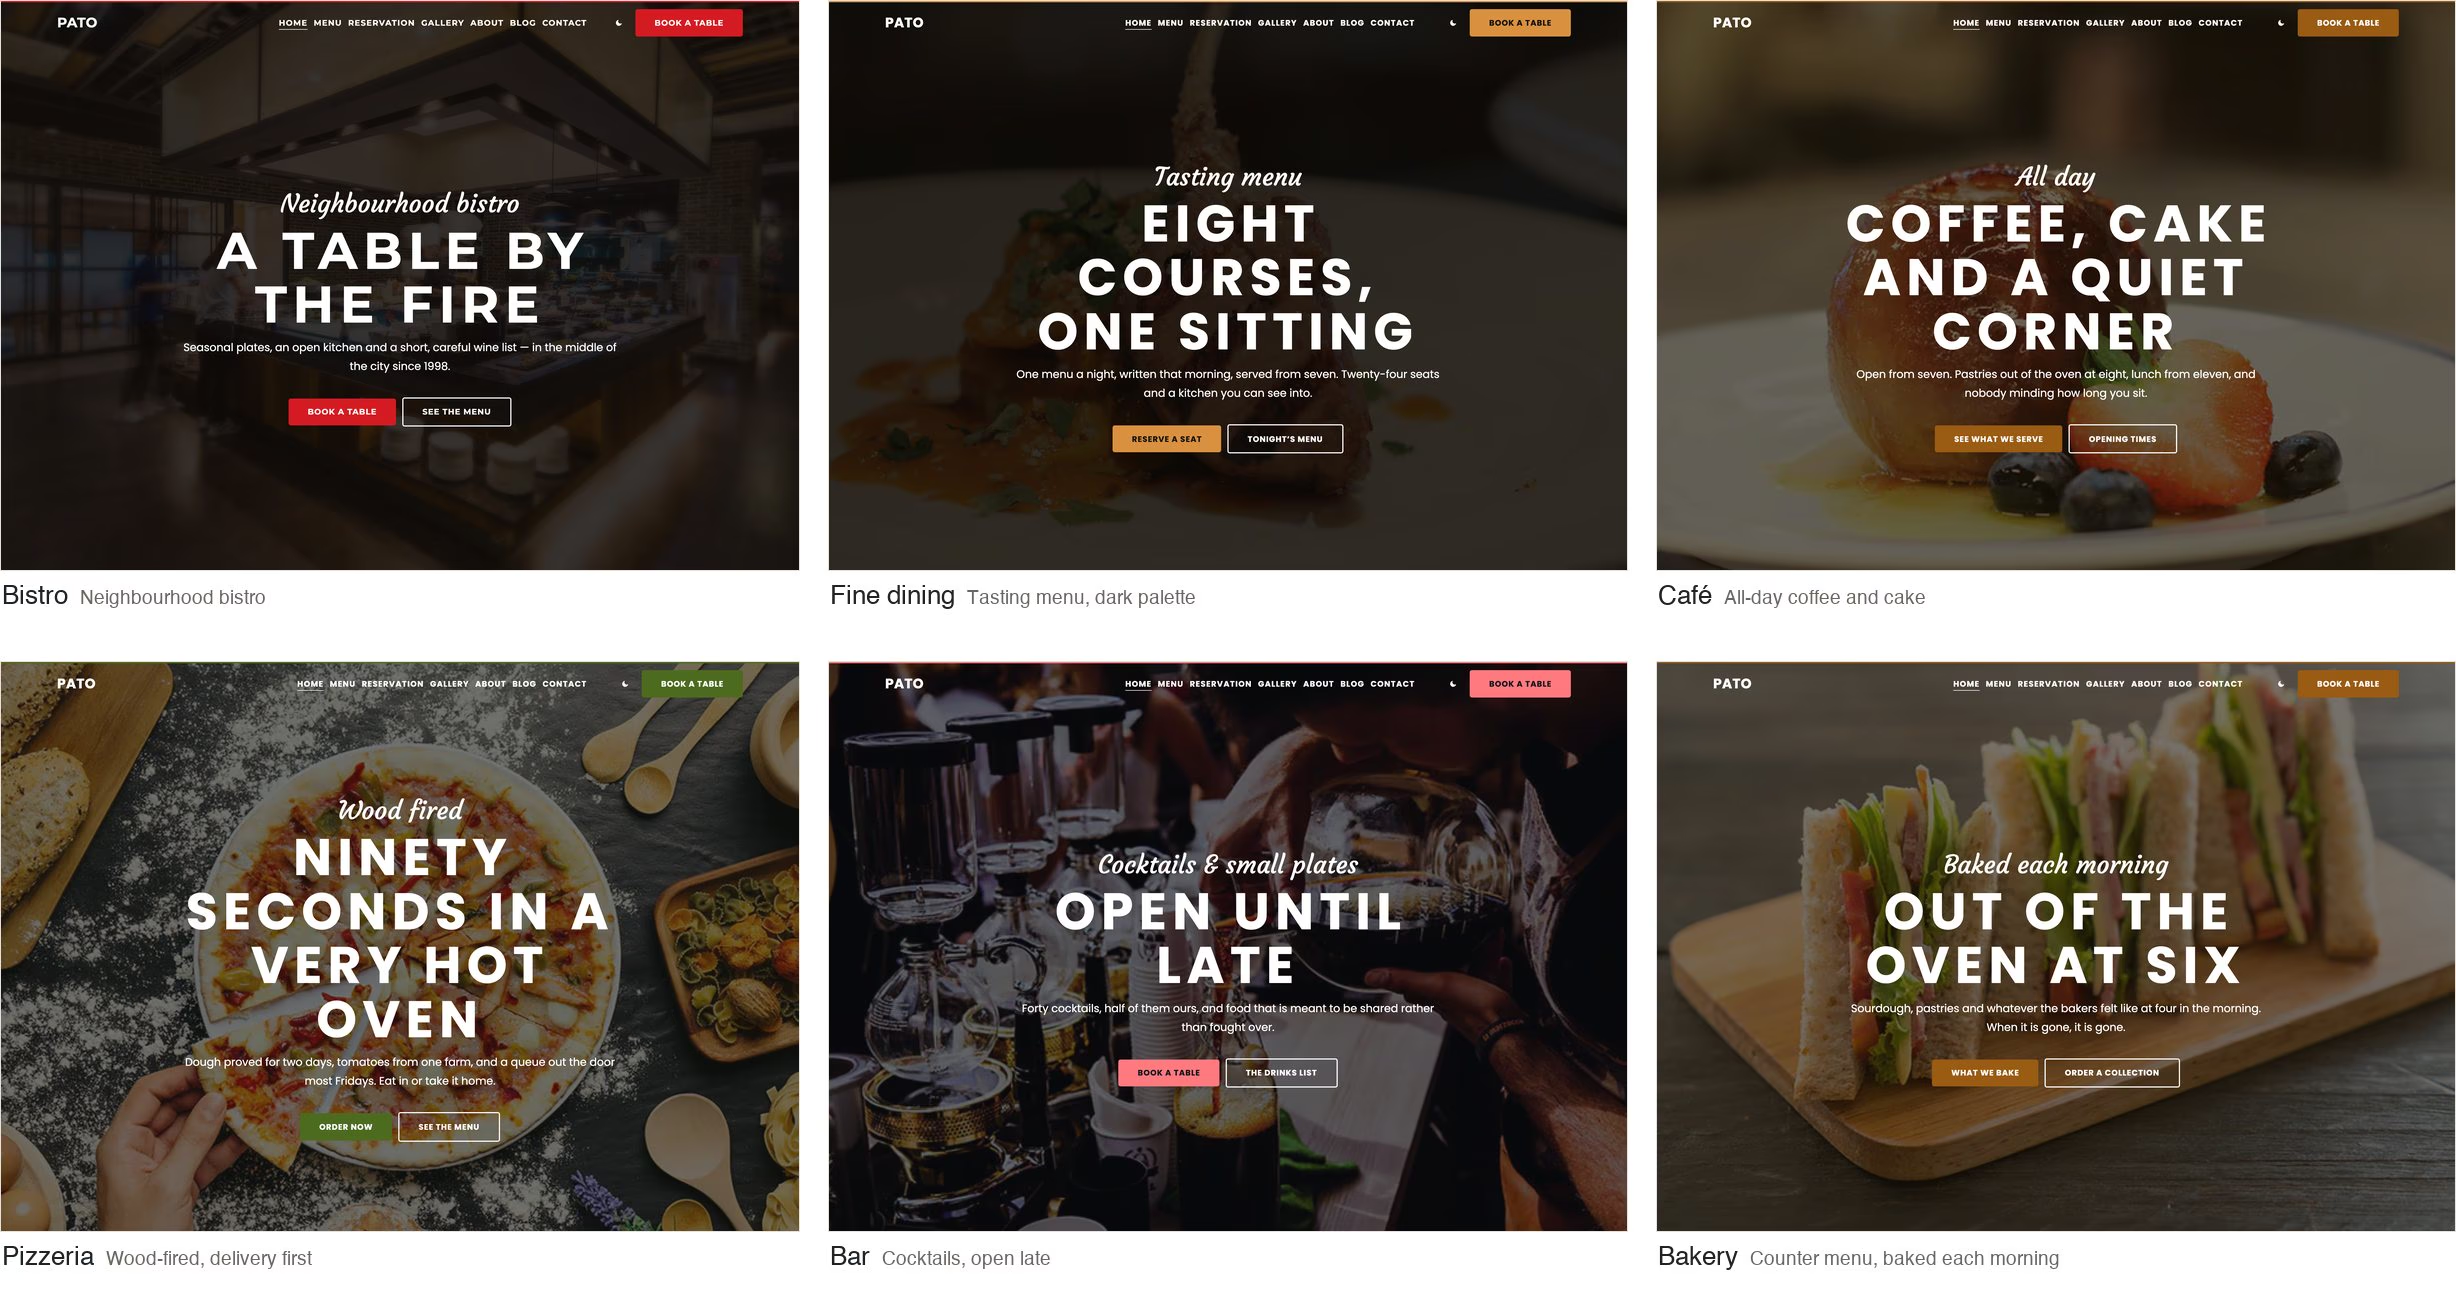
Pato comes with six complete front pages, each written for a different kind of place. They are not colour swaps: each has its own photographs, headline, dishes and prices, weekly offers and gallery, and its own colours and fonts.
| Starter | Written for | Colours | Fonts |
|---|---|---|---|
| Bistro | A neighbourhood restaurant: menu, reviews and a booking form | Ember | Montserrat & Poppins |
| Fine dining | One tasting menu, press quotes and private hire | Cellar (dark) | Montserrat throughout |
| Café | All-day coffee and cake, gift cards and opening times | Harvest | Poppins throughout |
| Pizzeria | Menu first, then delivery and collection | Olive | Poppins throughout |
| Bar | Drinks, events and late opening | Midnight (dark) | Montserrat & Poppins |
| Bakery | Counter menu, specials and gift cards | Harvest | Poppins throughout |
Import one
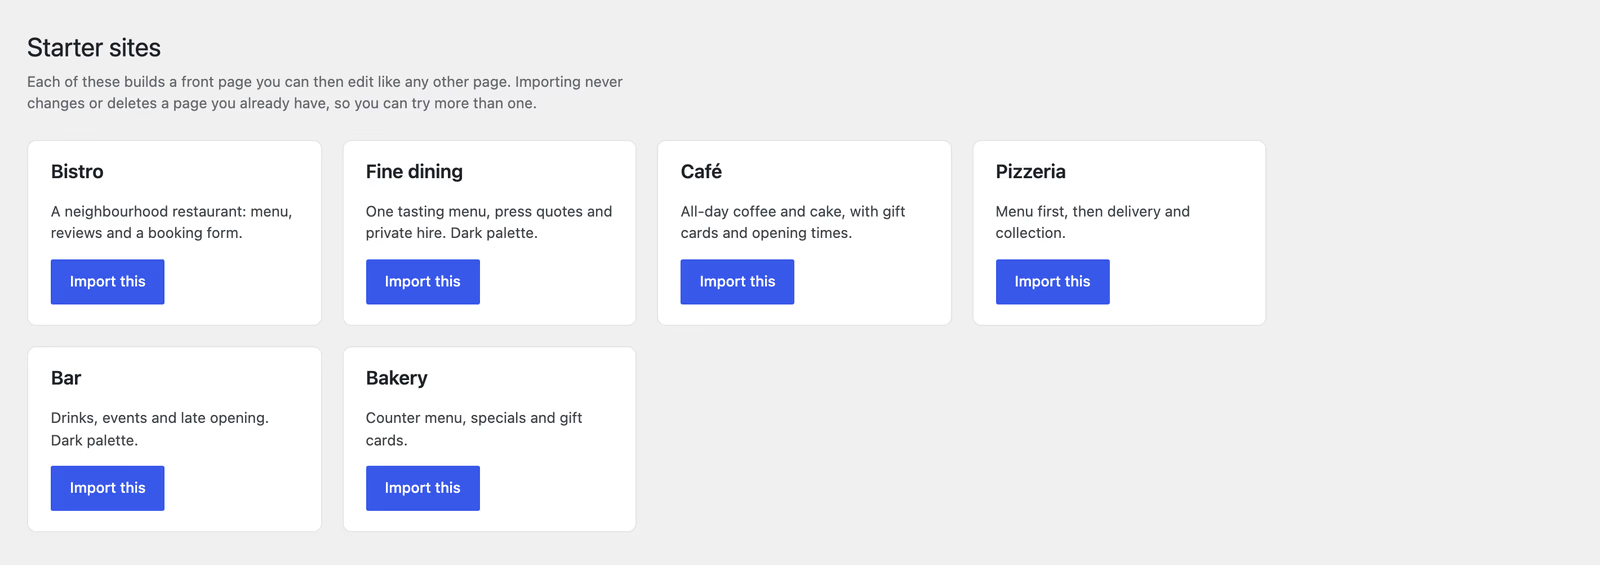
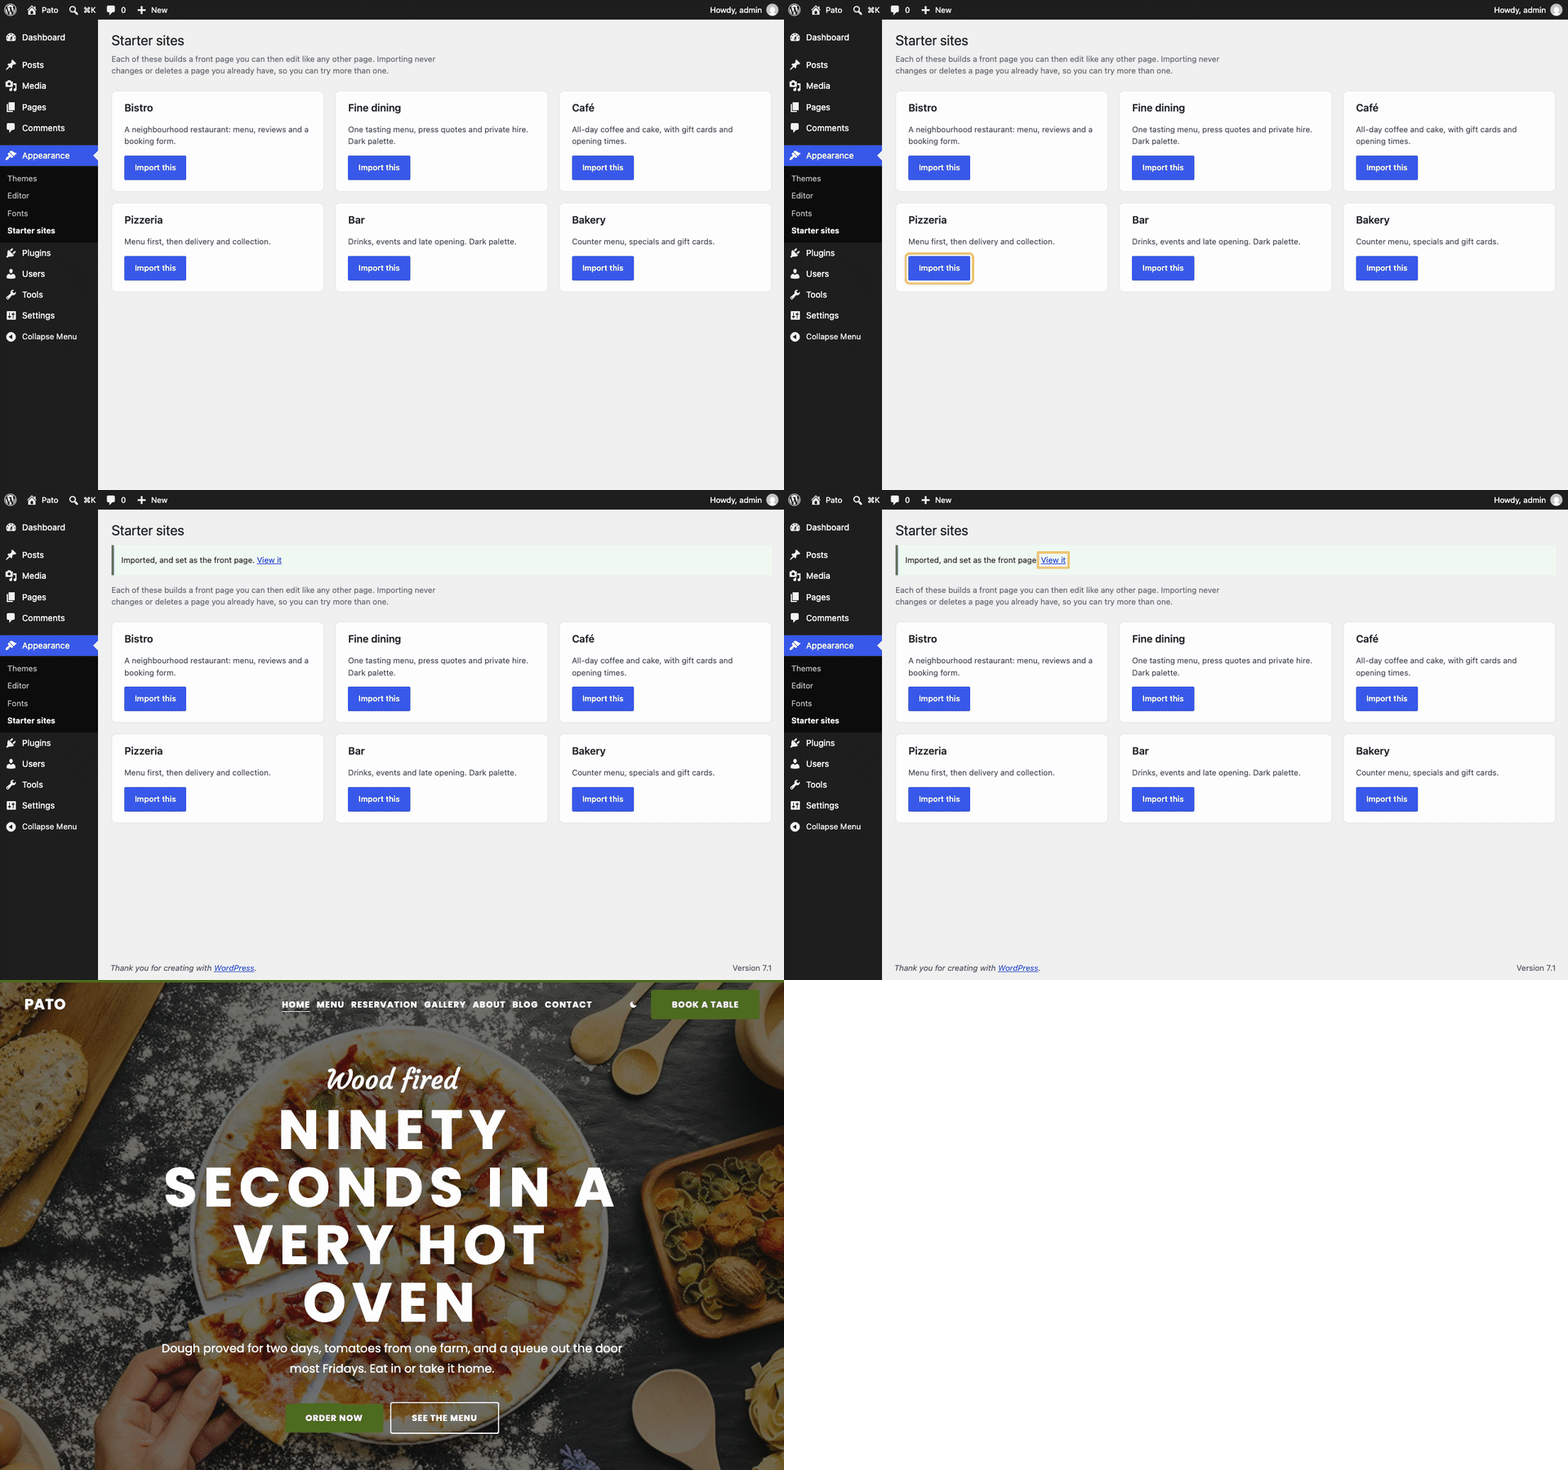
- Go to Appearance → Starter sites.
- Click Import this on the starter you want.
- When the screen reloads with “Imported, and set as the front page”, click View it.
What importing does, and what it does not
- It creates a new page named after the starter — “Pizzeria”, say — and makes it your front page.
- It applies the starter’s colours and fonts to the whole site. Anything else you changed in Styles is kept.
- It never edits or deletes a page you already have, and it does not touch your navigation menu.
- It changes only the front page. Your Menu, About, Gallery and other pages keep the content they had. After importing the Pizzeria starter, open the Menu page and put pizzas on it too — or delete that page and its menu link and let the front page’s menu do the job.
Try several. Each import adds one page, so you can import all six, compare them, and keep the one you like. Delete the others from Pages (hover over a title, then Trash). To go back to one you imported earlier, choose it under Settings → Reading → Homepage. The colours stay those of your most recent import; change them in Styles.
Everything a starter creates is ordinary content made of ordinary blocks. Nothing is locked, and nothing depends on the theme’s pattern files once it is imported.
Change dishes and prices
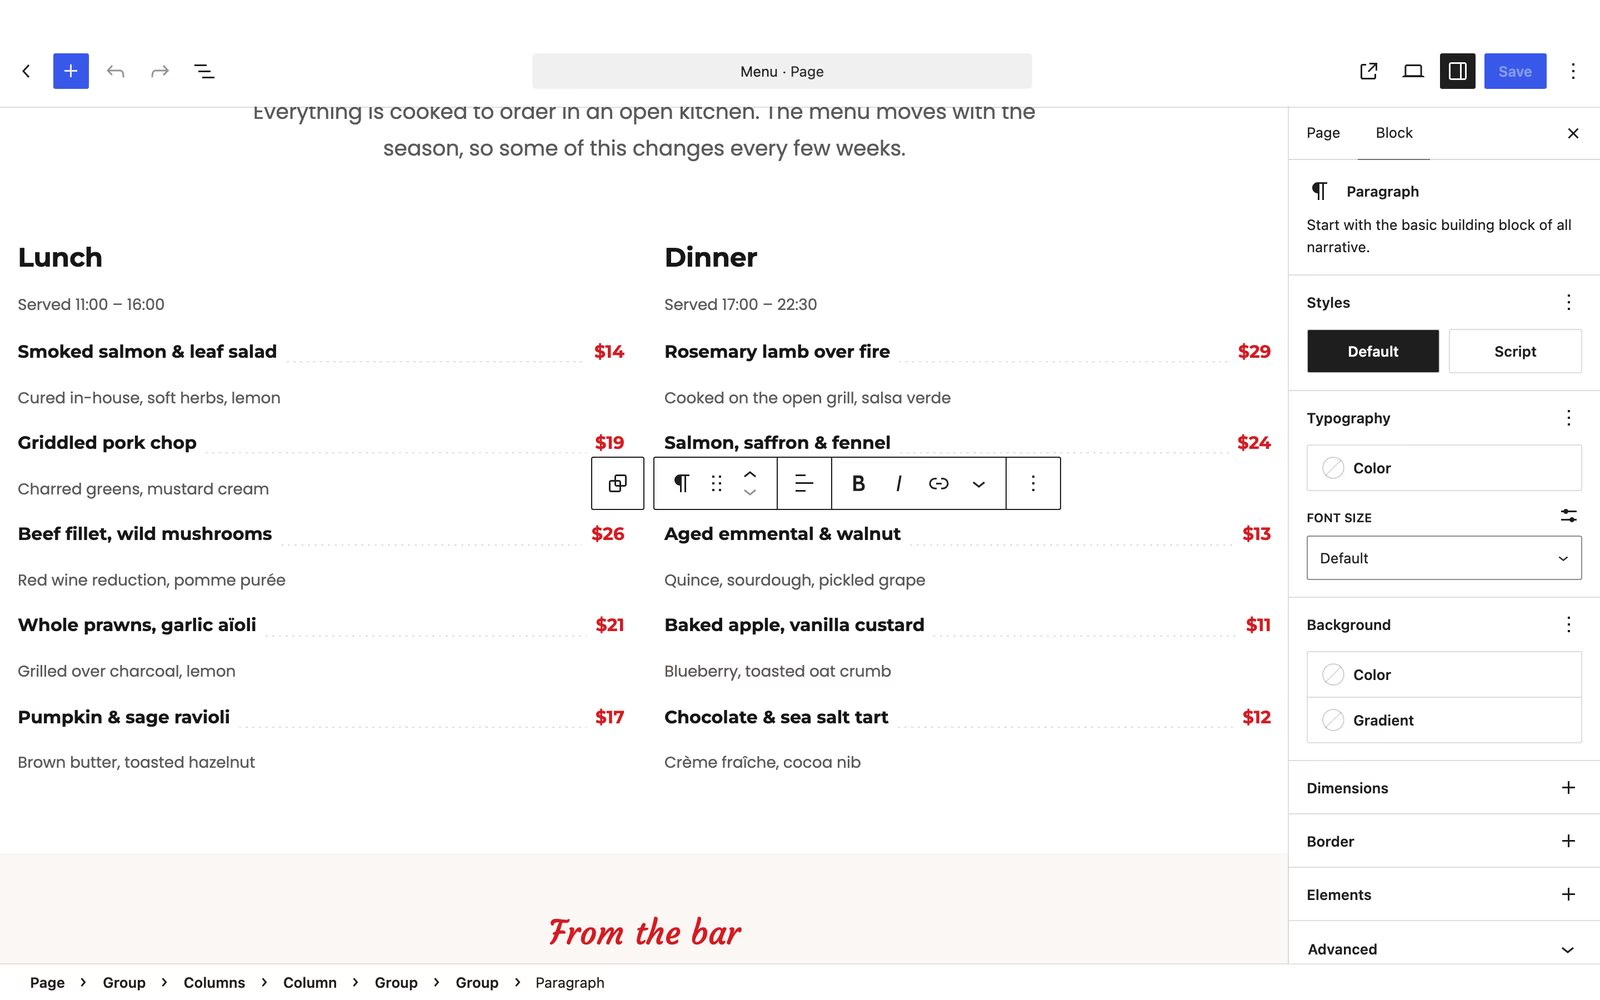
A menu row is two text blocks side by side — the dish and the price — with a dotted leader drawn between them, and an optional description underneath. There is no menu plugin and no special block to learn: you change a price the way you change any other text.
Change a price or a dish name
- Open the page. From the front of your site, click Edit Page in the black bar at the top; from the dashboard, go to Pages and click the page’s title. Menus are on your front page and on the page called Menu.
- Click the price. A small toolbar appears above it.
- Select the old text — double-click it, or press ⌘ A (Ctrl A on Windows), which selects only that price — and type the new one.
- Click Save in the top-right corner, or press ⌘ S / Ctrl S.
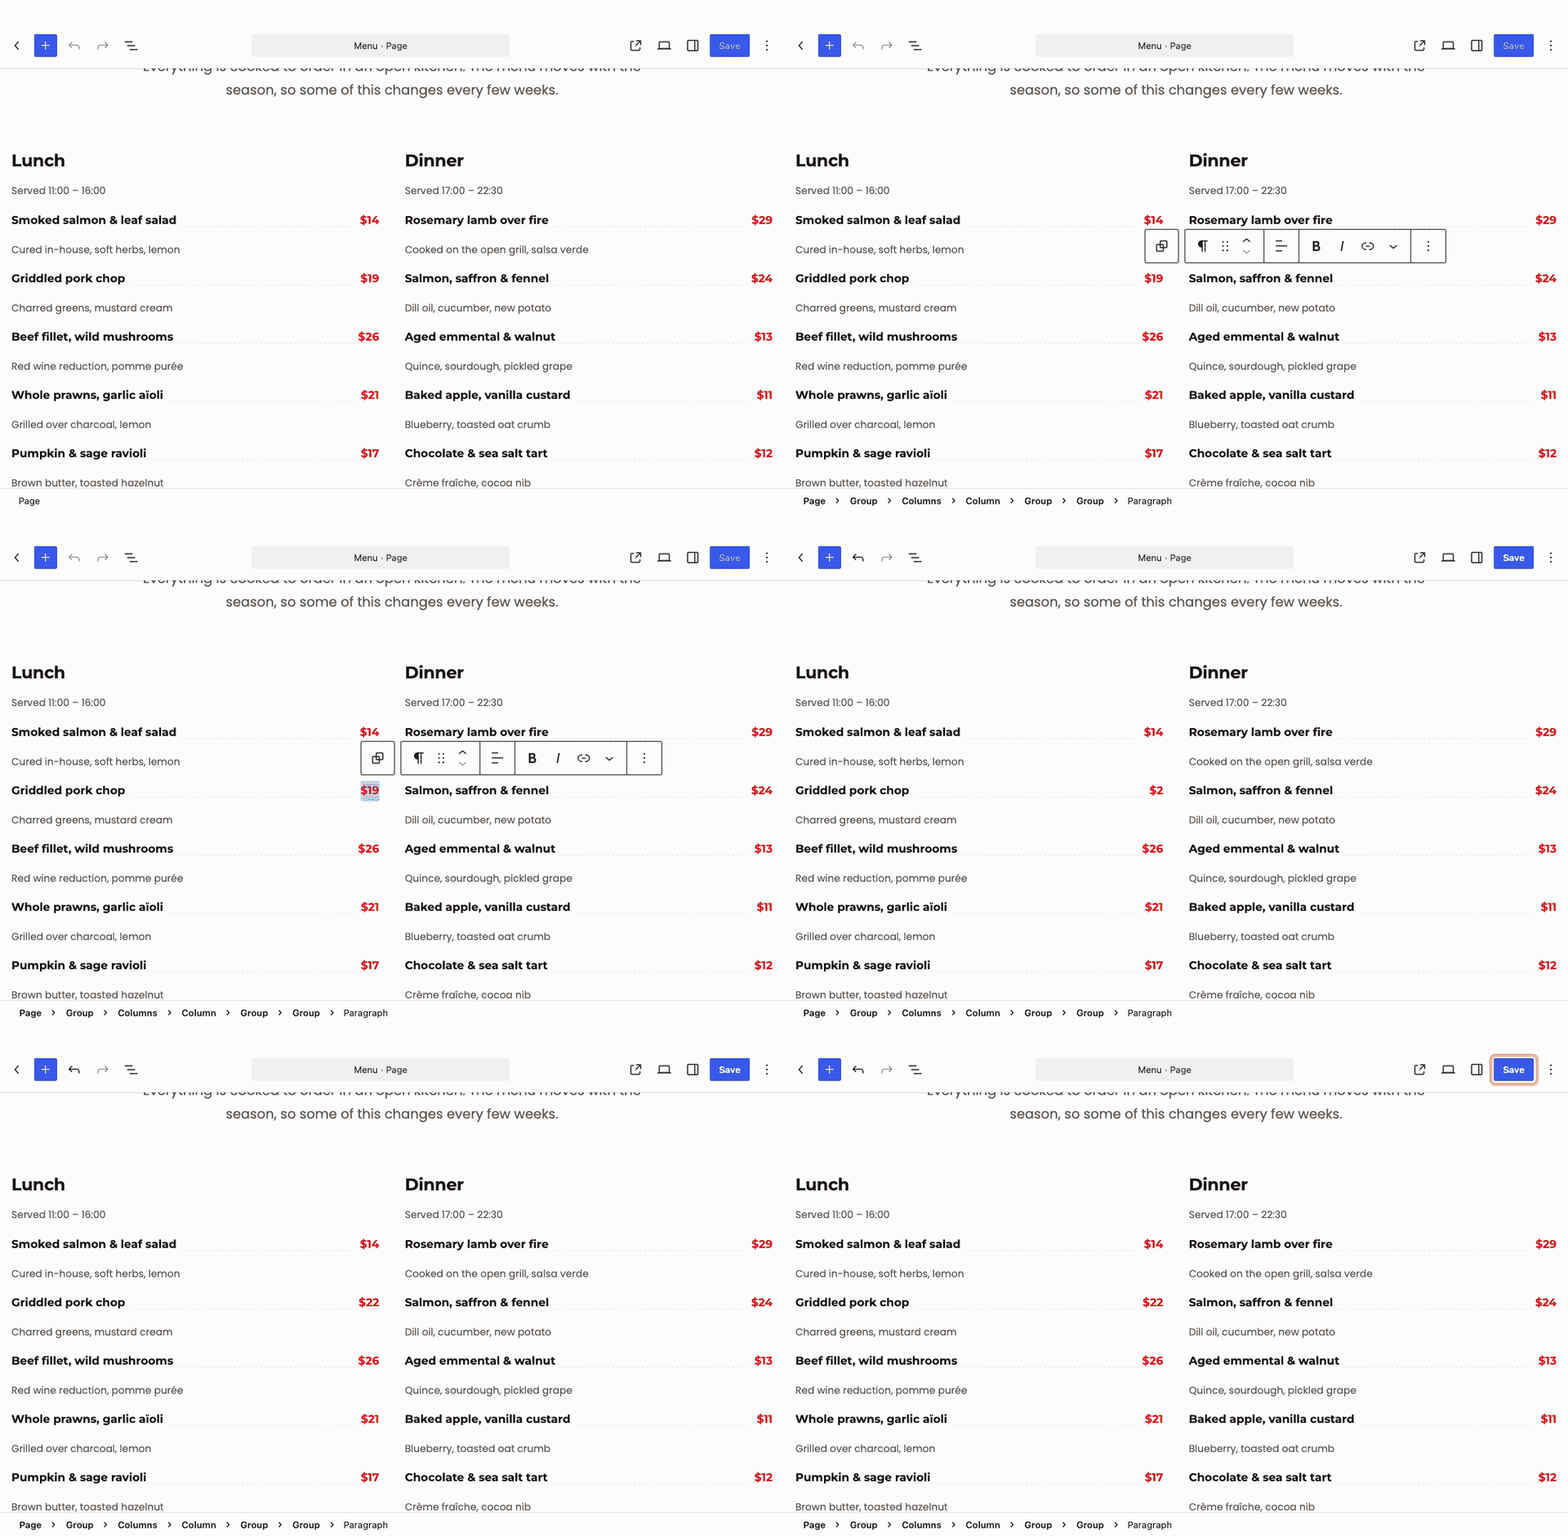
The dotted leader stretches or shrinks by itself, so a long dish name or a four-digit price never needs lining up. Type any currency the way you want it to read: €18, £18 or 18 kr.
Add a dish
Copy one that is already there: the copy keeps the row layout and the leader.
- Click the name of a dish next to where the new one should go.
- Press Select parent — the first button on the toolbar — so the whole row, name and price, is outlined.
- If the dish has a description, hold Shift and click the description too. It is a separate line under the row, so it has to be selected with it.
- Press ⇧ ⌘ D (Ctrl Shift D), or choose Duplicate from the toolbar’s ⋮ menu. The copy appears directly below.
- Type over the copy’s name, price and description, and save.
To remove a dish, select it the same way and press ⌃ ⌥ Z (Shift Alt Z), or choose Delete from the ⋮ menu. To move a dish, select it and use the up and down arrows on the toolbar. A description is optional — delete it if you do not want one.
Add a whole menu or course
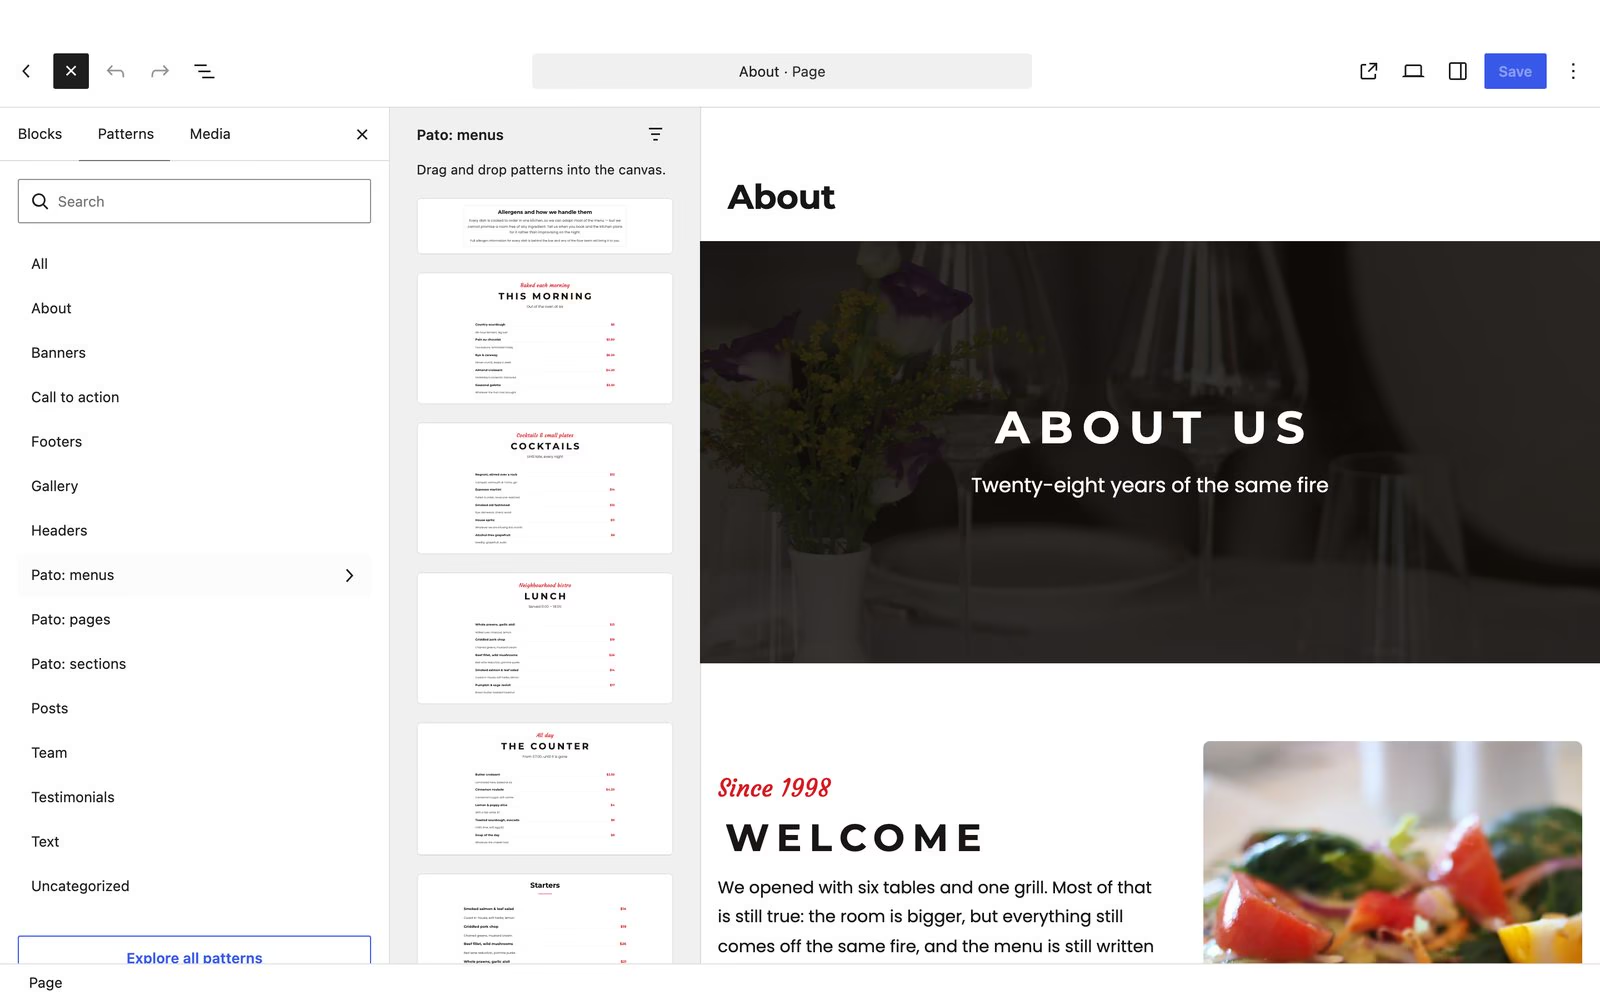
Pato has ready-made menu sections — lunch and dinner, a drinks list, a breakfast menu, a counter menu for a bakery or café, a pizzeria menu and more.
- Click where the new section should go, then click the blue + in the top-left corner.
- Open the Patterns tab and choose Pato: menus.
- Click a preview to insert it, or drag it into place, then type over the dishes.
Find your way around a page
Every page Pato builds is a stack of sections — an opening photograph, an introduction, the menu, a gallery, a booking panel — and every section is made of ordinary blocks.
List View: the outline of the page
Click Document Overview (the three stacked lines near the top left) or press ⌃ ⌥ O (Shift Alt O). A list of every block on the page opens on the left. Click an arrow to open a section, and click any row to select that block — the easy way to reach text inside a column or on top of a photograph.
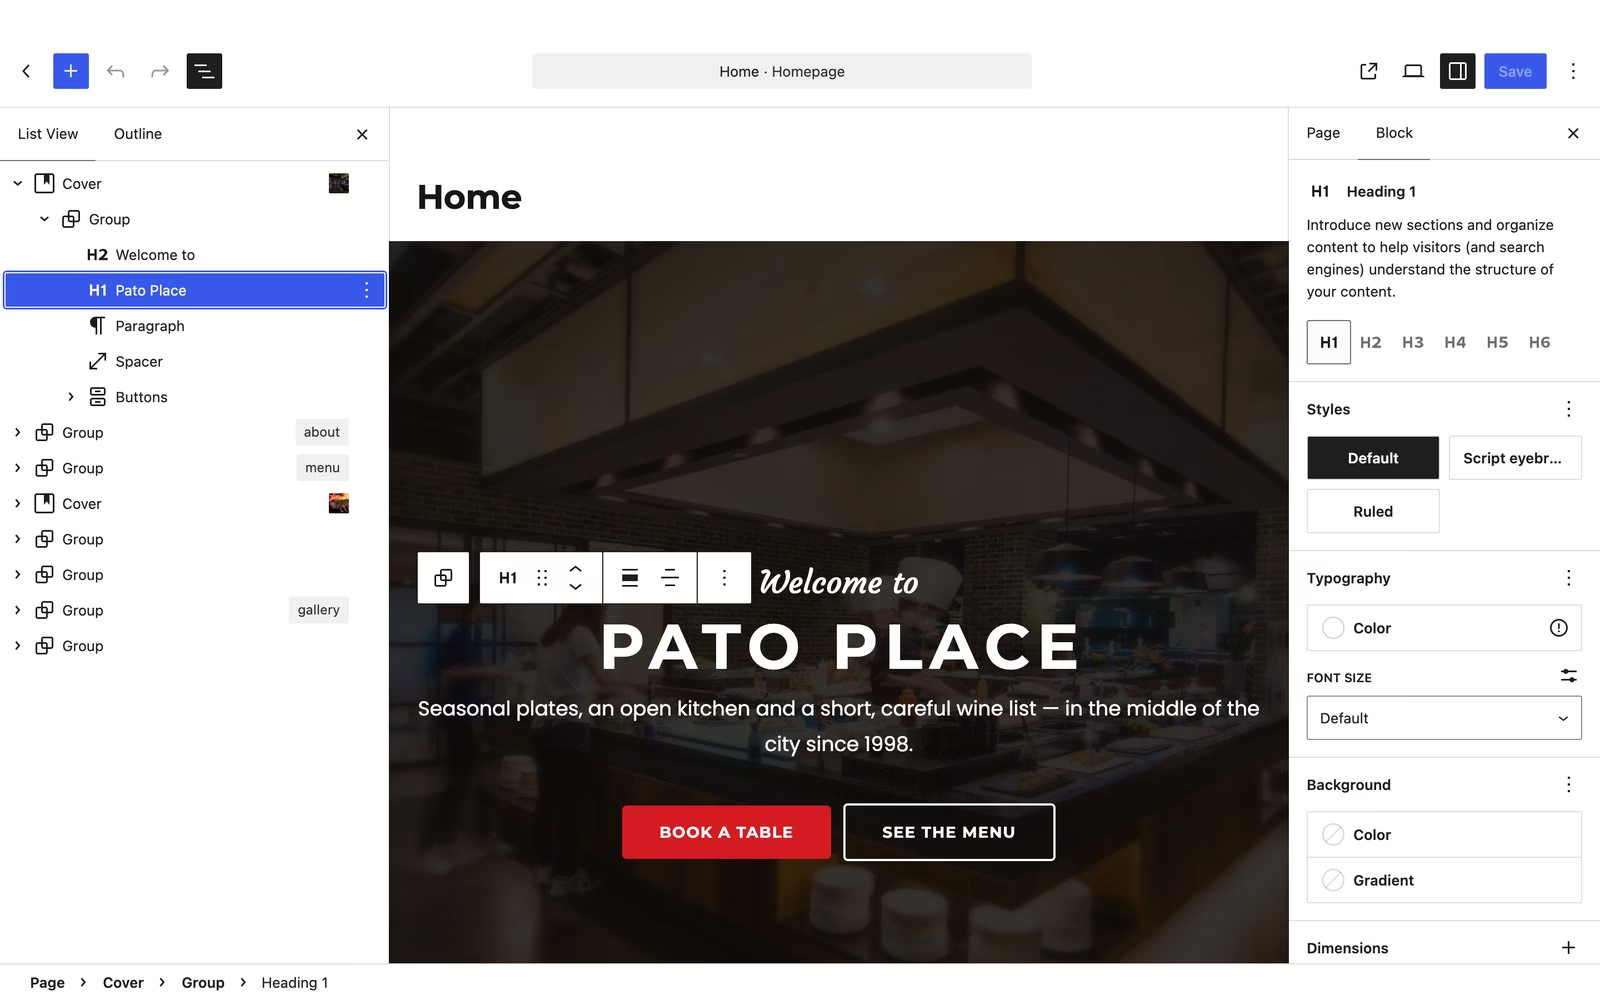
In List View you can drag a section up or down the page, and use each row’s ⋮ menu to duplicate, delete or hide it. Some sections carry a small label such as about, menu or gallery. That is the section’s anchor, set under Advanced → HTML anchor in the block settings: a button linking to #menu scrolls straight to it. Keep it if you move the section.
Add a section
Click the blue +, open Patterns, and browse Pato: sections — the chefs, takeaway, wine nights, private dining, questions and answers, the map, opening hours, a booking panel, the latest blog posts and more — or Pato: pages for a whole page at once. Insert it, then edit it like anything else.
Change a photograph
Click the photograph and choose Replace on the toolbar, then Open Media Library or Upload. On an opening banner (a Cover block), the Focal point picker in the sidebar decides which part of the photograph stays in view on a phone. Fill in Alternative text for every photograph: a short description for people who cannot see it, and for search engines.
Bookings: the reservation form
The booking form is built into Pato — no plugin — and is already on the Home, Reservation and Contact pages.
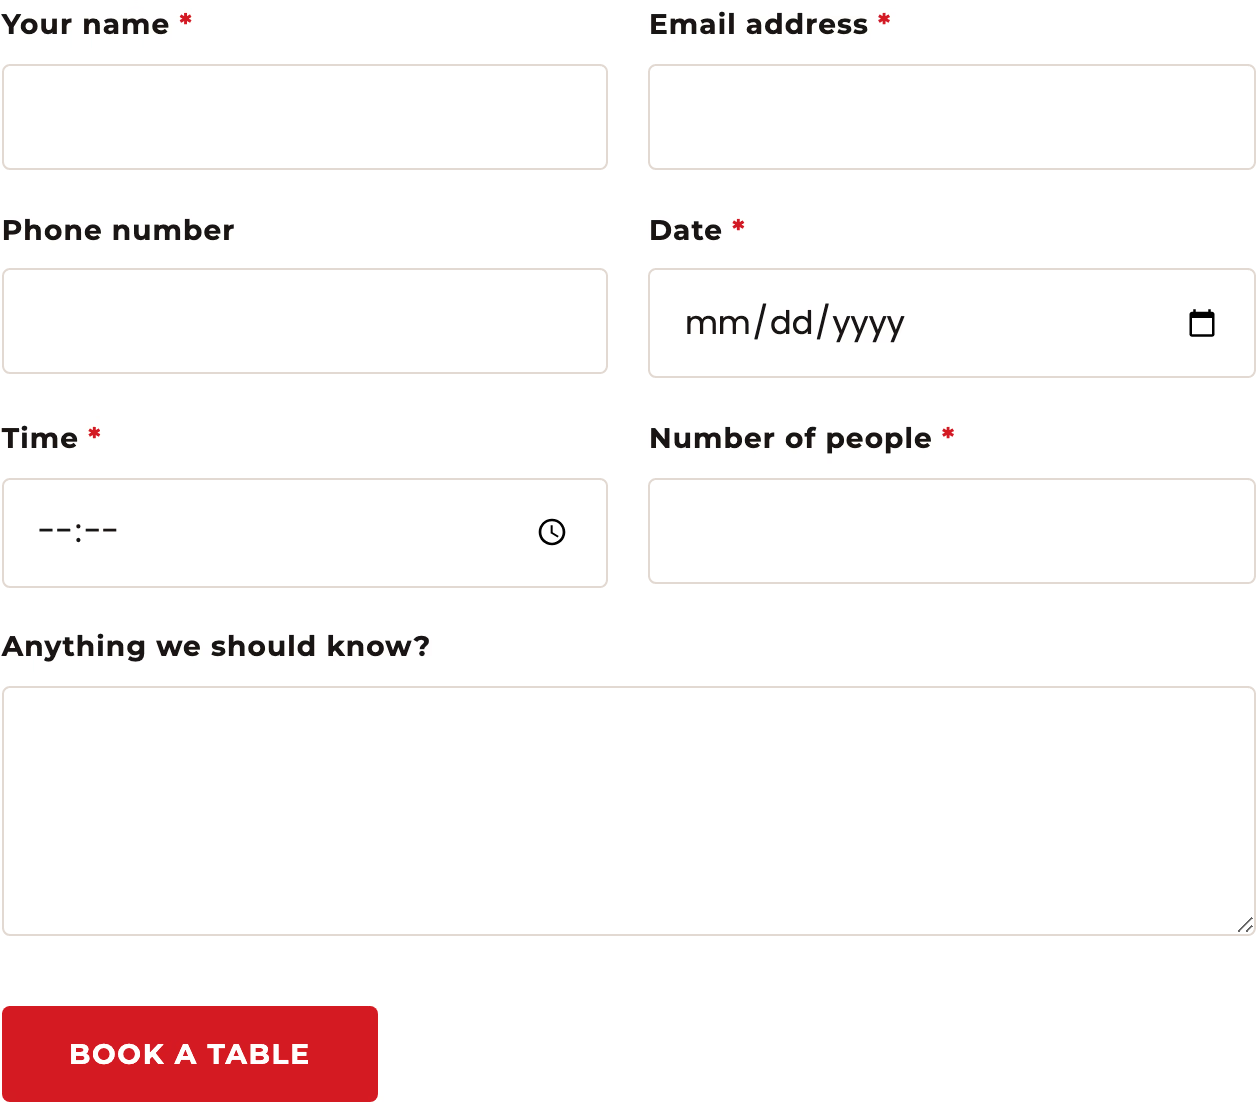
It asks for a name, email address, phone number, date, time, number of people and an optional message; name, email, date, time and number of people are required. It is checked on your server, protected from spam bots by a hidden trap field and a security token, and works with JavaScript turned off.
Where bookings go
Each booking is emailed to the Administration Email Address in Settings → General. Change that address and bookings follow it. The email’s reply-to is the guest, so pressing Reply in your inbox answers them.
Test it before you open
- Open your Reservation page in a private browser window, so you see it as a guest does.
- Fill in the form with your own email address and click Book a table.
- Check the page confirms the booking, then check the email arrives at the address in Settings → General — look in the spam folder too.
No email? Many hosts do not send WordPress email reliably. Install an SMTP plugin, such as FluentSMTP or WP Mail SMTP, and connect it to your email provider. Pato sends through WordPress’s own wp_mail(), so whatever fixes a missing password-reset email fixes bookings too.
Put the form on another page
Add a Shortcode block and type [pato_reservation_form]. The form is a shortcode on purpose: it is built fresh each time the page is shown, so it keeps working however the page around it is edited.
For developers: send bookings somewhere else
Bookings can go to a booking system, a CRM, a spreadsheet or a webhook instead of email. Add this to a child theme’s functions.php or a small plugin:
add_filter( 'pato_reservation_handlers', function ( $handled, $booking ) {
	// $booking has: name, email, phone, date, time, people, message
	my_crm_create_booking( $booking );
	return true; // handled, so Pato sends no email of its own
}, 10, 2 );
| Filter | Use it to |
|---|---|
pato_reservation_fields |
Add, remove, relabel or reorder the form’s fields |
pato_reservation_handlers |
Send the booking elsewhere; return true to skip the email |
pato_reservation_email_to |
Send bookings to an address other than the site administrator’s |
pato_reservation_email_subject |
Change the email’s subject line |
pato_reservation_email_body |
Change the email’s text |
Opening hours, address and map
Opening hours appear in two places: the Opening hours and address section on the Contact and Reservation pages (and in the Café, Pizzeria and Bakery starters), and the Opening times column of the footer, which shows on every page. Update both.
On a page
- Open the page and click the list of hours. It is a Custom HTML block, so you see its code.
- Change the text between the tags: each
<dt>holds the days and the<dd>after it holds the hours. Copy a<dt>…</dt><dd>…</dd>pair to add a line; delete one to remove it. - Click Preview on the block’s toolbar to check it, then Save.
<dt>Monday – Friday</dt><dd>11:00 – 23:00</dd>
<dt>Sunday</dt><dd>Closed</dd>
In the footer
Go to Appearance → Editor → Patterns, choose Footer under template parts, and edit the hours the same way. The footer’s phone number, email address and street address are in Custom HTML blocks too: change the visible text and the tel: and mailto: links beside it. The footer is shared, so one save updates every page.
The map
The map is an OpenStreetMap embed, so it needs no API key and no billing account. It is a Custom HTML block. To show your own address:
- Find your place on openstreetmap.org, right-click it and choose Show address. The latitude and longitude appear at the top of the panel on the left.
- Click the map block to see its code. In the
srcaddress, replace the two numbers aftermarker=with your latitude and longitude, keeping the%2Cbetween them. - The four numbers after
bbox=are the edges of the map: west, south, east, north. About 0.005 either side of your point gives a street-level view.
…embed.html?bbox=-74.0170%2C40.6990%2C-74.0070%2C40.7100&layer=mapnik&marker=40.704644%2C-74.011987
Prefer Google Maps? Delete the block, add a new Custom HTML block, and paste the code from Google Maps’ Share → Embed a map.
Logo, header, footer and navigation
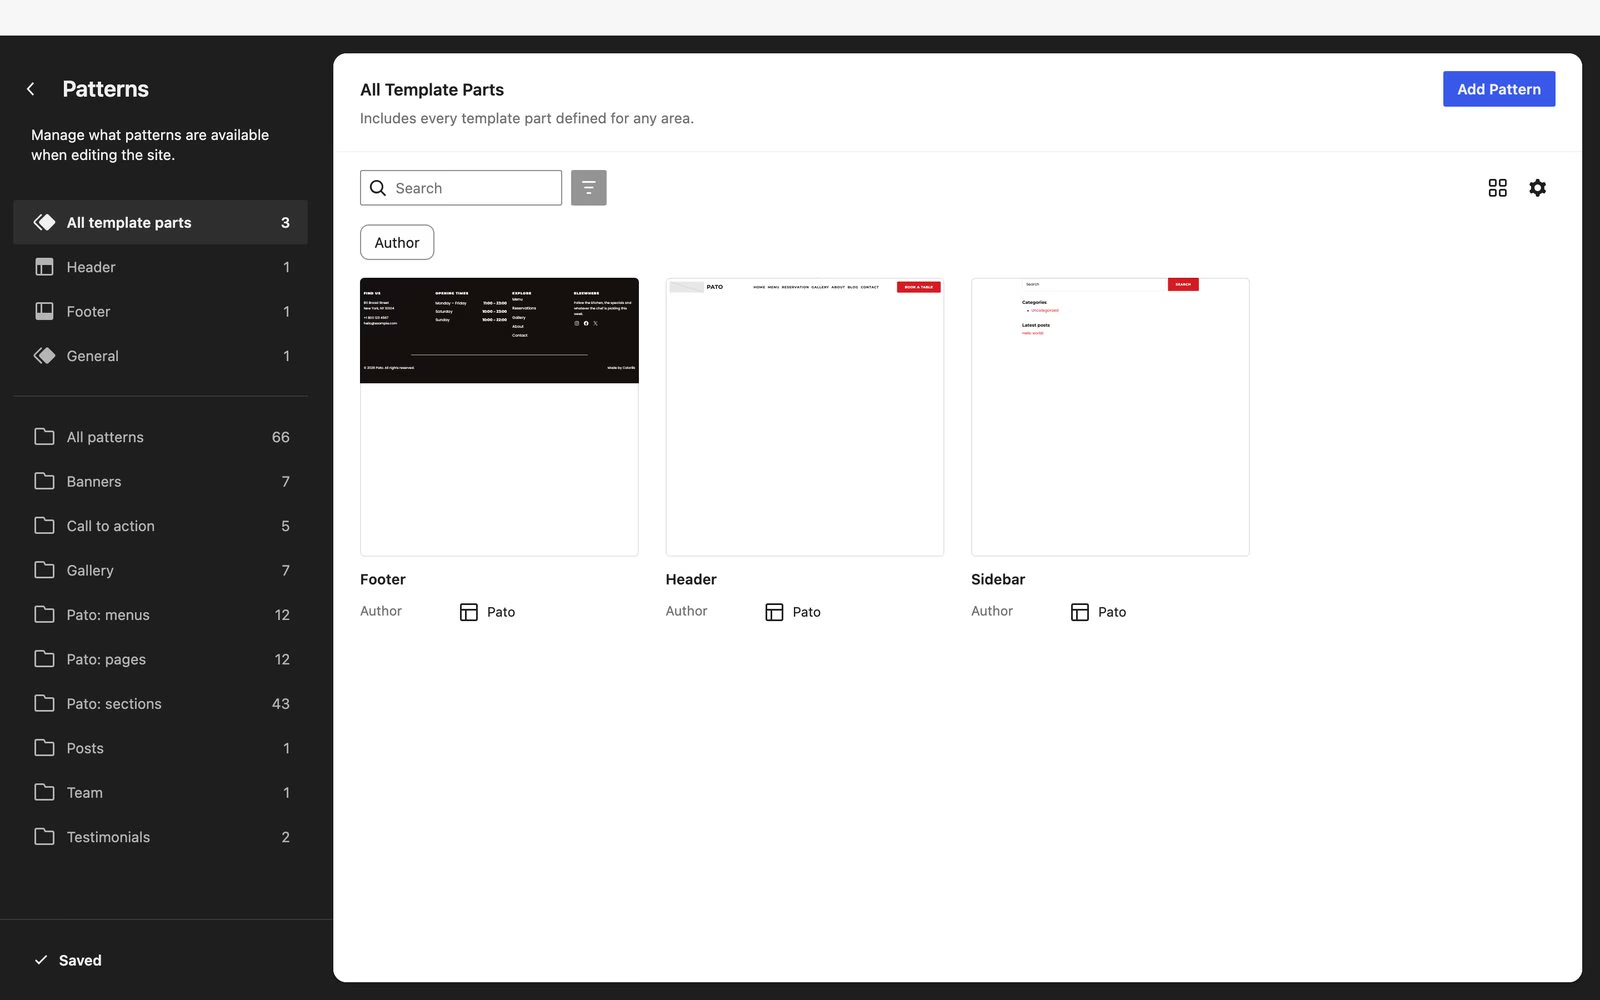
The header and footer are template parts: edit one once and every page follows.
Add your logo
- Go to Appearance → Editor → Patterns and choose Header.
- Click the grey logo placeholder beside the site name, and upload your logo or pick it from the Media Library.
- Drag the handle on the logo’s corner to resize it, then click Save.

The name beside the logo is your Site Title from Settings → General. If your logo already spells out the name, select the title in the header and delete it. Until you add a logo, the placeholder shows only in the editor, never to visitors.
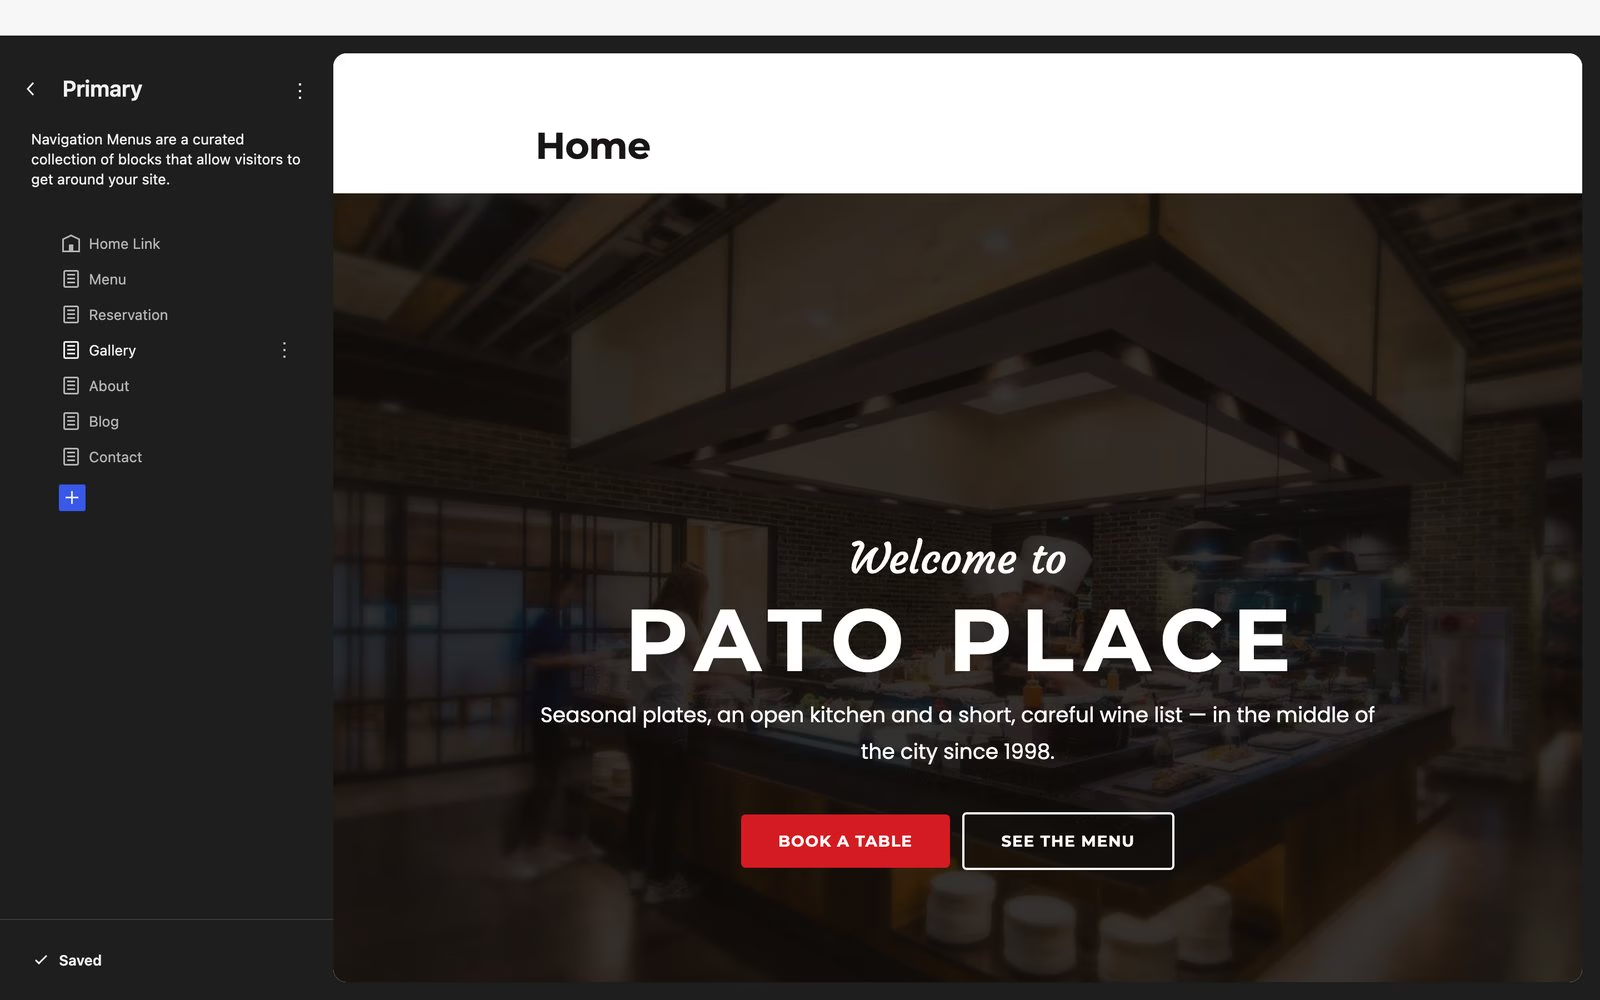
Change the navigation menu
Go to Appearance → Editor → Navigation and open the Primary menu.
- Reorder links with Move up and Move down in the ⋮ menu beside each link.
- Add a link with the + under the list: search for a page, or paste any web address.
- Remove a link from its ⋮ menu. The page itself is not deleted.
- Rename a link in the header: open Patterns → Header, click the link in the menu and type over it. The page’s own title does not change.
On a phone the menu folds into a single button that opens it full-screen. That happens by itself.
The two buttons on the right
The moon is the visitor’s dark mode switch. Book a table is an ordinary Button block: click it to change its words, and use the link button on its toolbar to point it somewhere else — a booking service, say, or a phone number written as tel:+441234567890.
Colours and fonts
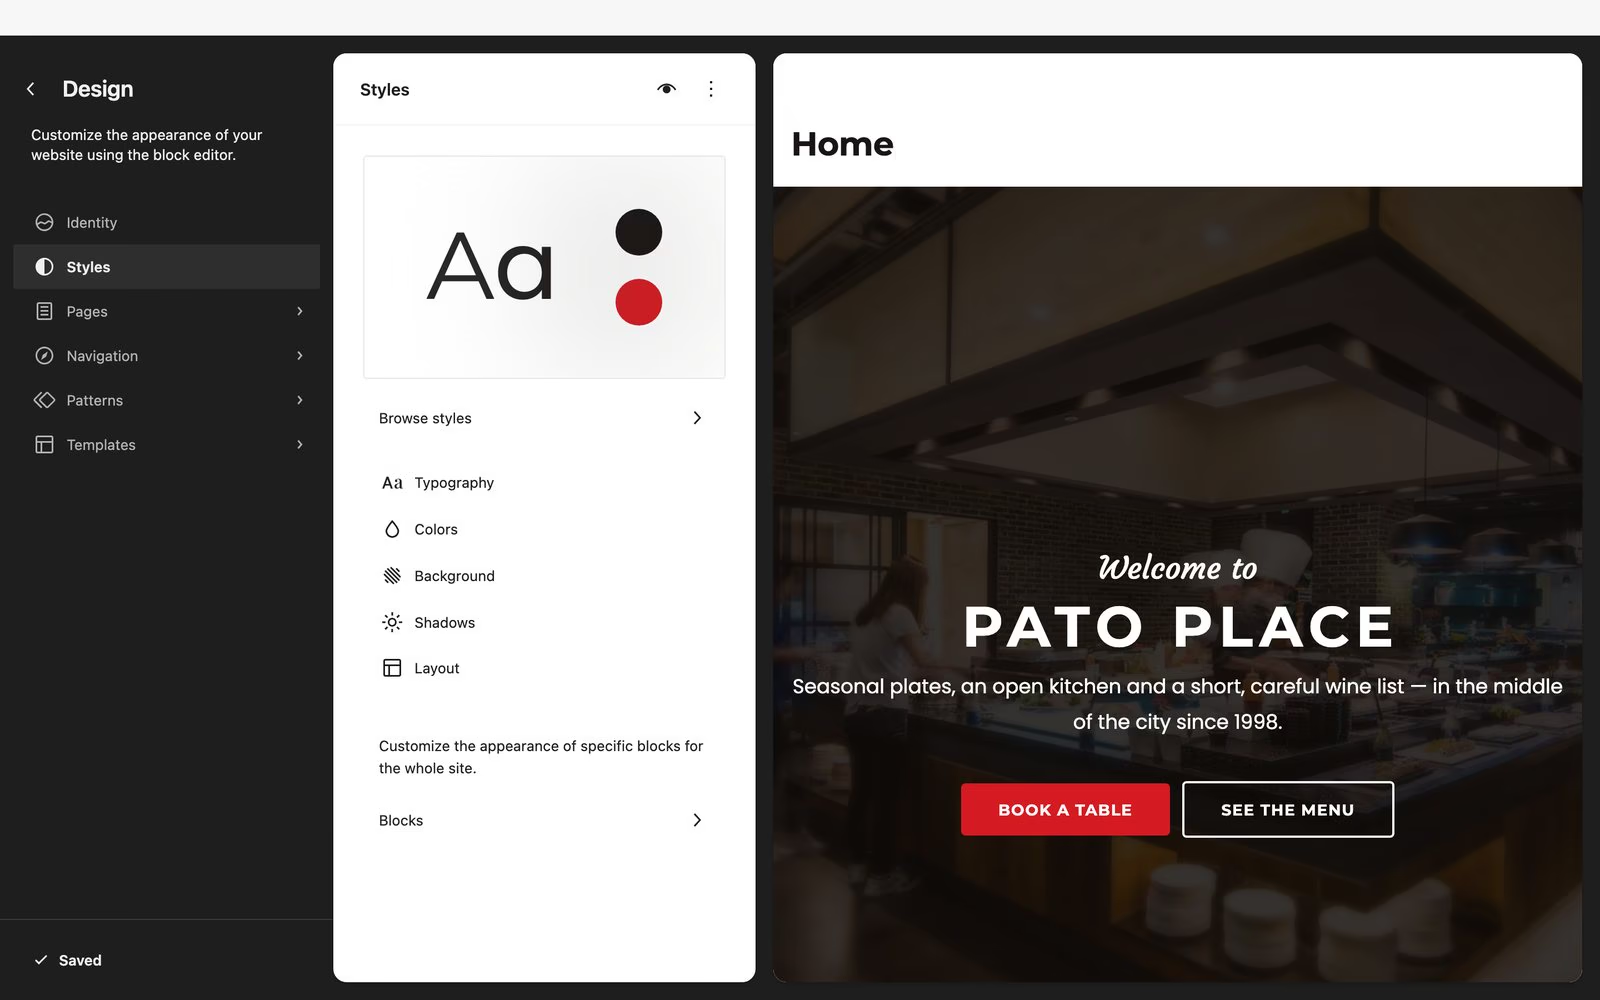
Colours and fonts are set once for the whole site in Appearance → Editor → Styles. Click Styles, then Browse styles.
Click a colour variation and the preview on the right changes immediately. Your live site does not change until you click Save, so try as many as you like.
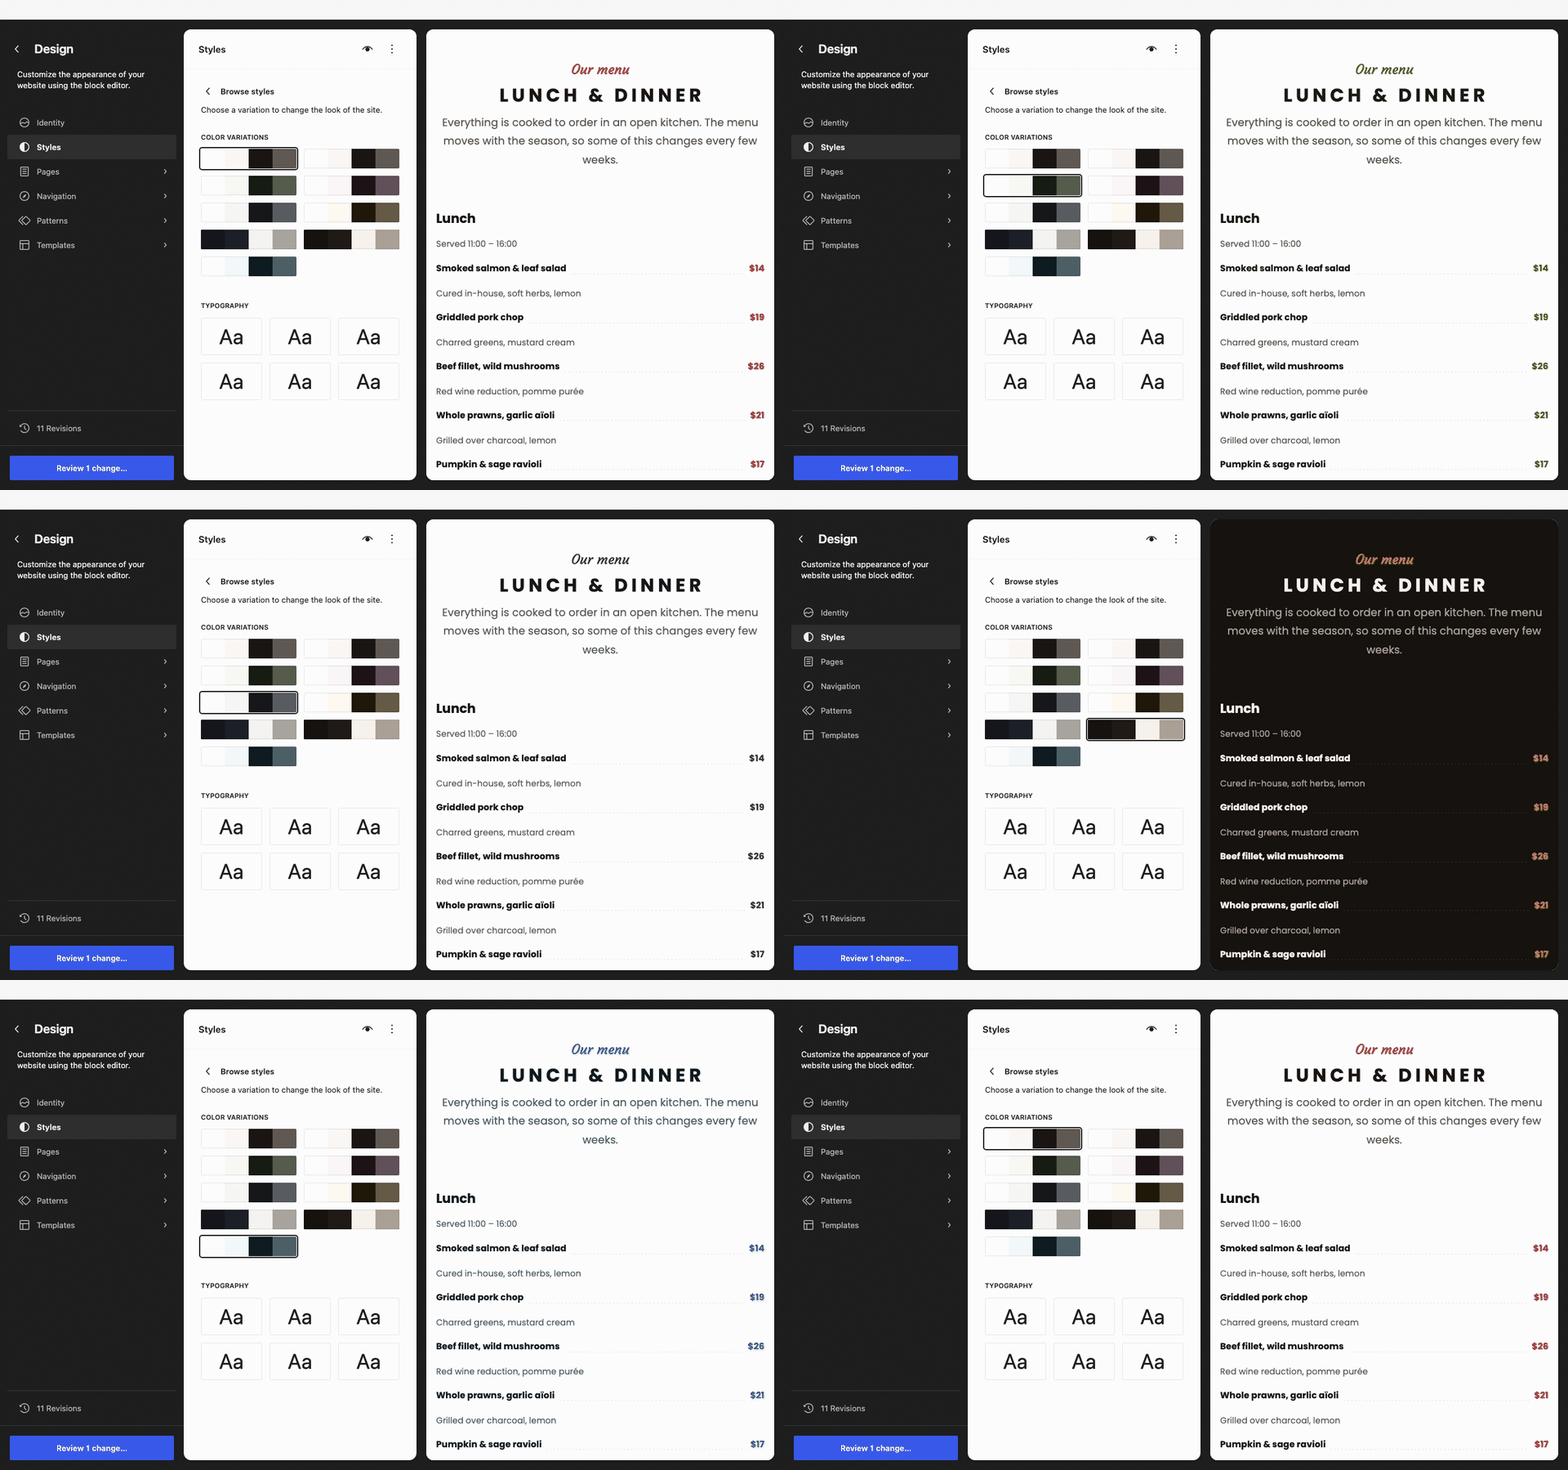
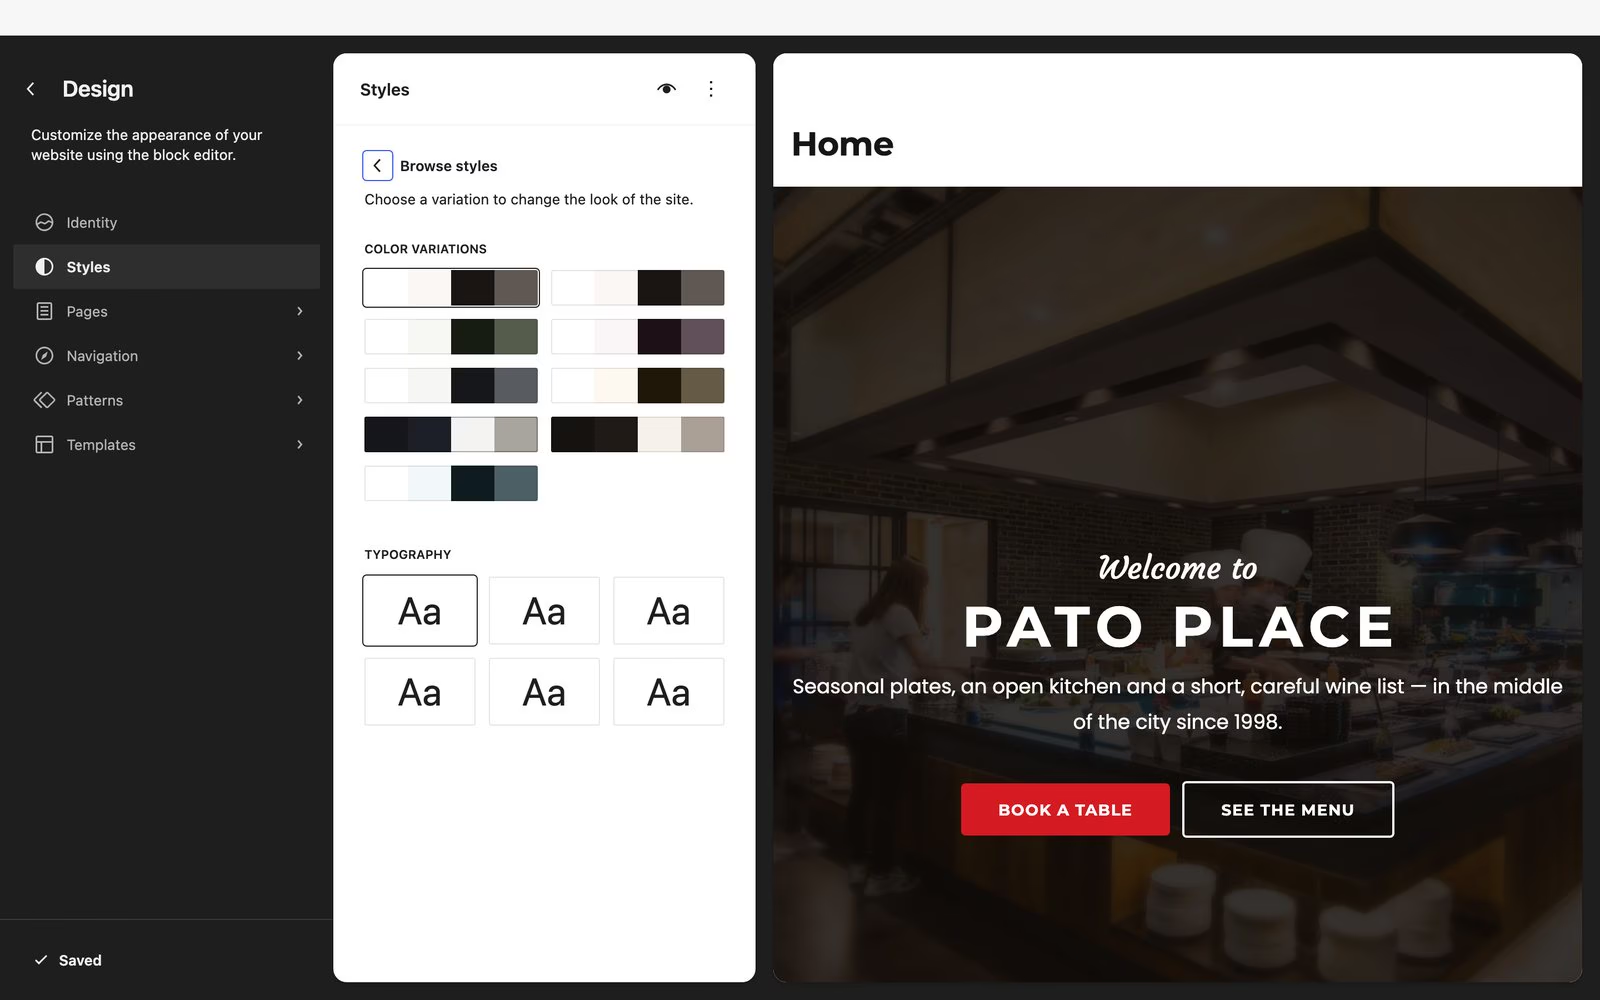
The eight palettes
| Palette | Background | Buttons and prices |
|---|---|---|
| Ember (the theme’s own colours) | Light | Tomato red |
| Olive | Light | Olive green |
| Vineyard | Light | Deep wine |
| Charcoal | Light | Charcoal grey |
| Harvest | Light | Amber brown |
| Seaside | Light | Teal |
| Midnight | Dark | Coral |
| Cellar | Dark | Warm amber |
Every palette was checked before it shipped: body text, secondary text, links and button labels all meet WCAG AA contrast on every background the design uses, in light mode and in dark mode.
The five font pairings
Pato uses Montserrat for headings, Poppins for text and Courgette for the handwritten lines above section titles, such as “Our menu”. All three are served from your own site, not from Google. The typography variations rearrange them:
- Montserrat & Poppins — the default: Montserrat headings, Poppins text.
- Poppins throughout — rounder and softer.
- Montserrat throughout — tighter and more formal.
- Poppins headings — Poppins headings over Montserrat text.
- No script — the handwritten lines use Montserrat instead of Courgette, for a plainer look.
Change one colour, or undo
To adjust a single colour, open Styles → Colors → Edit palette and click a swatch. Pato names its colours by job — Base is the page, Contrast the text, Primary the buttons and prices — so changing one swatch changes it everywhere it is used.
To undo, click Revisions at the bottom of the Design panel and go back to any earlier save, or open the ⋮ menu at the top of Styles and choose Reset styles to return to the theme’s own.
Dark mode
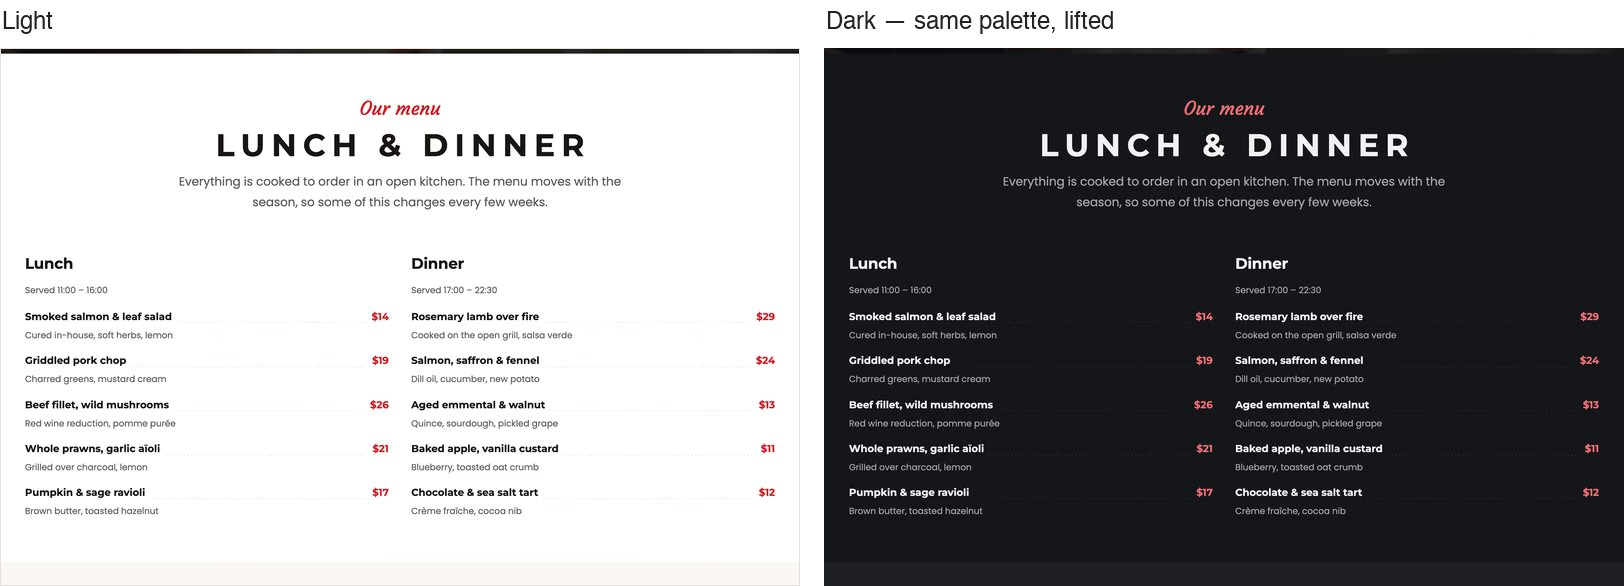
The moon in the header lets each visitor choose light or dark. It is separate from your palette: dark mode lifts the palette you chose instead of replacing it, so an Olive site stays olive and only the backgrounds and text change.
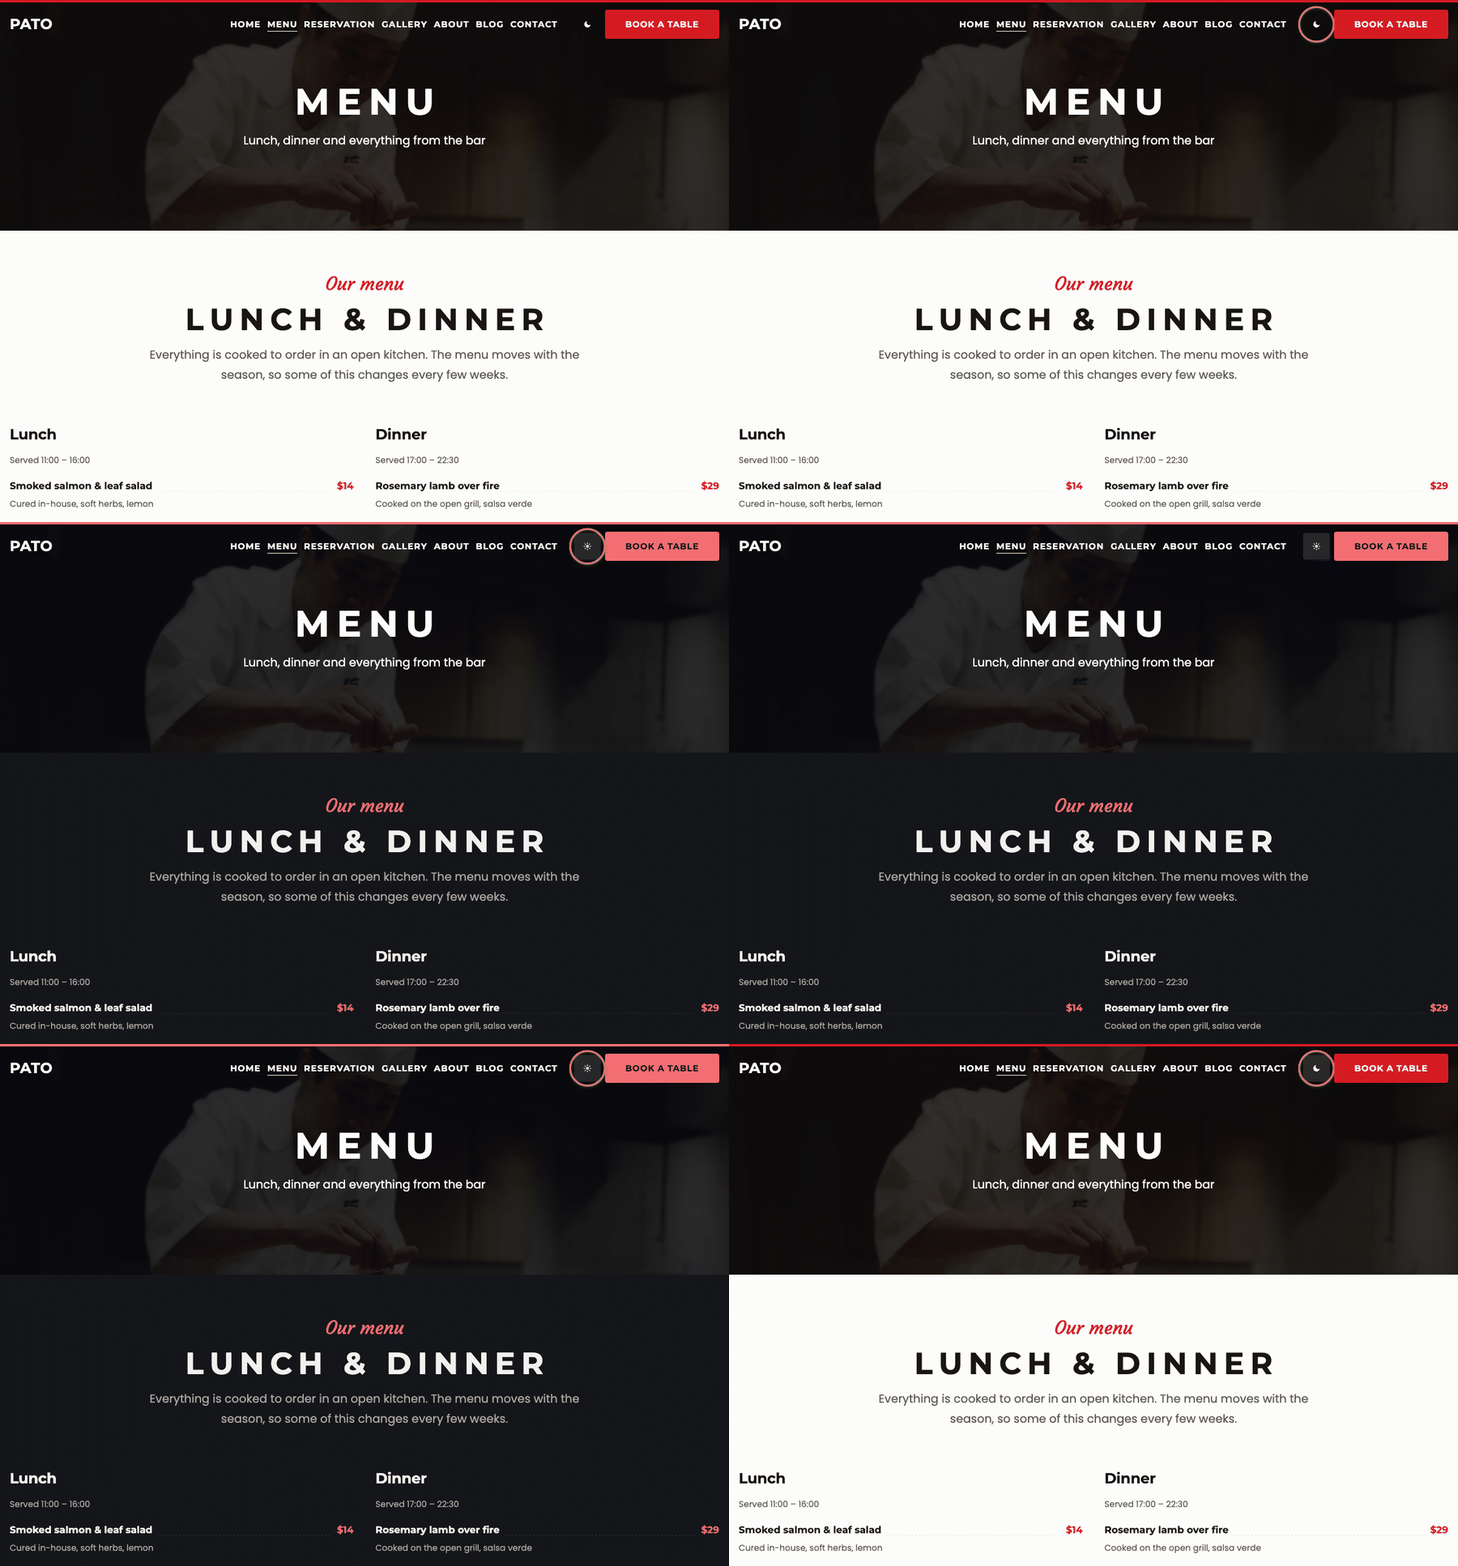
- Until a visitor clicks it, it follows their phone or computer’s own light or dark setting.
- Once they click, it remembers their choice on that device.
- It is applied before the page is drawn, so a phone in dark mode never flashes white.
To remove the switch, add add_filter( 'pato_enable_dark_mode', '__return_false' ); to a child theme or a small plugin. To move it, edit the header and drag the button: it is an ordinary Button block with the class pato-scheme-toggle, and any button with that class becomes the switch.
Page templates
A template decides what surrounds a page’s content: the header, a banner, a sidebar, the footer. Pato ships 14 templates. For a page you choose between three:
- Page — a photograph banner with the page’s title on it, above the content.
- Page without title — no title and no banner. Use it when the page opens with its own photograph; every page Pato builds uses it.
- Page with sidebar — the content, with search, categories and recent posts on the right.
To switch, open the page, click the Page tab in the sidebar, click the template’s name next to Template, and choose Change template.
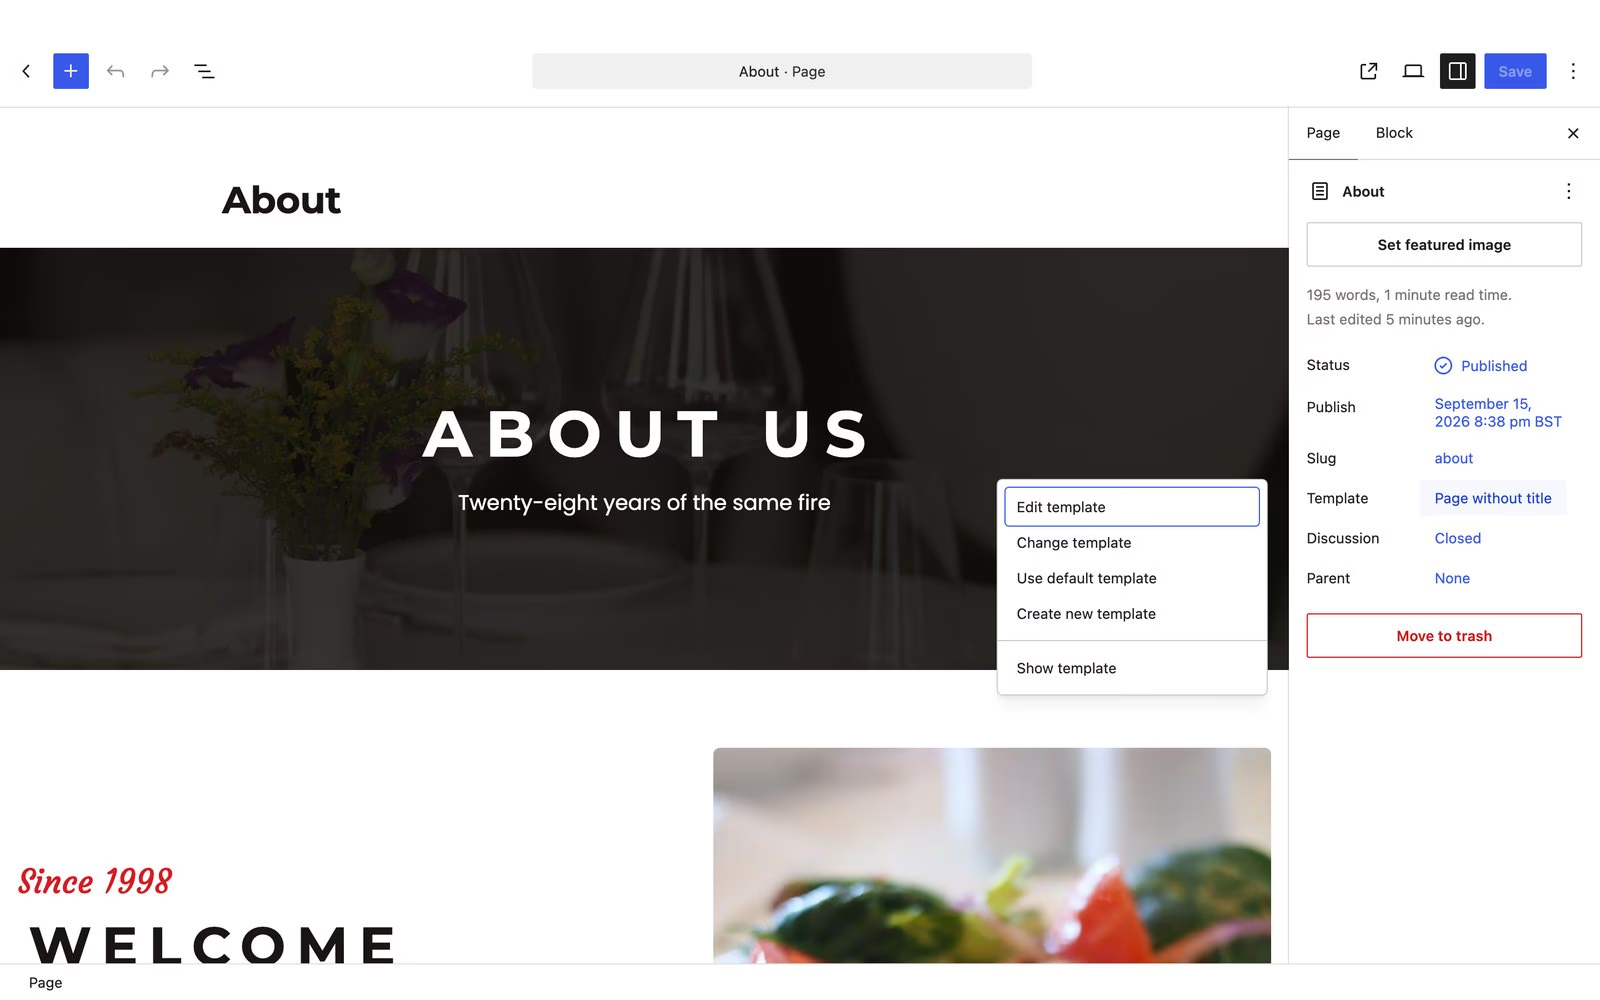
Posts can use Post with sidebar the same way. The blog, archives, categories, tags, author pages, search results and the 404 page each have their own designed template, which you can change in Appearance → Editor → Templates.
Selling gift cards and more
Install WooCommerce and Pato styles it — the shop, product pages, cart and checkout take the theme’s colours, fonts and buttons, so the shop does not look like a different website. There is nothing to configure.
That covers both the block-based shop WooCommerce builds on a block theme and the older shortcode pages, so it works whichever way your shop is set up. Gift cards, a cookbook, merchandise or collection orders are the usual reasons a restaurant wants one. Without WooCommerce, none of this styling is loaded.
Contact forms
Pato’s own booking form needs no plugin. For a separate contact form, install any of these and Pato styles it to match: Contact Form 7, WPForms, Gravity Forms, Fluent Forms, Forminator, Ninja Forms, Formidable Forms or HappyForms. Add the plugin’s block to the page and the form takes the theme’s fields, button and spacing.
Updates
Pato is not in the WordPress.org theme directory, so it checks updates.colorlib.com for new versions every 12 hours. A new version then appears in Dashboard → Updates and on Appearance → Themes, like any other theme, and updates with one click.
The check sends the theme’s version, your WordPress and PHP versions, your site’s language, whether it is a multisite, and a one-way hash of your site address. It sends no personal data and no site name, and the hash cannot be turned back into your address. To switch it off, add add_filter( 'pato_check_for_updates', '__return_false' ); — you will then not hear about new versions.
Updates change the theme, not what you wrote. Your pages are your content. The single deliberate exception is version 1.1.1, which repairs pages built by 1.0.0 and 1.1.0: in those, every spacer showed “This block contains unexpected or invalid content” in the editor. The repair puts back one missing character in each spacer’s settings the first time an administrator opens the dashboard, and changes nothing a visitor can see.
Keyboard shortcuts worth knowing
| To | Mac | Windows |
|---|---|---|
| Save | ⌘ S | Ctrl S |
| Undo / redo | ⌘ Z / ⇧ ⌘ Z | Ctrl Z / Ctrl Shift Z |
| Select the text in a block (press again for the whole page) | ⌘ A | Ctrl A |
| Duplicate the selected block | ⇧ ⌘ D | Ctrl Shift D |
| Delete the selected block | ⌃ ⌥ Z | Shift Alt Z |
| Add a block before / after | ⌥ ⌘ T / ⌥ ⌘ Y | Ctrl Alt T / Ctrl Alt Y |
| Open List View | ⌃ ⌥ O | Shift Alt O |
| Show every shortcut | ⌃ ⌥ H | Shift Alt H |
| Add a block by name | Type / on an empty line, then the block’s name | |
If something is not where you expect
The editor says “This block contains unexpected or invalid content”. On a page built by Pato 1.0.0 or 1.1.0 that is a known fault in the spacers. Update to 1.1.1 or later and open the dashboard once; the pages are repaired automatically. Clicking Attempt recovery on each block also fixes it.
There is no Appearance → Starter sites. It appears only while Pato is the active theme, and only for users who can change the site’s design — administrators.
My front page shows the latest blog posts. Go to Settings → Reading, choose A static page, and pick Home (or your starter) as the homepage.
I imported a starter, but the Menu page still has the old dishes. Importing changes only the front page. Edit the Menu page too, or remove it.
My colours changed after importing a starter. Each starter brings its own palette and fonts. Pick different ones in Styles, or use Revisions there to go back.
Bookings are not arriving. Check the address in Settings → General and your spam folder, then test whether WordPress can send mail at all — most hosts need an SMTP plugin. If WordPress cannot send a password reset, it cannot send a booking.
The header is see-through on some pages and solid on others. That is deliberate: it sits over the photograph when a page opens with one, and becomes a solid bar when there is nothing to sit on, such as a blog post.
I edited a pattern file in the theme and my page did not change. Starter content is copied into your pages when it is created, so it is yours from then on. Edit the page, not the pattern.
I saved, but visitors still see the old version. A caching plugin or your host’s cache is serving a stored copy. Clear it from the plugin’s or host’s settings.
Still stuck?
Ask on the Colorlib support forum. Include your WordPress version, your PHP version, what you did, and what you expected to happen — a screenshot helps.