
Unioncorp documentation
Everything you need to take Unioncorp from install to a finished site for your firm, in the order you will need it, with a screenshot, animation or video for every step. Unioncorp is a free block theme for financial advisers, consultants and professional services.
Written for Unioncorp 1.1.2 on WordPress 7.1. Every setup screenshot is from a fresh install.
On this page
- The short version
- Install Unioncorp
- How the site is put together
- Change words, figures and photos
- Add a section or a whole page
- Change an icon
- Counters, animations and the video button
- The enquiry form
- Contact details, social links and map
- Logo, header, footer and navigation
- Colours and fonts
- Dark mode
- Page templates
- Block styles
- WooCommerce and form plugins
- Updates
- Keyboard shortcuts
- If something is not where you expect
The short version
If you read one section, read this one. Each step links to the full explanation further down.
- Install and activate Unioncorp. It builds your pages and your menu on its own. Install Unioncorp
- Put in your firm’s details: the phone number and hours in the header, the address and email in the footer and on the Contact page. Contact details and map
- Rewrite the words and figures, and replace the photographs. Change words, figures and photos
- Point every button somewhere. They all start out going nowhere. Buttons and links
- Add your logo. Logo, header, footer and navigation
- Send yourself a test enquiry and make sure the email arrives. The enquiry form
- Pick a palette and fonts if the blue is not yours. Colours and fonts
None of it needs code, a page builder or a plugin.
Install Unioncorp
Download the zip with the button at the top of this page. Do not unzip it — WordPress installs the zip file itself.
- In your dashboard, go to Appearance → Themes and click Add New Theme.
- Click Upload Theme at the top of the screen.
- Click Choose File, pick
unioncorp.zip, then click Install Now. - When WordPress reports the theme is installed, click Activate.
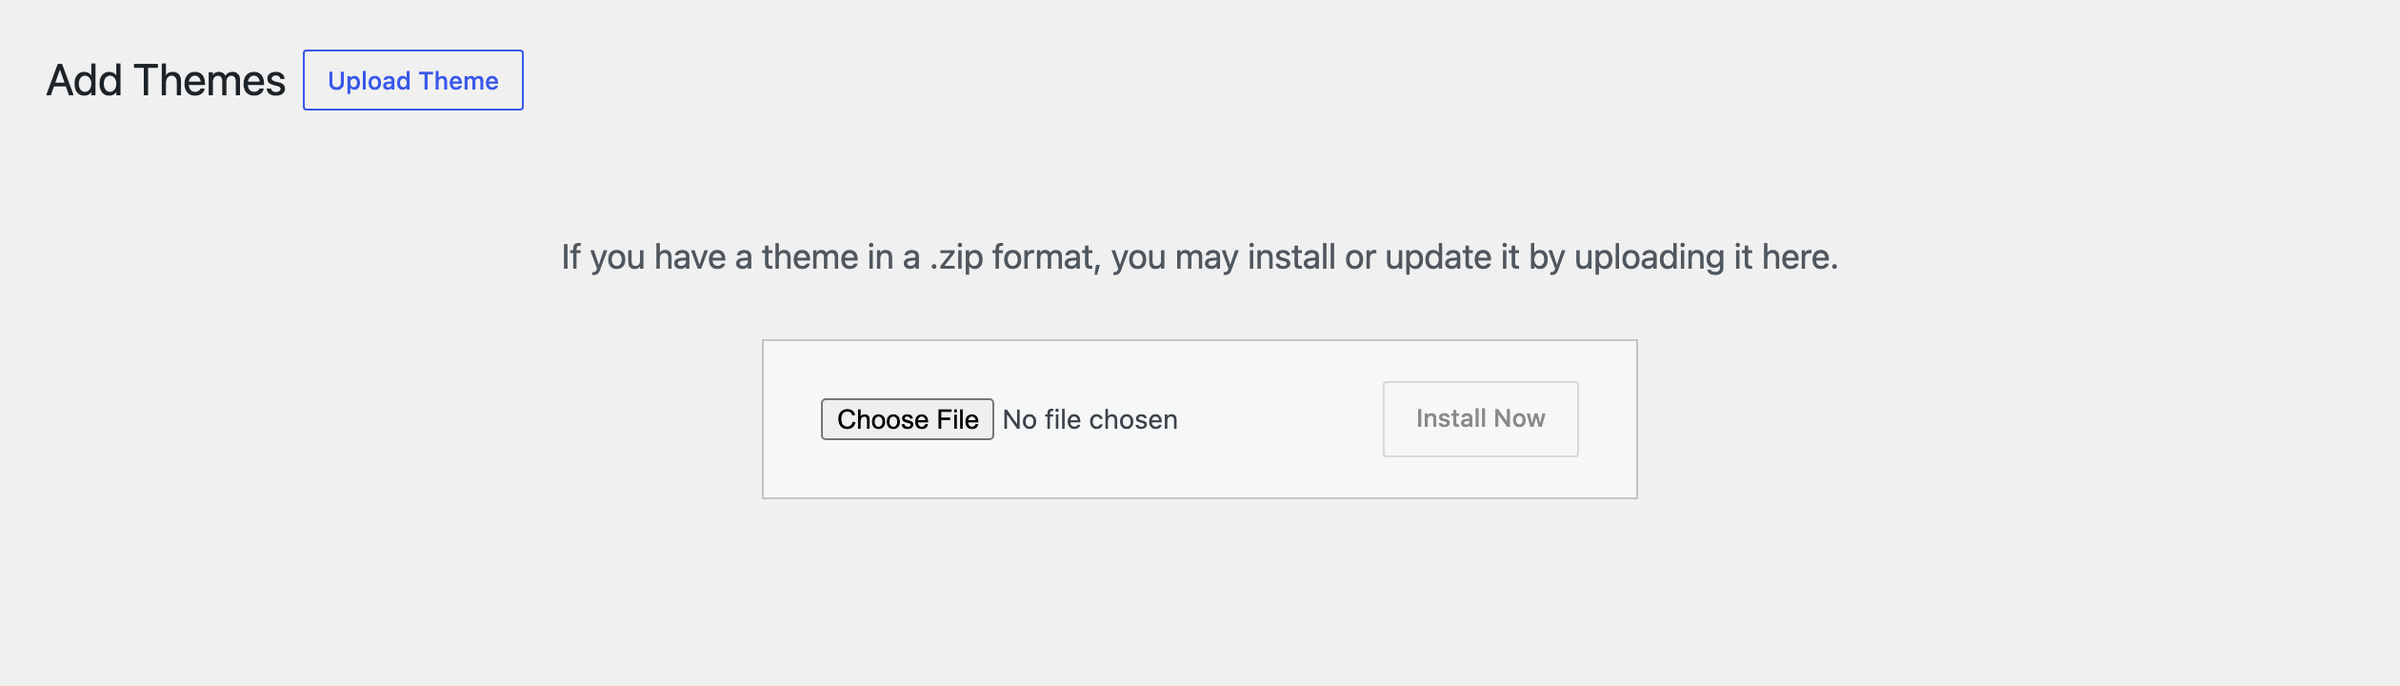
Unioncorp needs WordPress 6.6 or newer and PHP 7.4 or newer, and is tested up to WordPress 7.1. Tools → Site Health → Info shows both versions.
What happens when you activate it
On a site that has not been built yet, Unioncorp creates seven pages — Home, About, Services, Case studies, Pricing, Contact and Blog — and fills six of them with real content. It makes Home the front page and Blog the posts page, and builds a navigation menu that links them all.
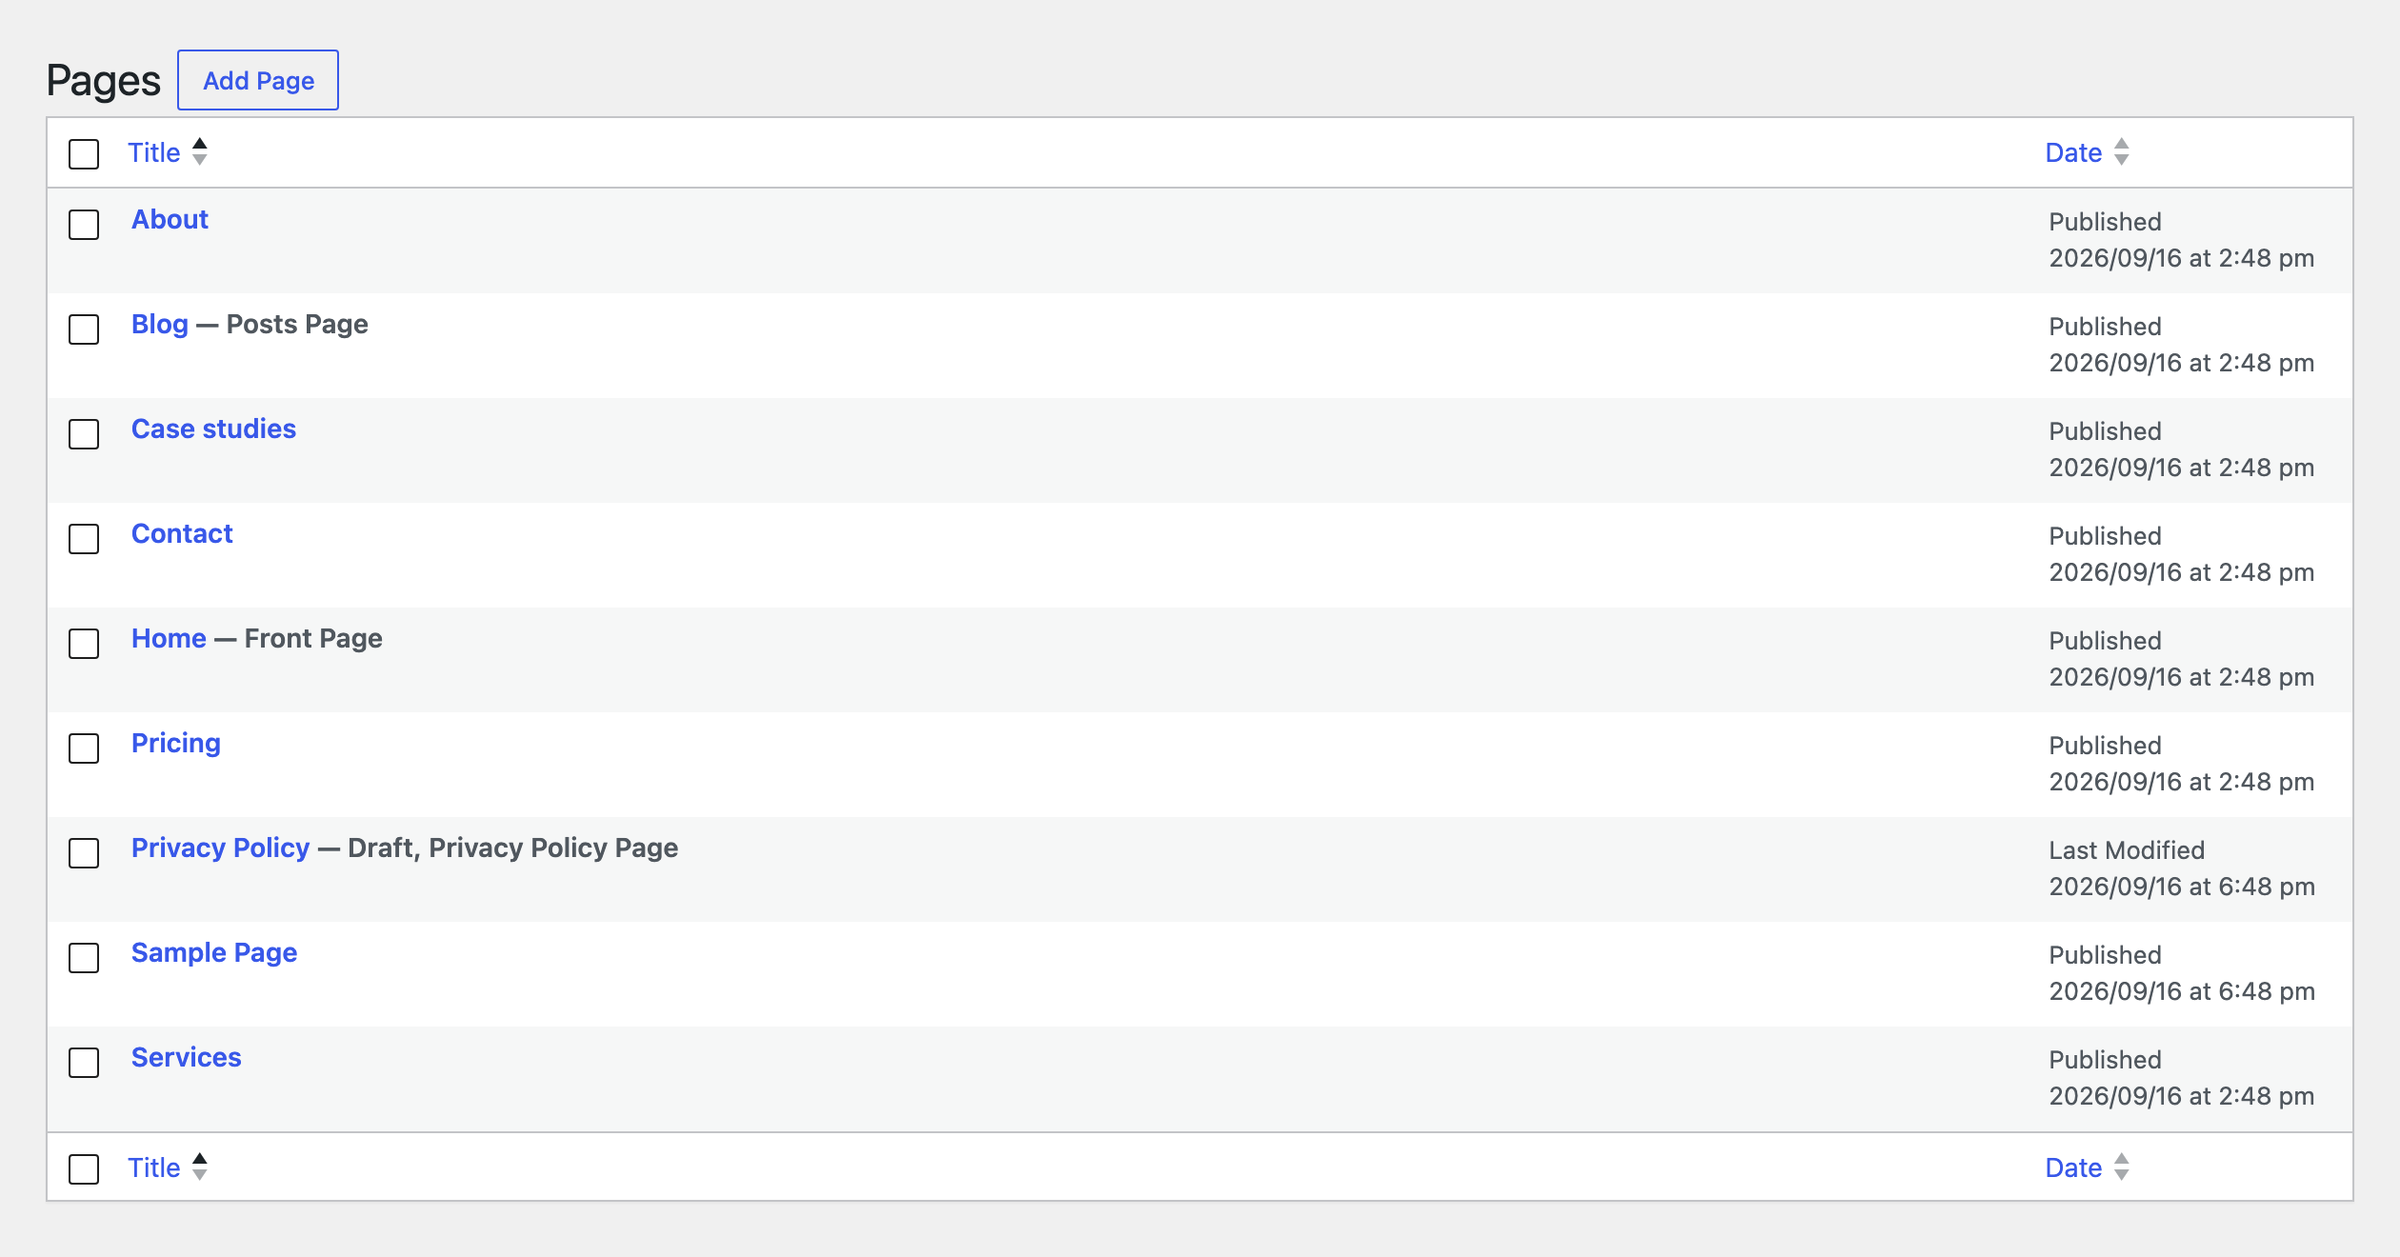
Privacy Policy and Sample Page come with WordPress, not with Unioncorp. Delete Sample Page whenever you like.
Already had pages? If the site has more than one page of its own, Unioncorp builds nothing, so it can never overwrite a site you have been working on. Build pages from the theme’s page layouts instead, and choose your front page in Settings → Reading.
Where Unioncorp lives in the dashboard
Unioncorp is a block theme, so there is no Customizer and no theme options screen. Your words and photographs are on Pages. Everything shared by every page — the header, the footer, the menu, colours, fonts and templates — is in Appearance → Editor.
How the site is put together
Every page Unioncorp builds is a stack of sections — a hero, the services, the statistics, the team — and every section is made of ordinary blocks. The sections were copied into your pages when the theme was activated, so they are yours to rewrite, reorder or delete.
Above and below the sections sit the header and footer. They are template parts: shared by every page, and edited once in Appearance → Editor.
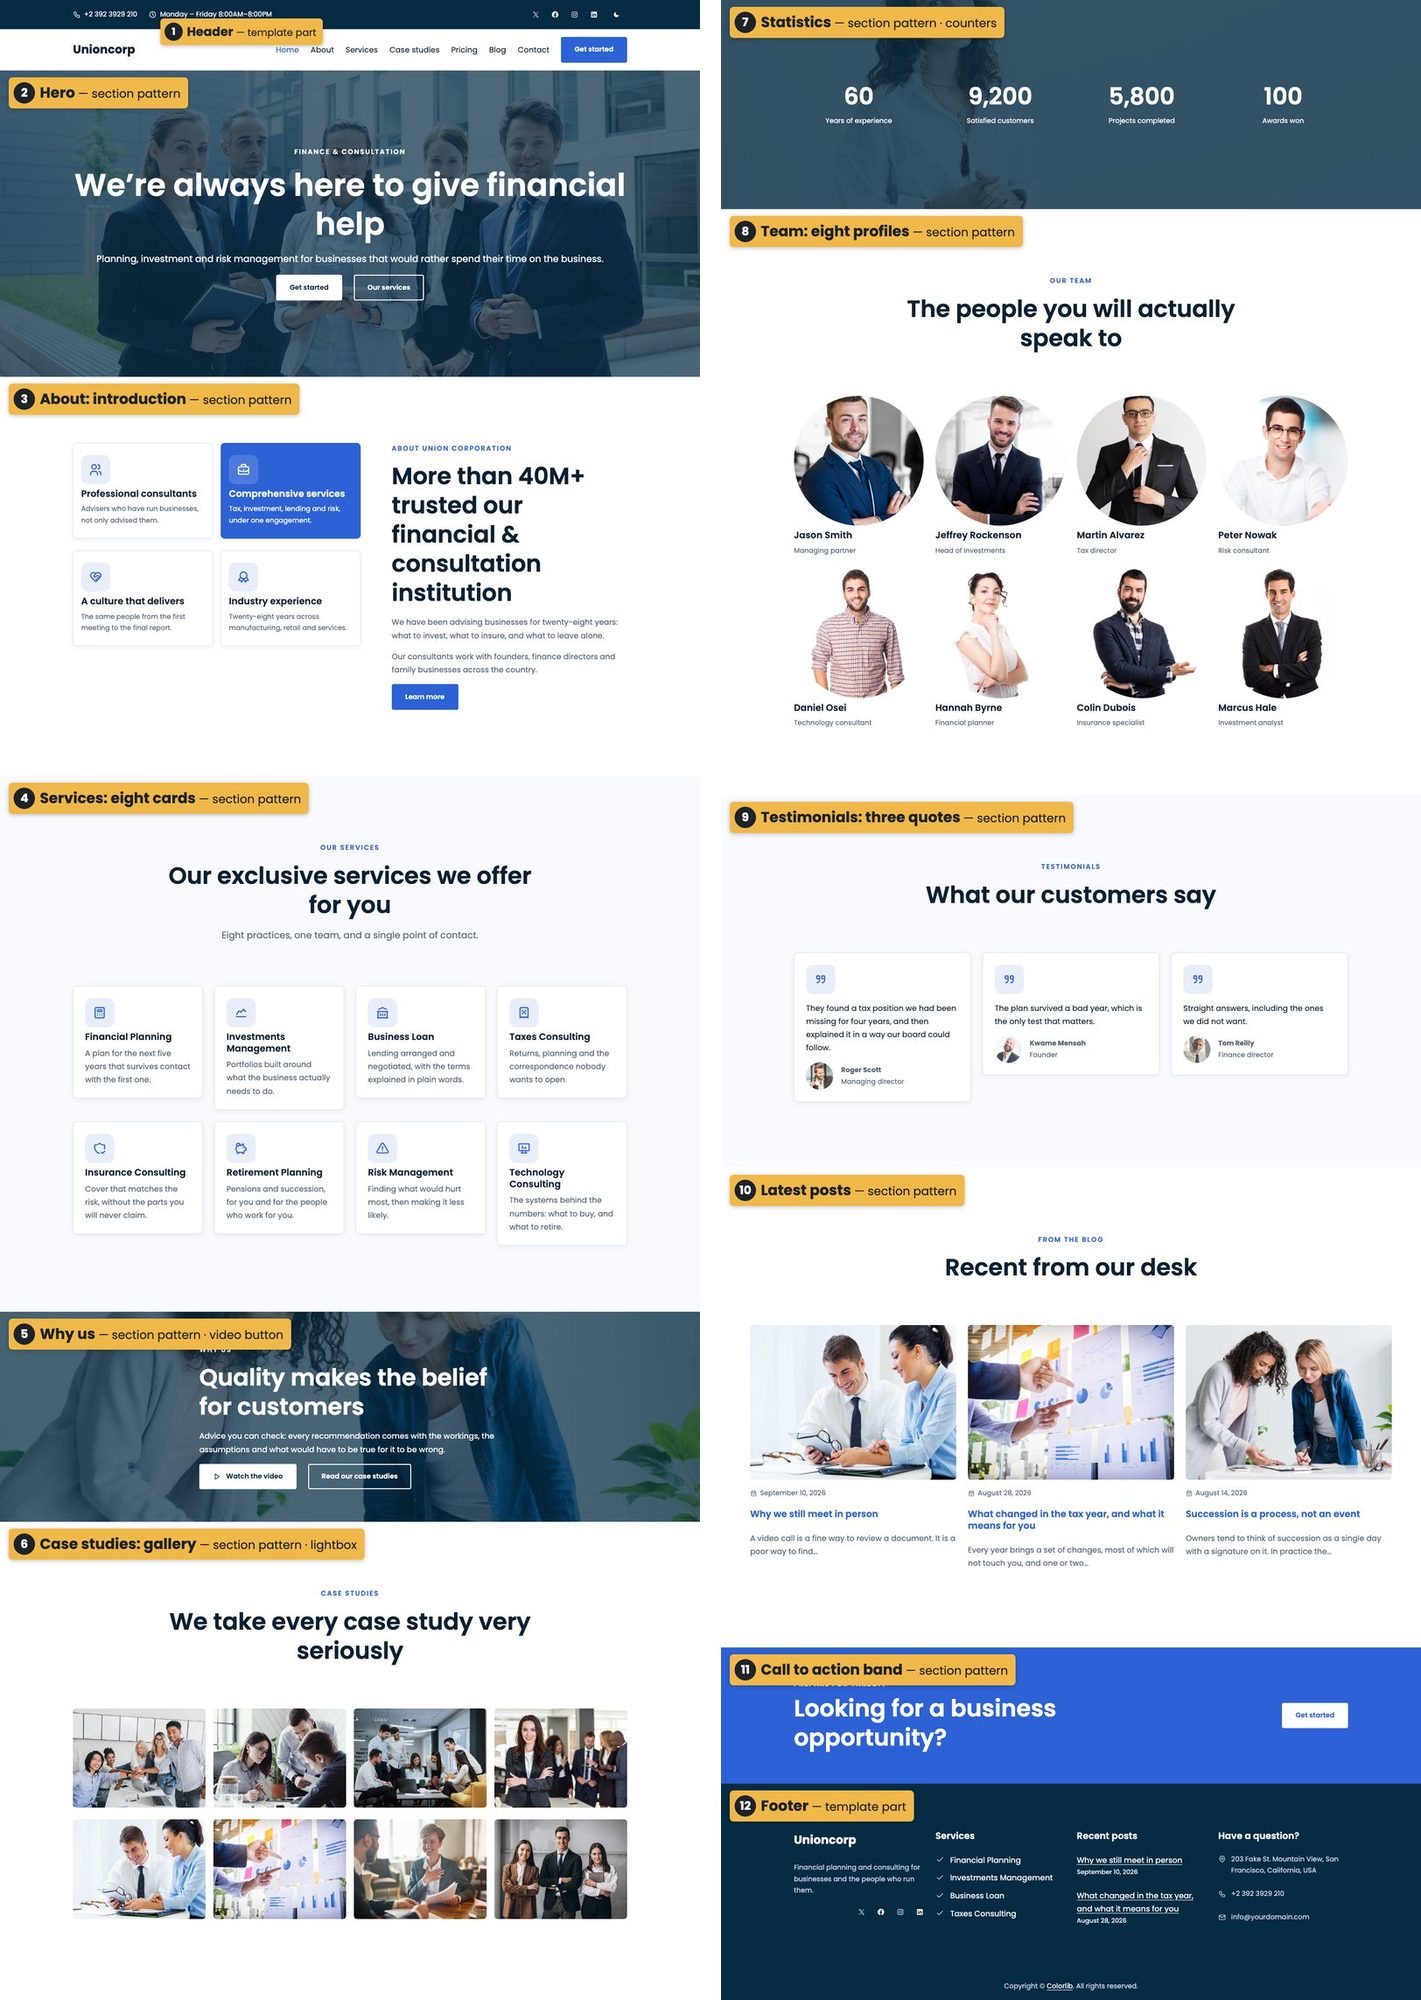
| Page | Sections, in order |
|---|---|
| Home | Hero, About, Services, Why us, Case studies, Statistics, Team, Testimonials, Latest posts, Call to action |
| About | About, Why us, Statistics, Team, Testimonials, Call to action |
| Services | Services, Why us, Testimonials, Call to action |
| Case studies | Case studies, Statistics, Call to action |
| Pricing | Pricing, Testimonials, Call to action |
| Contact | Contact details, form and map, Call to action |
| Blog | Your posts, laid out by the theme |
Every page except Home opens with a photograph banner carrying the page’s title. Home has its own hero instead — see Page templates.
Change words, figures and photos
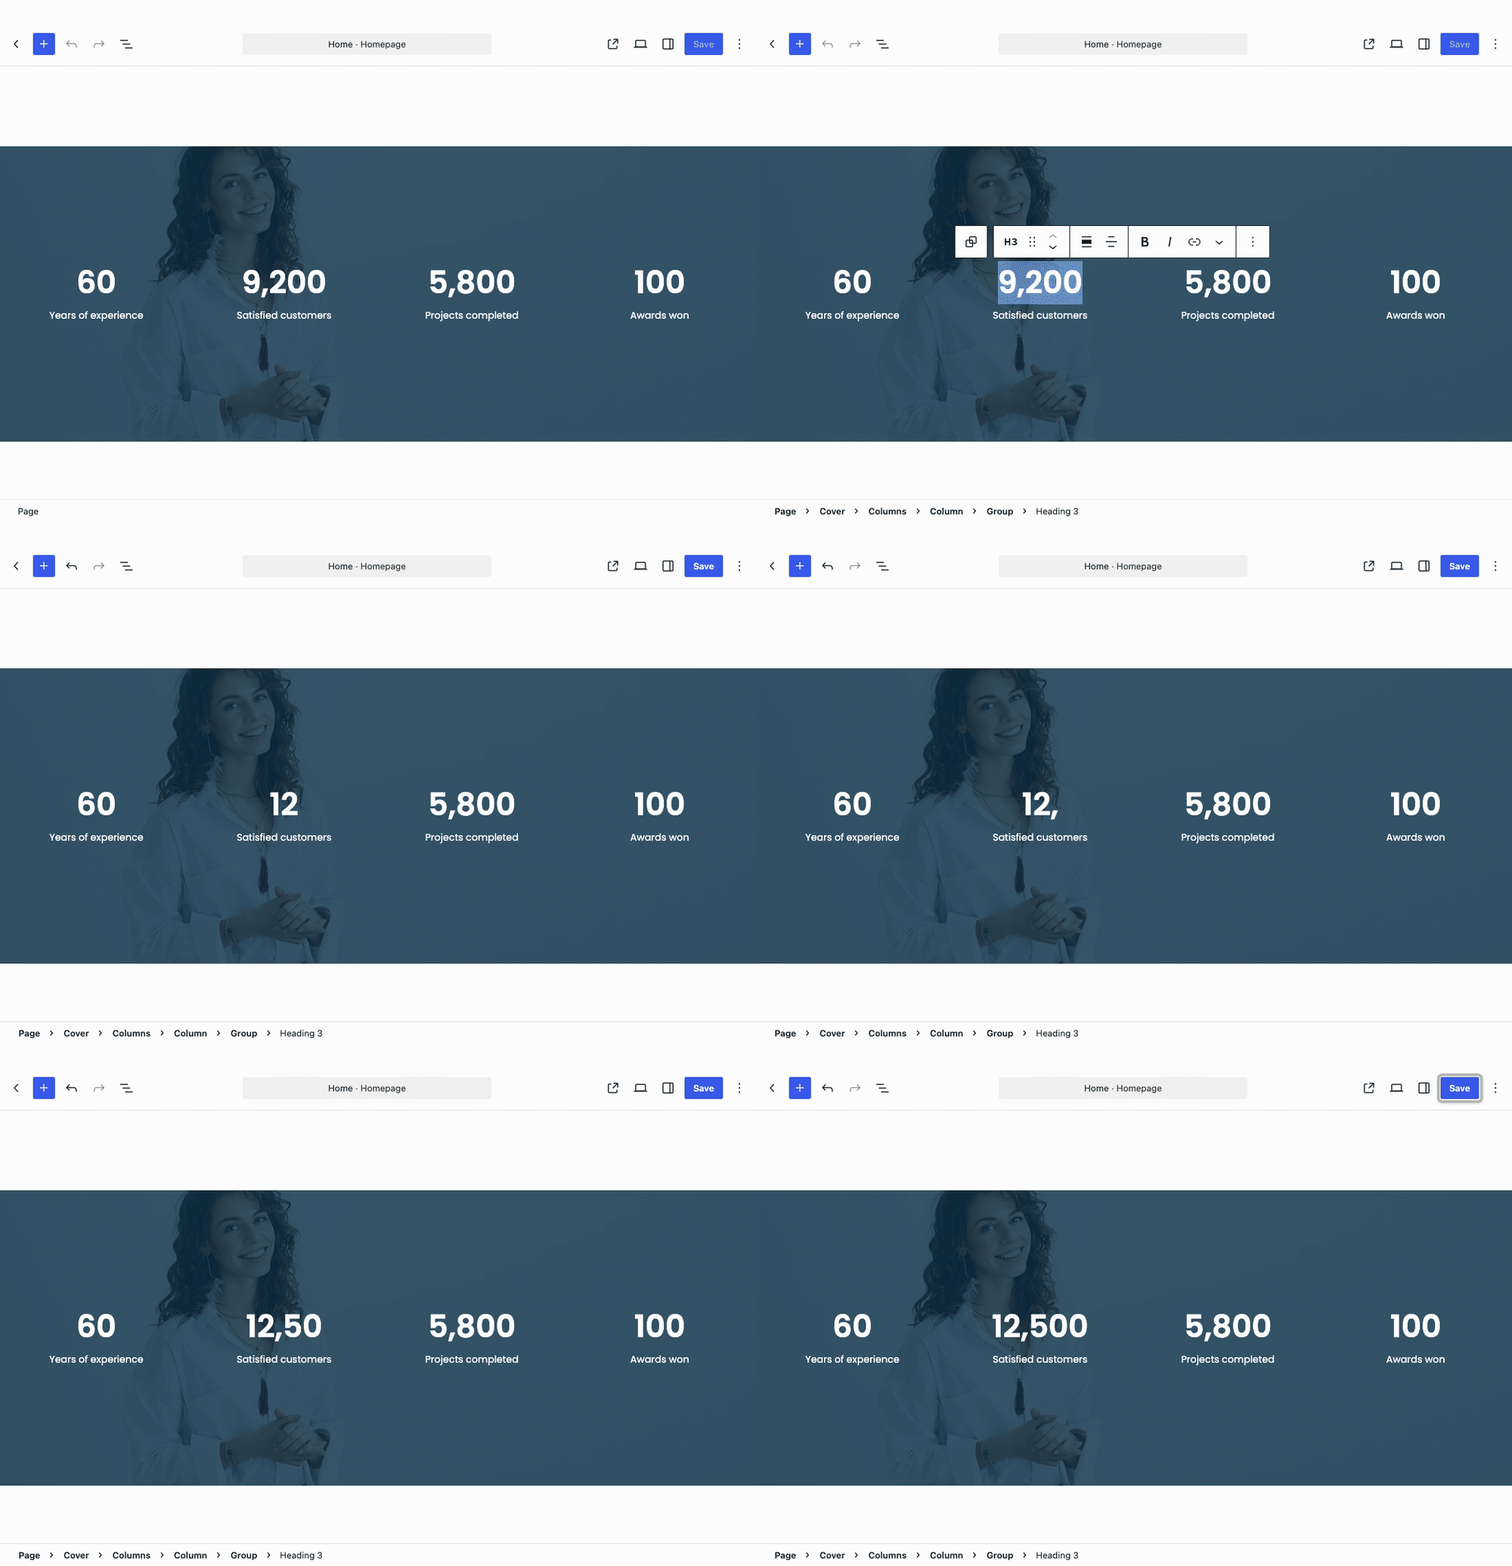
Open the page: from the front of your site click Edit Page in the black bar at the top, or go to Pages and click its title.
- Click the words you want to change. A small toolbar appears above them.
- Select the old text — double-click it, or press ⌘ A (Ctrl A on Windows), which selects only that block — and type the new text.
- Click Save in the top-right corner, or press ⌘ S / Ctrl S.
List View: the outline of the page
Click Document Overview (the three stacked lines near the top left) or press ⌃ ⌥ O (Shift Alt O). Every block on the page is listed on the left: open a section with its arrow, and click a row to select that block — the easy way to reach text on top of a photograph.
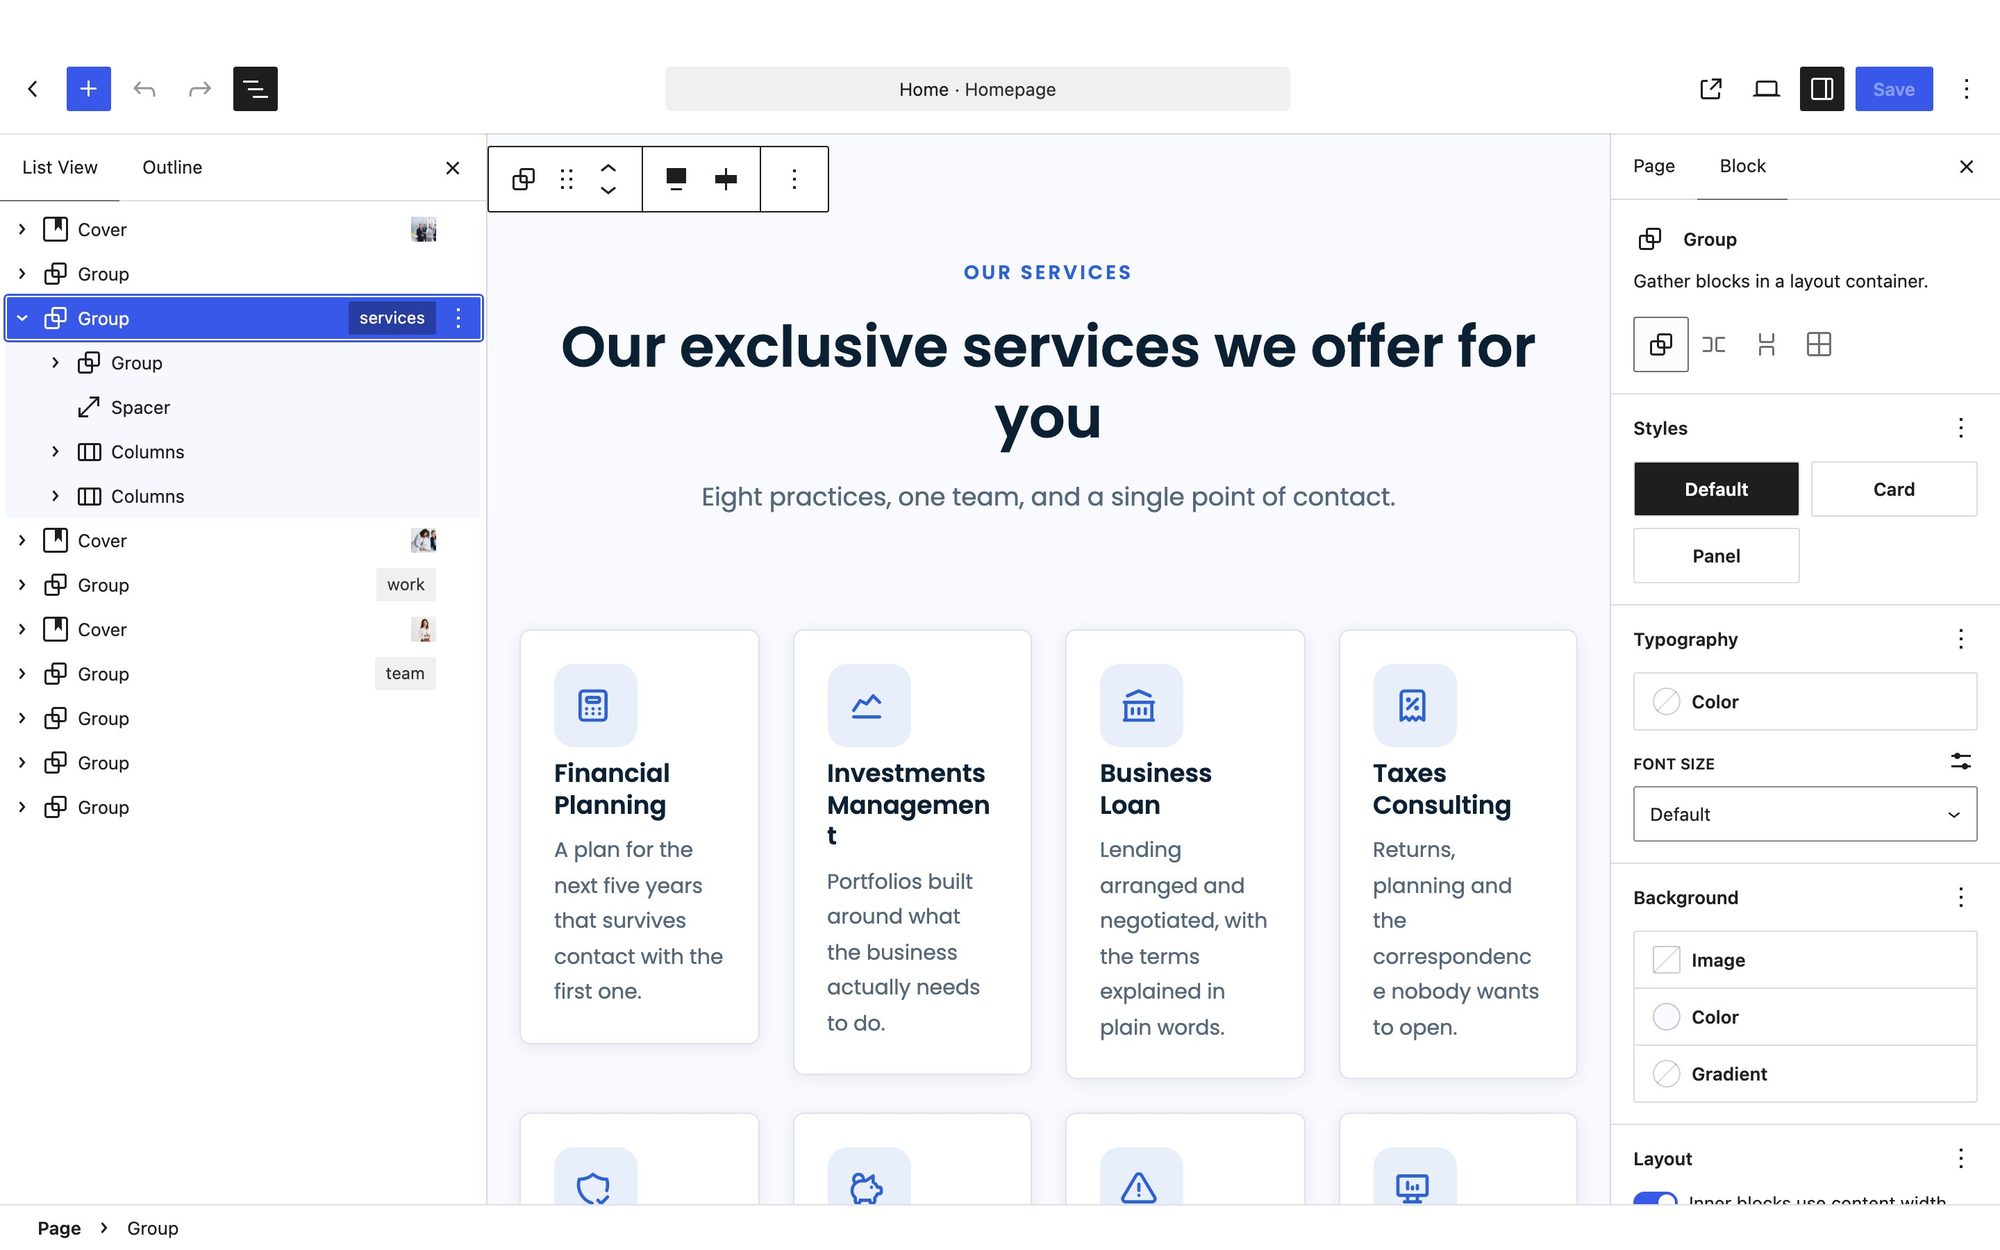
Drag a section up or down in List View to move it, and use its ⋮ menu to duplicate or delete it. Some sections carry a small label — services, work, team, pricing, contact. That is the section’s anchor, set under Advanced → HTML anchor: a link to #services scrolls straight to it.
Change a photograph
Click the photograph and choose Replace on the toolbar, then Open Media Library or Upload. On a banner with text over it (a Cover block), the Focal point picker in the sidebar decides which part stays in view on a phone. The case studies gallery opens each photograph larger when it is clicked; a replacement keeps that. Fill in Alternative text for every photograph: a short description for people who cannot see it, and for search engines.
Buttons and links
Every button Unioncorp builds — Get started, Our services, Learn more, Read our case studies — starts out linked to #, which goes nowhere. Point each one before you launch:
- Click the button, then the Link icon on its toolbar.
- Search for a page — Contact for “Get started”, say — or paste an address. A section anchor such as
#servicesscrolls the same page. - Save. The Get started button in the header is in the Header template part: change it there once, as described under Logo, header, footer and navigation.
Add a section or a whole page
Every section of the demo is also a pattern you can insert on any page, and every page layout is one too.
- Click where the new section should go, then the blue + in the top-left corner.
- Open the Patterns tab and choose Unioncorp: sections or Unioncorp: pages.
- Click a preview to insert it, or drag it into place, then edit it like anything else.
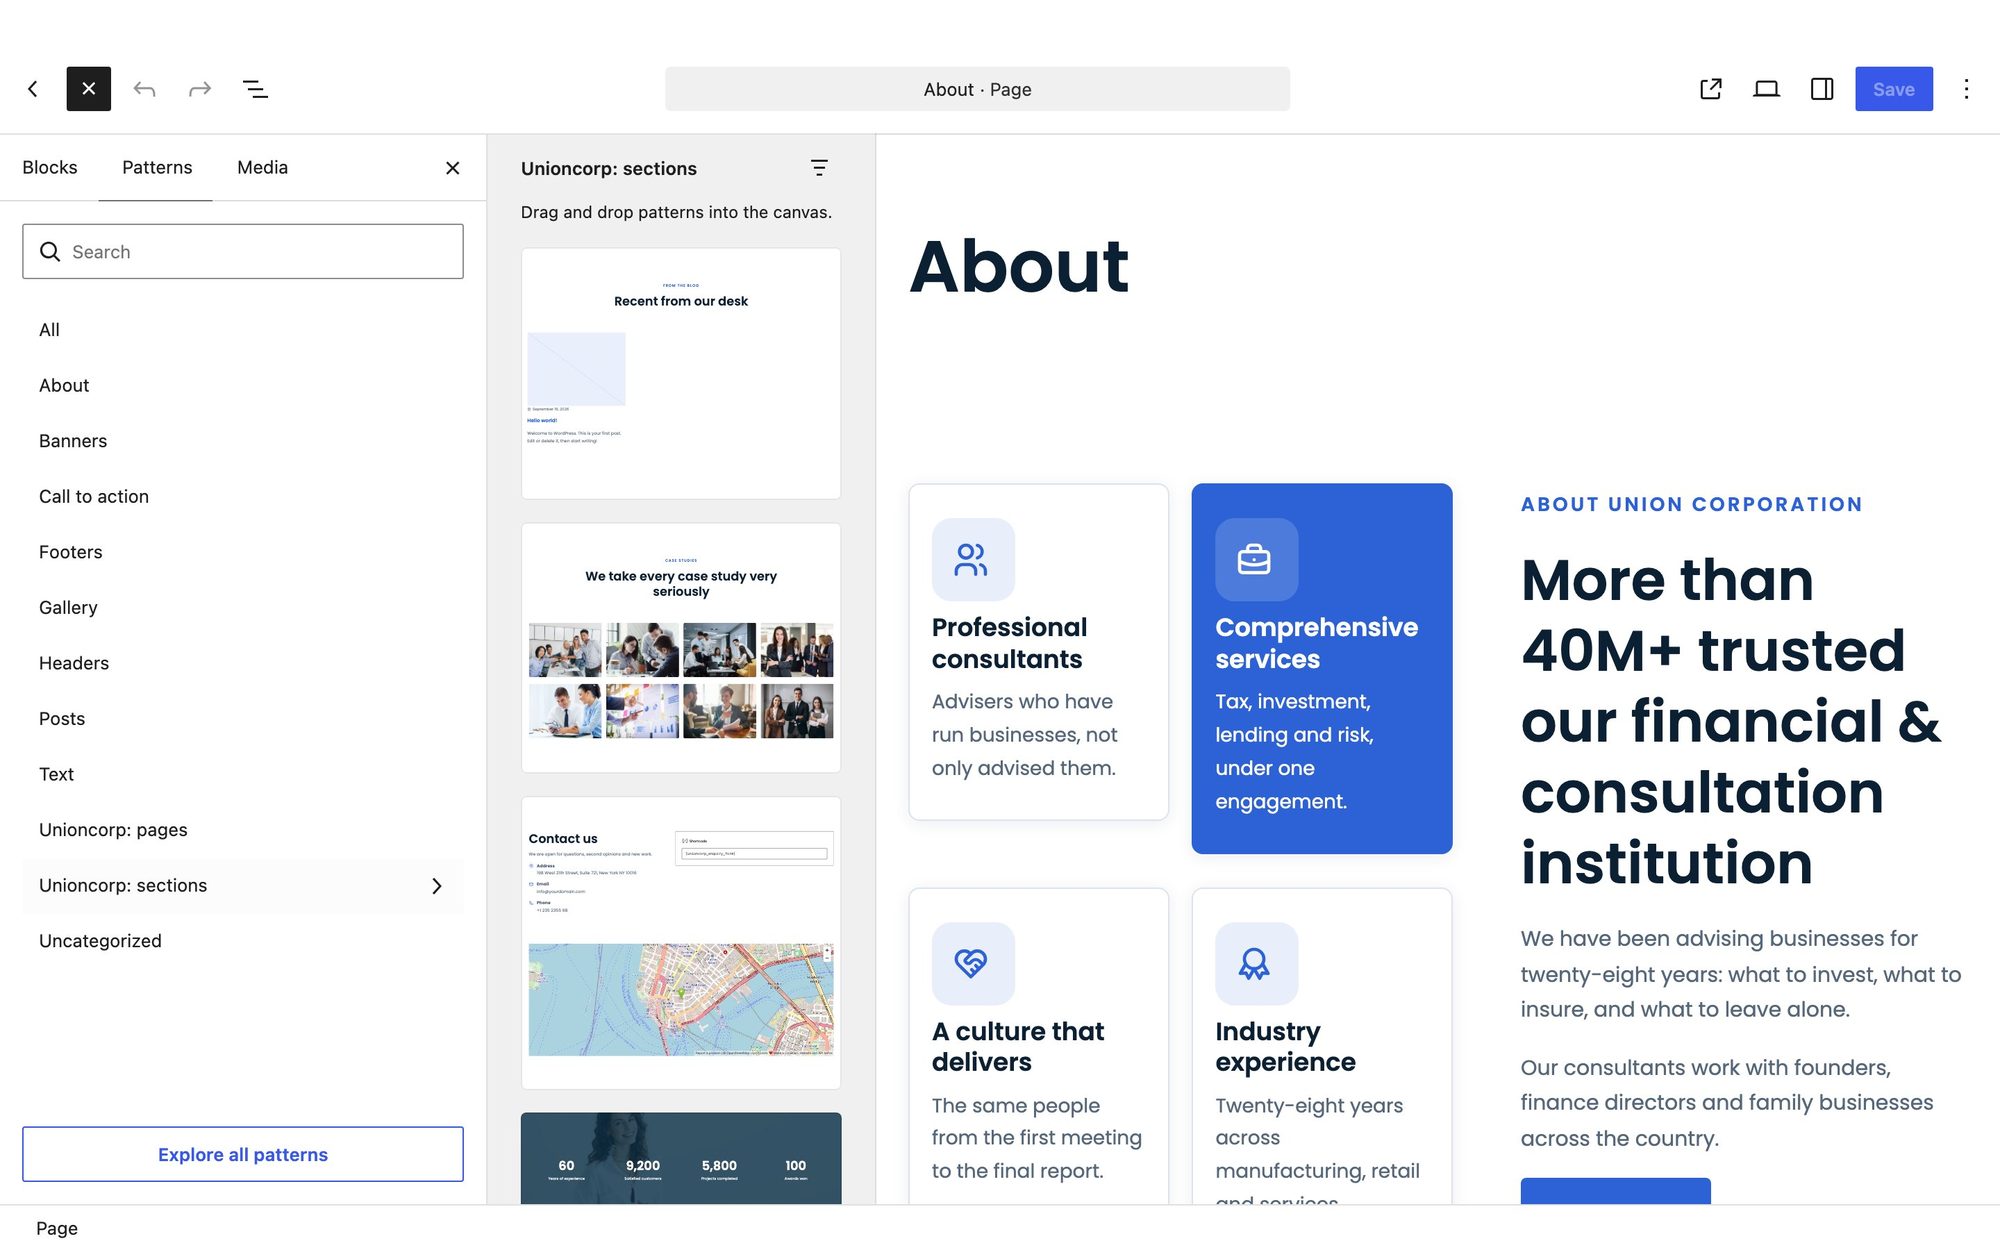
| Unioncorp: sections | Unioncorp: pages |
|---|---|
| Hero · About: introduction · Services: eight cards · Why us: photograph and statement · Case studies: gallery · Statistics · Team: eight profiles · Testimonials: three quotes · Pricing: four plans · Latest posts · Contact: details, form and map · Call to action band | Page: home · Page: about · Page: services · Page: case studies · Page: pricing · Page: contact |
An inserted pattern is a copy: it keeps working however much you change it, and later theme updates do not rewrite it.
Change an icon
Each service, about and testimonial card has an icon in a tile, and each contact line has one beside it. The icon comes from a class name on the block, so changing it takes a few seconds:
- Click the icon tile (or the contact line) to select it.
- In the sidebar, open the Block tab, then Advanced.
- In Additional CSS class(es), replace the name after
unioncorp-icon--with another from the list below — for exampleunioncorp-icon--calculatorbecomesunioncorp-icon--briefcase. Leave the other class, such asunioncorp-card__icon, as it is. - Save.
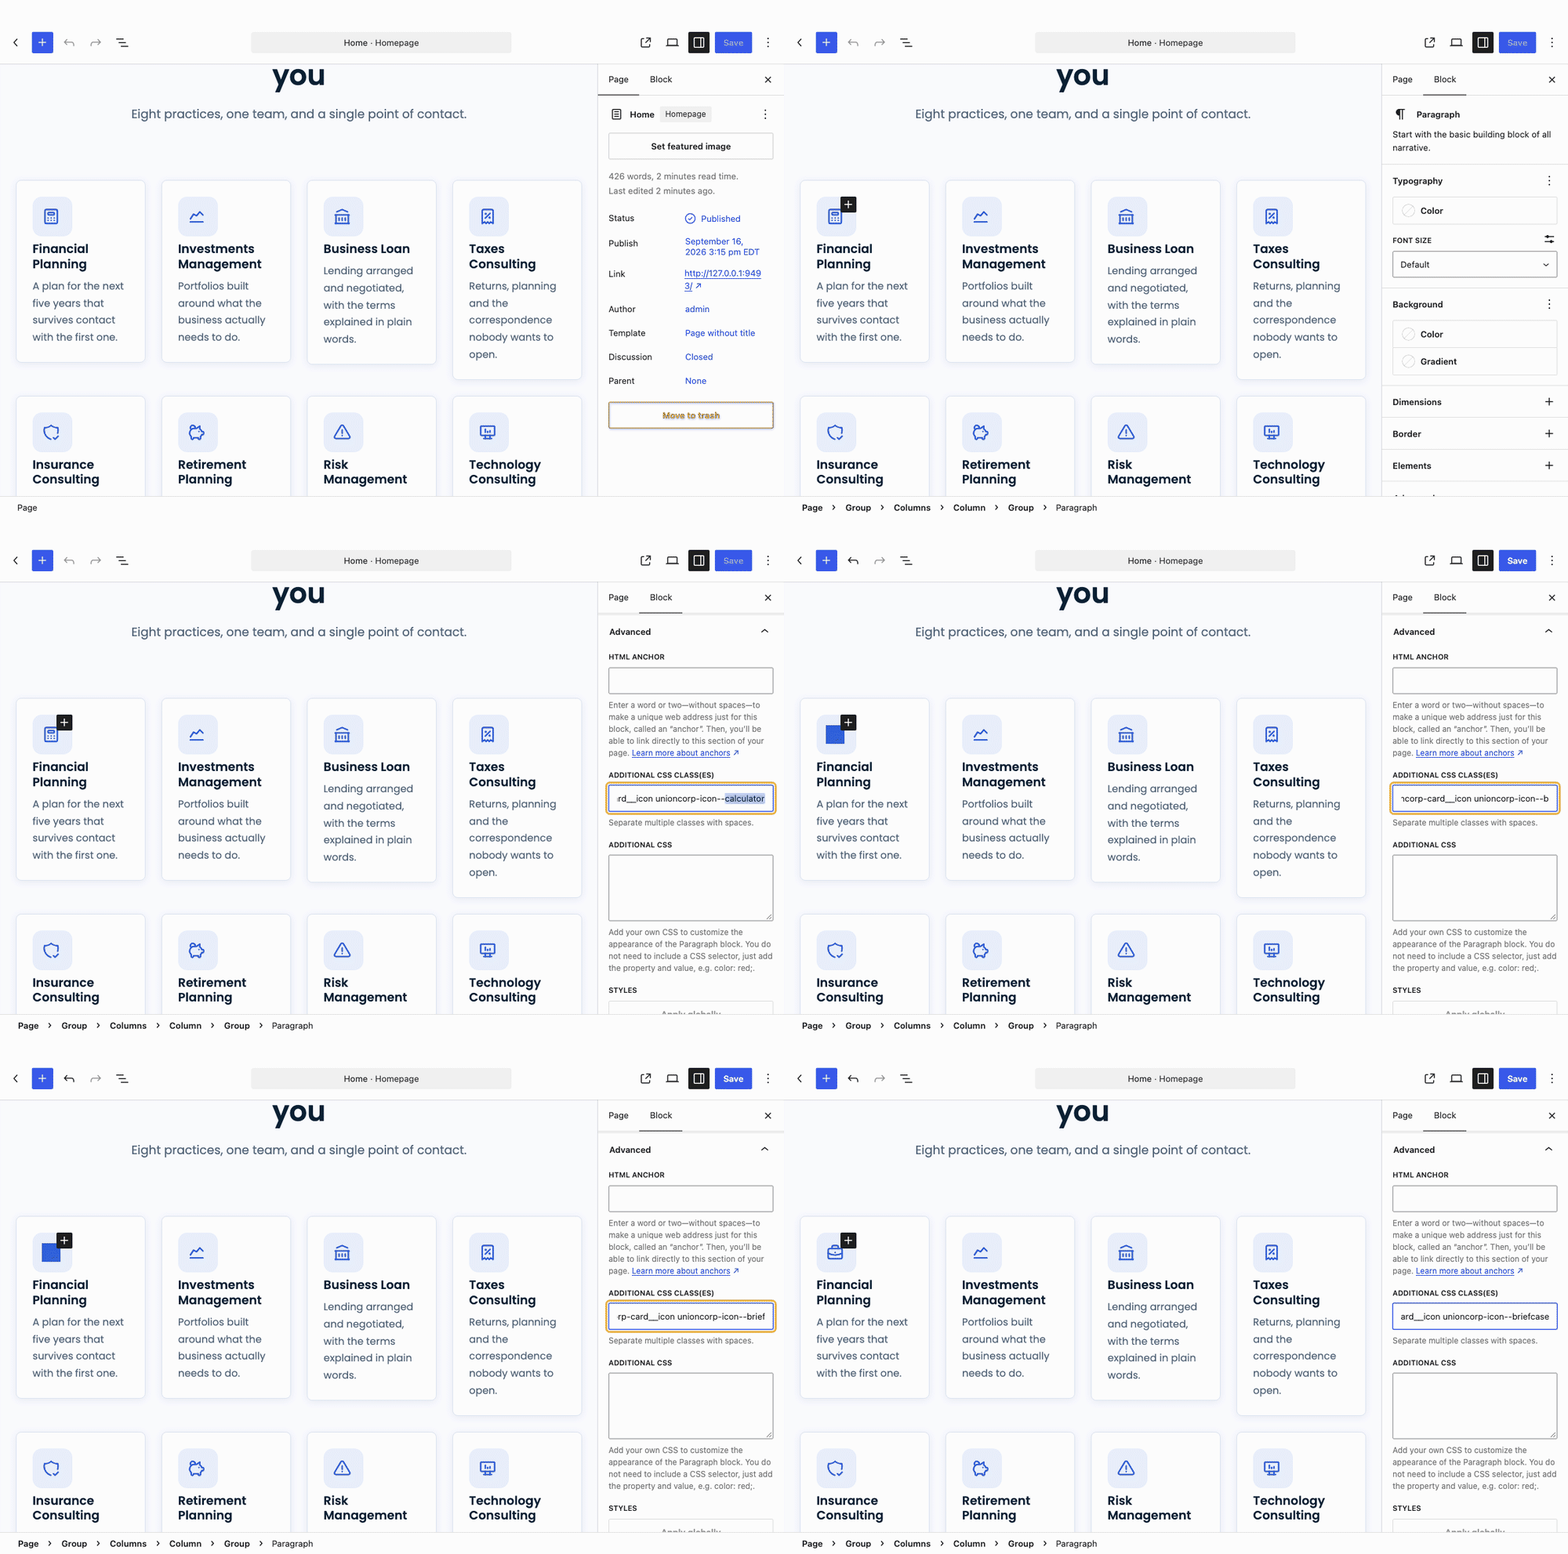
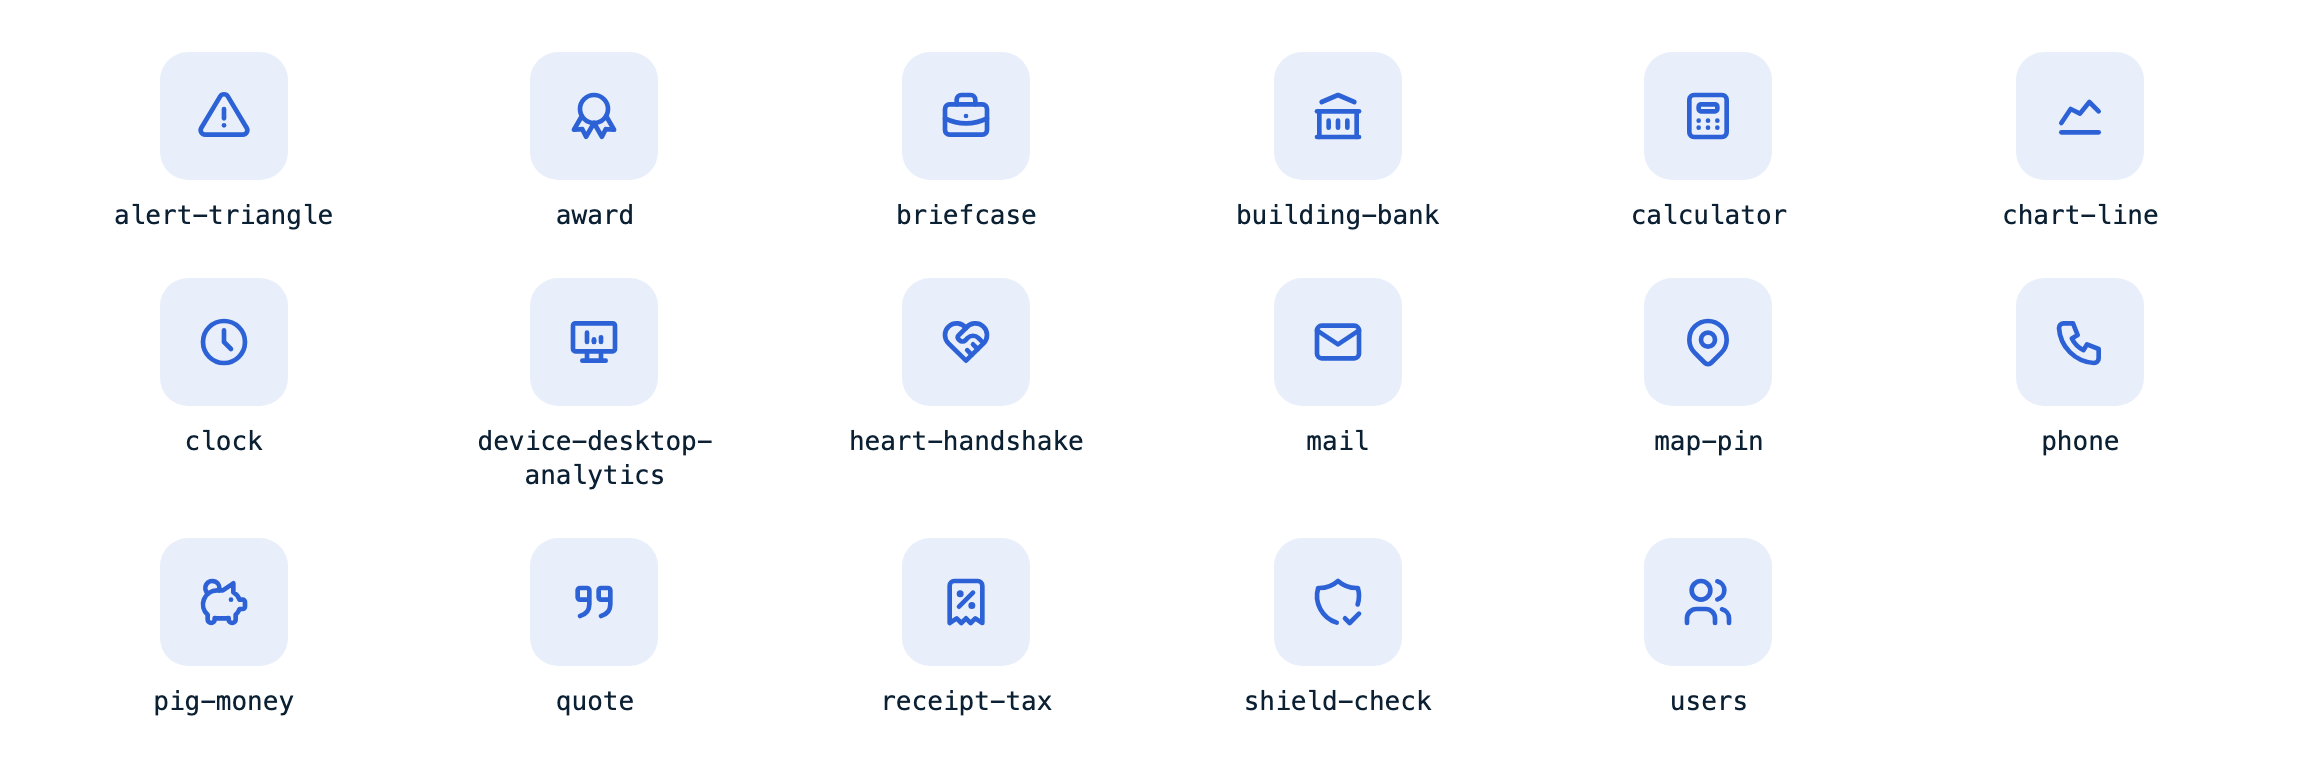
Icons take the palette’s colours, turn over with their tile when a card is hovered, and follow dark mode. They come from Tabler Icons and ship with the theme.
Pages built by Unioncorp 1.1.1 or earlier keep the icon inside the paragraph instead, and the editor shows those tiles without an icon, often with the words “Type / to choose a block”. To change one, select it, choose Edit as HTML from the toolbar’s ⋮ menu, change the name in unioncorp-icon--…, then choose Edit visually. A section inserted from the patterns today uses the newer form.
Counters, animations and the video button
As a visitor scrolls, sections fade in and the statistics count up from zero. It is all automatic.
Statistics that count up
Any heading with the class unioncorp-count counts up the first time it scrolls into view — the four figures in the Statistics section have it already. Change the number and the animation follows. Write it the way it should end up — 9,200, 98% or $2.4m: one number, with any symbols before or after it. A heading with two numbers in it, such as 24/7, simply does not animate. A figure already on screen when the page opens does not count, and screen readers are given the final figure straight away.
The video button
Watch the video in the Why us section opens a YouTube video over the page instead of leaving the site.
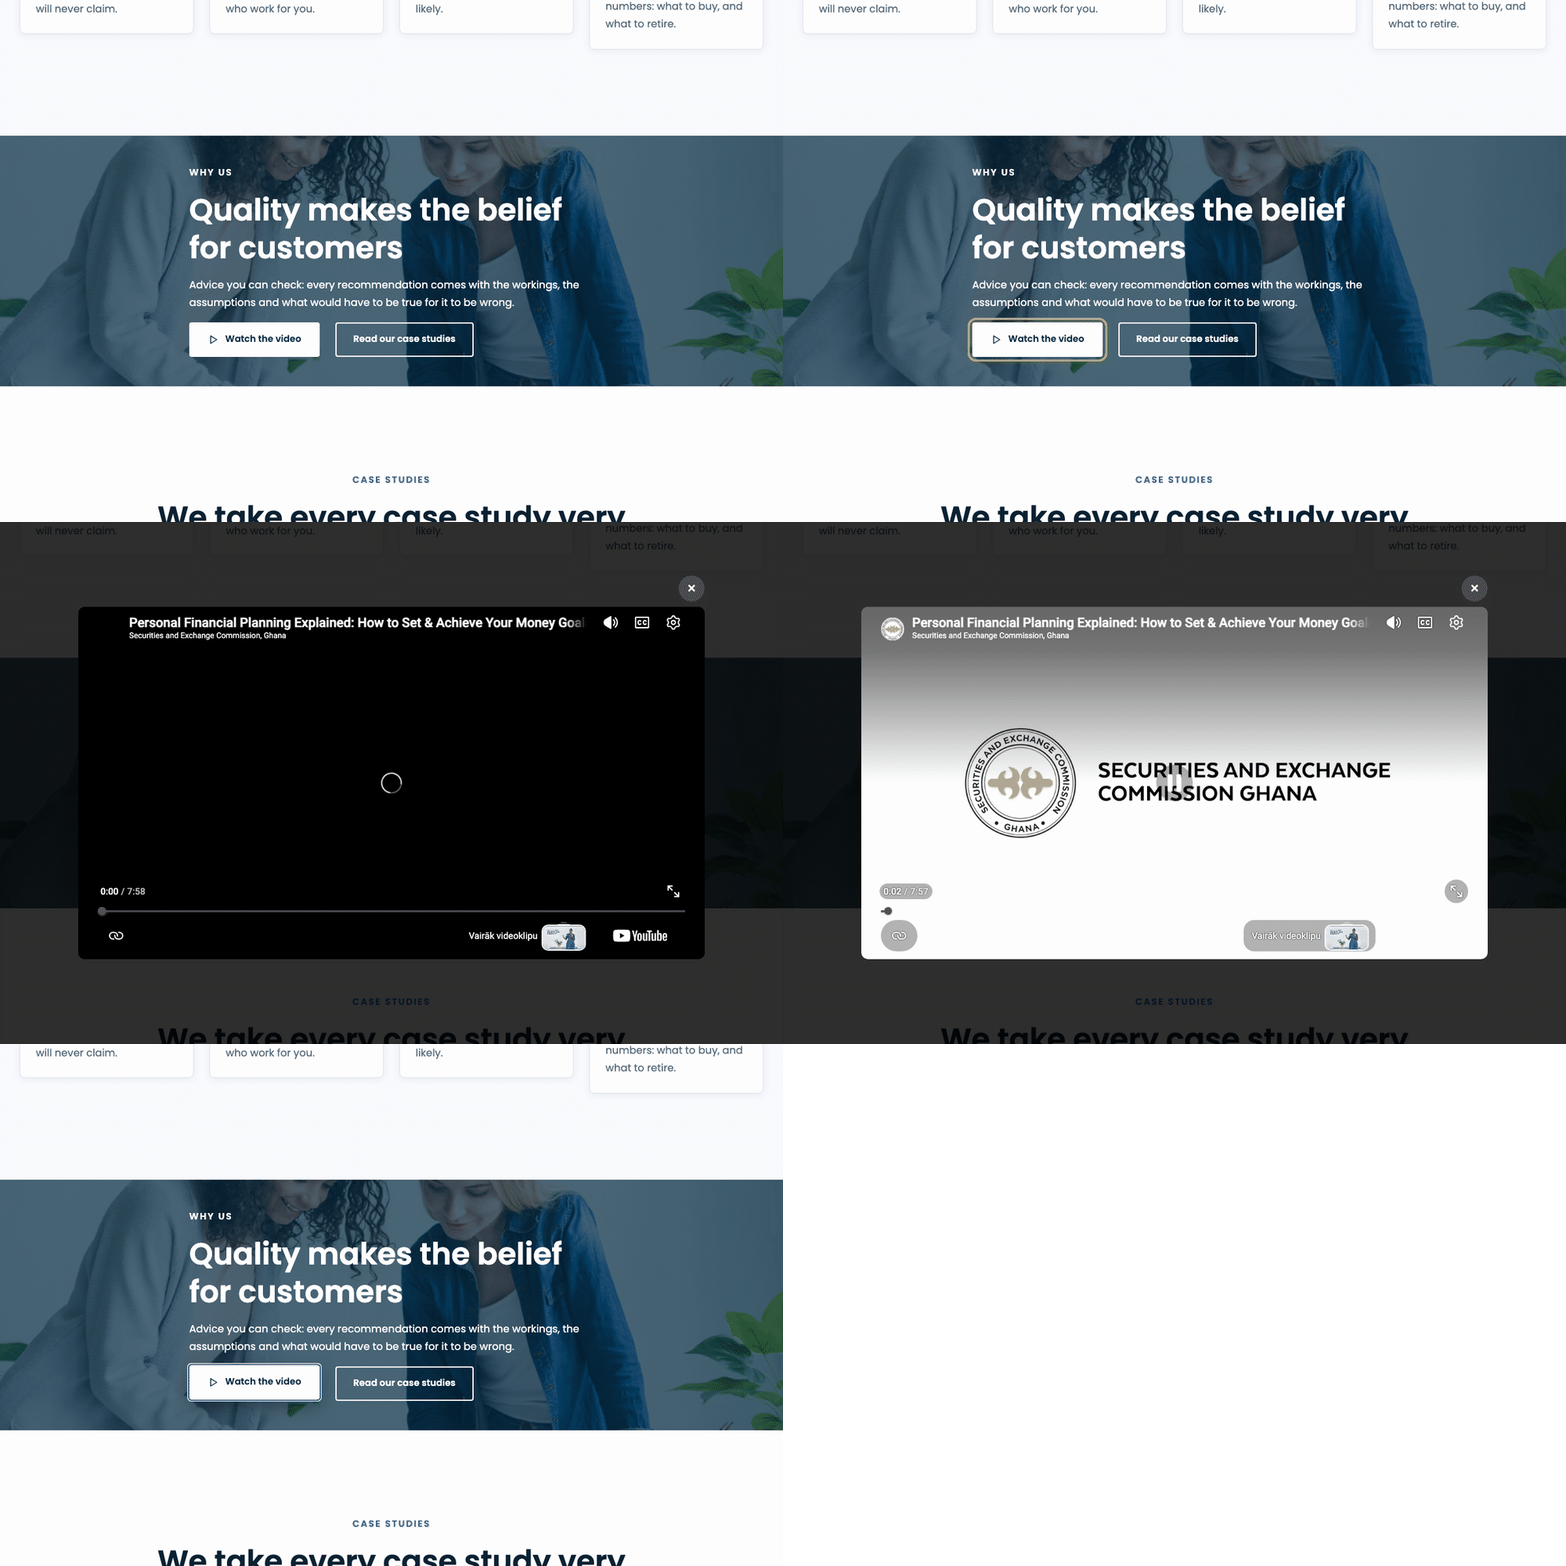
- Click the button, then the Link icon, and paste your video’s YouTube address — a normal link, a
youtu.belink or a Shorts link. - Save.
Any button can do this: give the Button block the class unioncorp-video under Advanced → Additional CSS class(es) and link it to YouTube. The video plays from youtube-nocookie.com, YouTube’s privacy-enhanced mode. A link that is not YouTube behaves like an ordinary link.
Replace the demo video. It is there to show the button working and is not about your firm.
Turning the animations off
Visitors who have asked their phone or computer to reduce motion never see the animations. To switch them off for everyone, add this to a child theme or a small plugin — the video button keeps working:
add_filter( 'unioncorp_enable_scroll_animations', '__return_false' );
The enquiry form
The enquiry form is built into Unioncorp — no plugin — and is already on the Contact page.
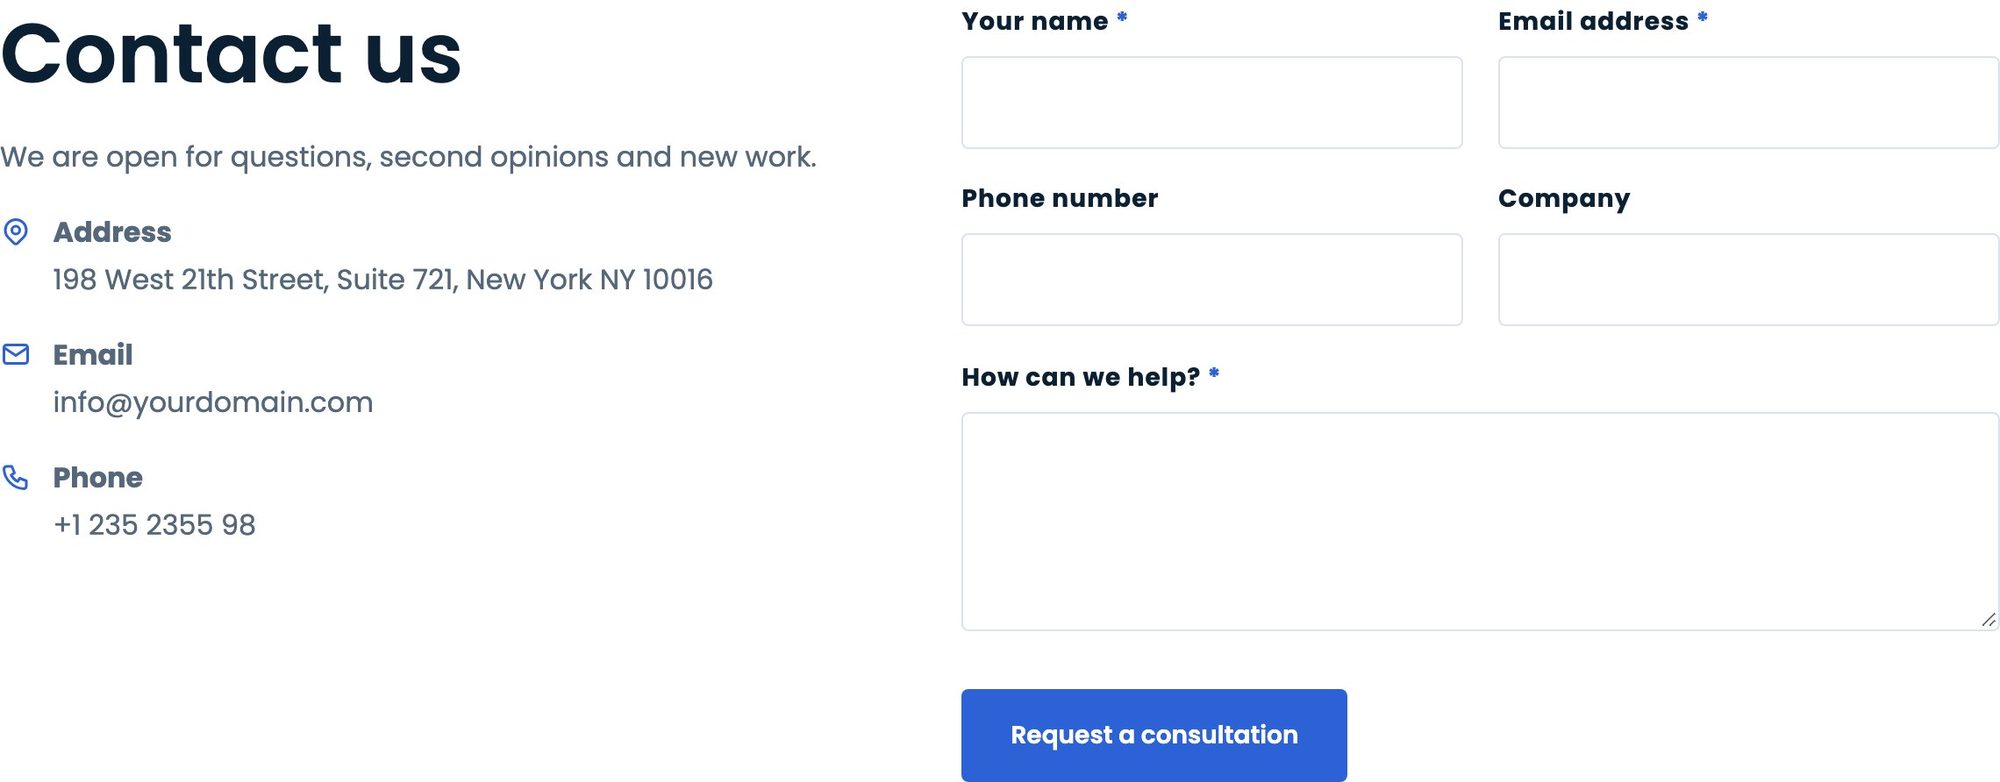
It asks for a name, an email address, a phone number, a company and a message; the name, email and message are required. It is checked on your server, protected from spam bots by a hidden trap field and a security token, and works with JavaScript turned off. The button reads Request a consultation.
Where enquiries go
Each enquiry is emailed to the Administration Email Address in Settings → General, with the subject [Your site name] Website enquiry. Its reply-to is the visitor, so pressing Reply answers them.
Test it before you launch
- Open your Contact page in a private browser window, so you see it as a visitor does.
- Fill in the form with your own email address and click Request a consultation.
- Check the page thanks you, then check the email arrives — look in the spam folder too.
No email? Many hosts do not send WordPress email reliably. Install an SMTP plugin, such as FluentSMTP or WP Mail SMTP, and connect it to your email provider. The form sends through WordPress’s own wp_mail(), so whatever fixes a missing password-reset email fixes enquiries too.
Put the form on another page
Add a Shortcode block and type [unioncorp_enquiry_form]. To change the button’s words, give it a button: [unioncorp_enquiry_form button="Book a call"]. The form is a shortcode on purpose: it is built fresh each time the page is shown, so it keeps working however the page around it is edited.
For developers: send enquiries somewhere else
Enquiries can go to a CRM, a helpdesk or a webhook instead of email. Add this to a child theme’s functions.php or a small plugin:
add_filter( 'unioncorp_enquiry_handlers', function ( $handled, $enquiry ) {
	// $enquiry has: name, email, phone, company, message
	my_crm_create_lead( $enquiry );
	return true; // handled, so Unioncorp sends no email of its own
}, 10, 2 );
| Filter | Use it to |
|---|---|
unioncorp_enquiry_fields |
Add, remove, relabel or reorder the form’s fields |
unioncorp_enquiry_handlers |
Send the enquiry elsewhere; return true to skip the email |
unioncorp_enquiry_email_to |
Send enquiries to an address other than the site administrator’s |
unioncorp_enquiry_email_subject |
Change the email’s subject line |
unioncorp_enquiry_email_body |
Change the email’s text |
Contact details, social links and map
Your phone number, address and email appear in three places. Update all three:
- The top bar of the header — phone number and opening hours — on every page. Edit the Header template part (see below) and type over them.
- The footer’s “Have a question?” column — address, phone and email — on every page. Edit the Footer template part the same way.
- The contact section on the Contact page — address, email and phone beside the form. Edit the page.
Social links
The icons in the top bar and the footer are a Social Icons block, and they link to # until you set them. Click an icon and paste your profile’s address; to remove a network, select its icon and press ⌃ ⌥ Z (Shift Alt Z); to add one, click the block’s +.
The map
The map under the enquiry form is an OpenStreetMap embed, so it needs no API key and no billing account. It is a Custom HTML block. To show your own address:
- Find your office on openstreetmap.org, right-click it and choose Show address. The latitude and longitude appear at the top of the panel on the left.
- Click the map block to see its code. In the
srcaddress, replace the two numbers aftermarker=with your latitude and longitude, keeping the%2Cbetween them. - The four numbers after
bbox=are the edges of the map: west, south, east, north. About 0.005 either side of your point gives a street-level view.
…embed.html?bbox=-74.0170%2C40.6990%2C-74.0070%2C40.7100&layer=mapnik&marker=40.704644%2C-74.011987
Prefer Google Maps? Delete the block, add a new Custom HTML block, and paste the code from Google Maps’ Share → Embed a map.
Logo, header, footer and navigation
The header, the footer and the blog’s sidebar are template parts: edit one once and every page follows.
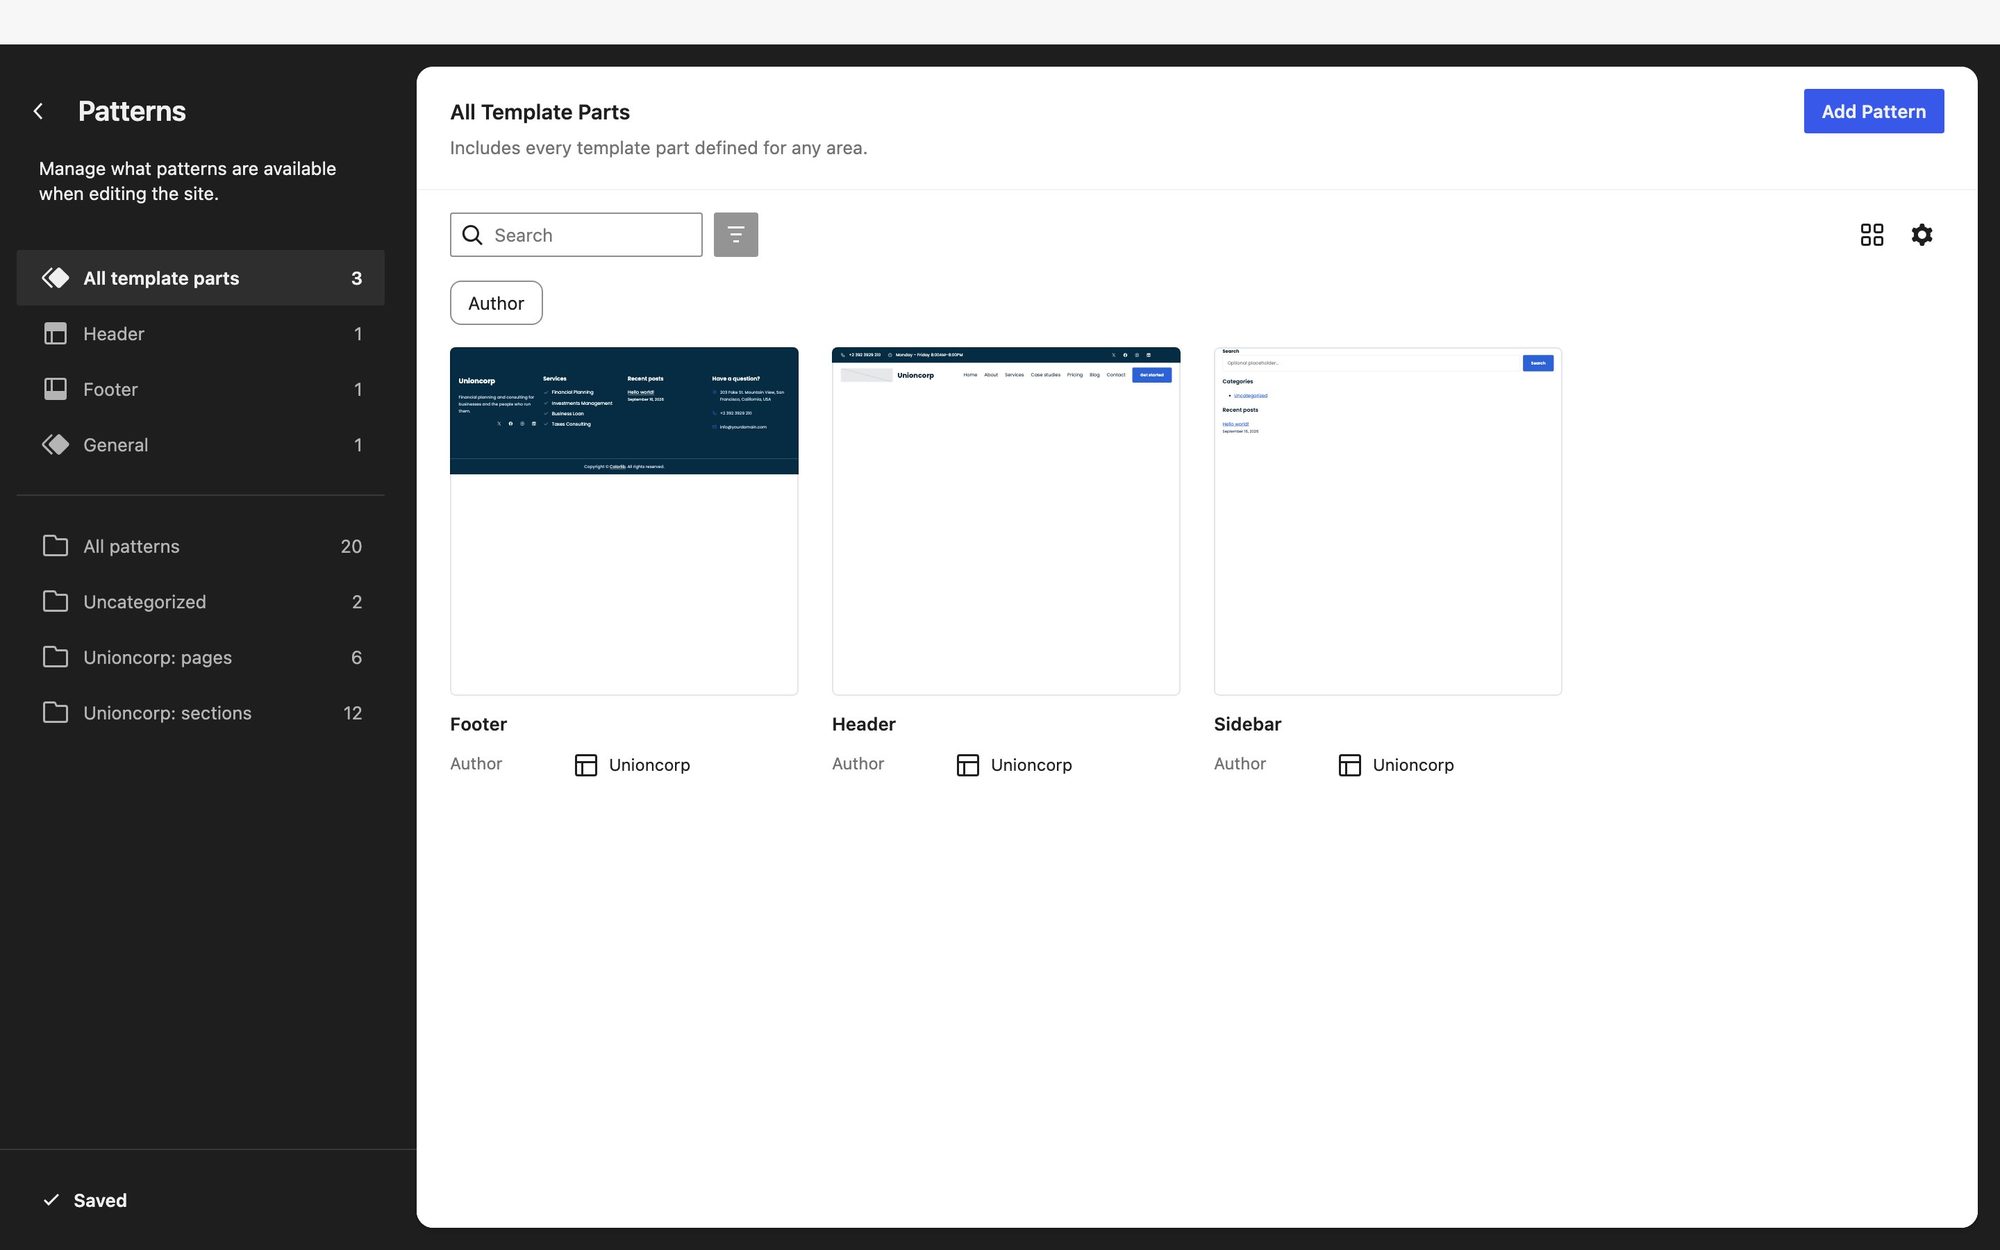
Add your logo
- Go to Appearance → Editor → Patterns and choose Header.
- Click the grey logo placeholder beside the site name, and upload your logo or pick it from the Media Library.
- Drag the handle on the logo’s corner to resize it, then click Save.
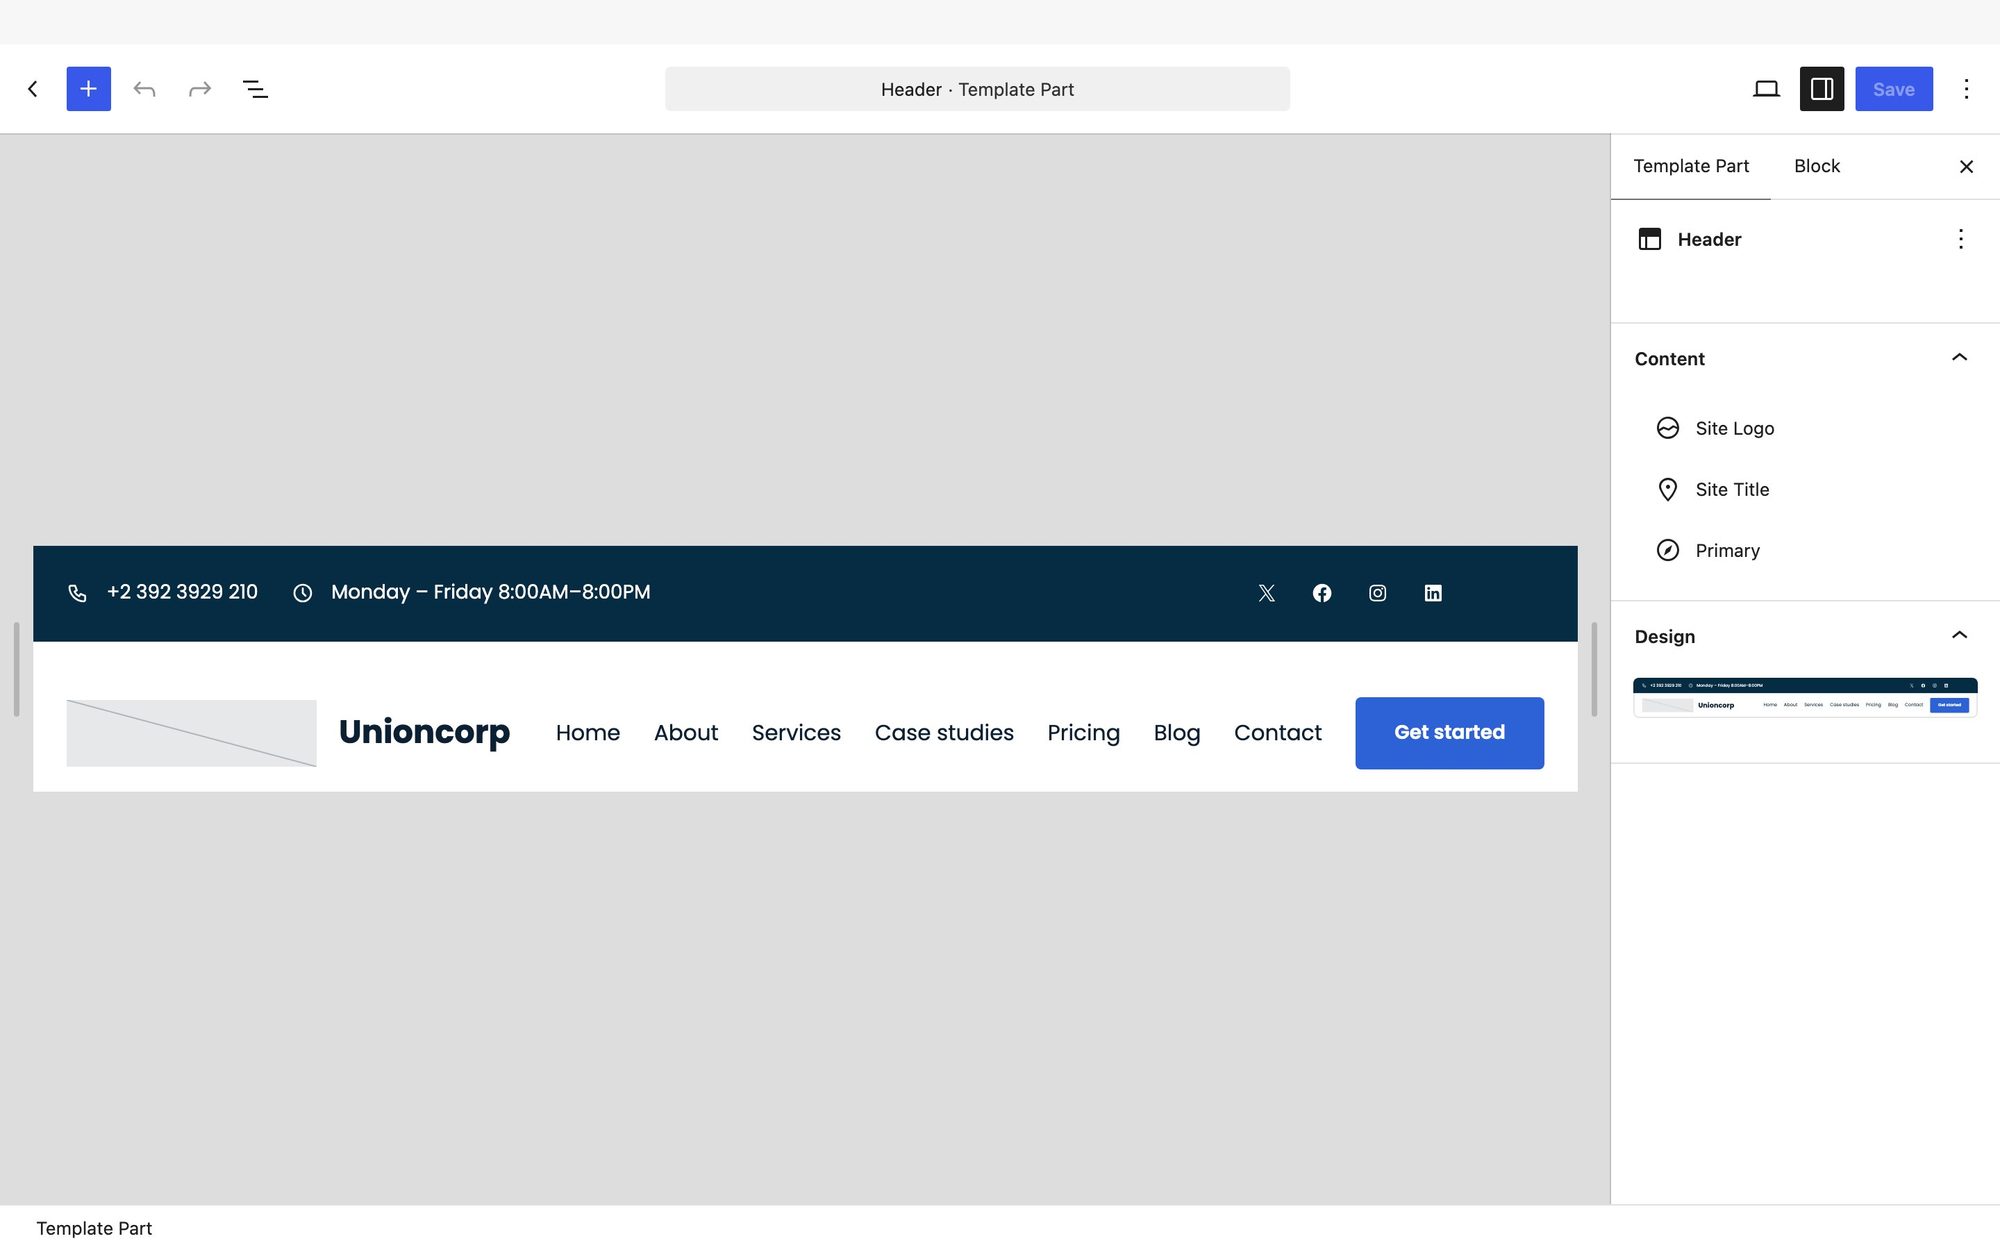
The name beside the logo is your Site Title from Settings → General. If your logo already spells out the name, select the title in the header and delete it. Until you add a logo, the placeholder shows only in the editor, never to visitors.
Change the navigation menu
Go to Appearance → Editor → Navigation and open the Primary menu.
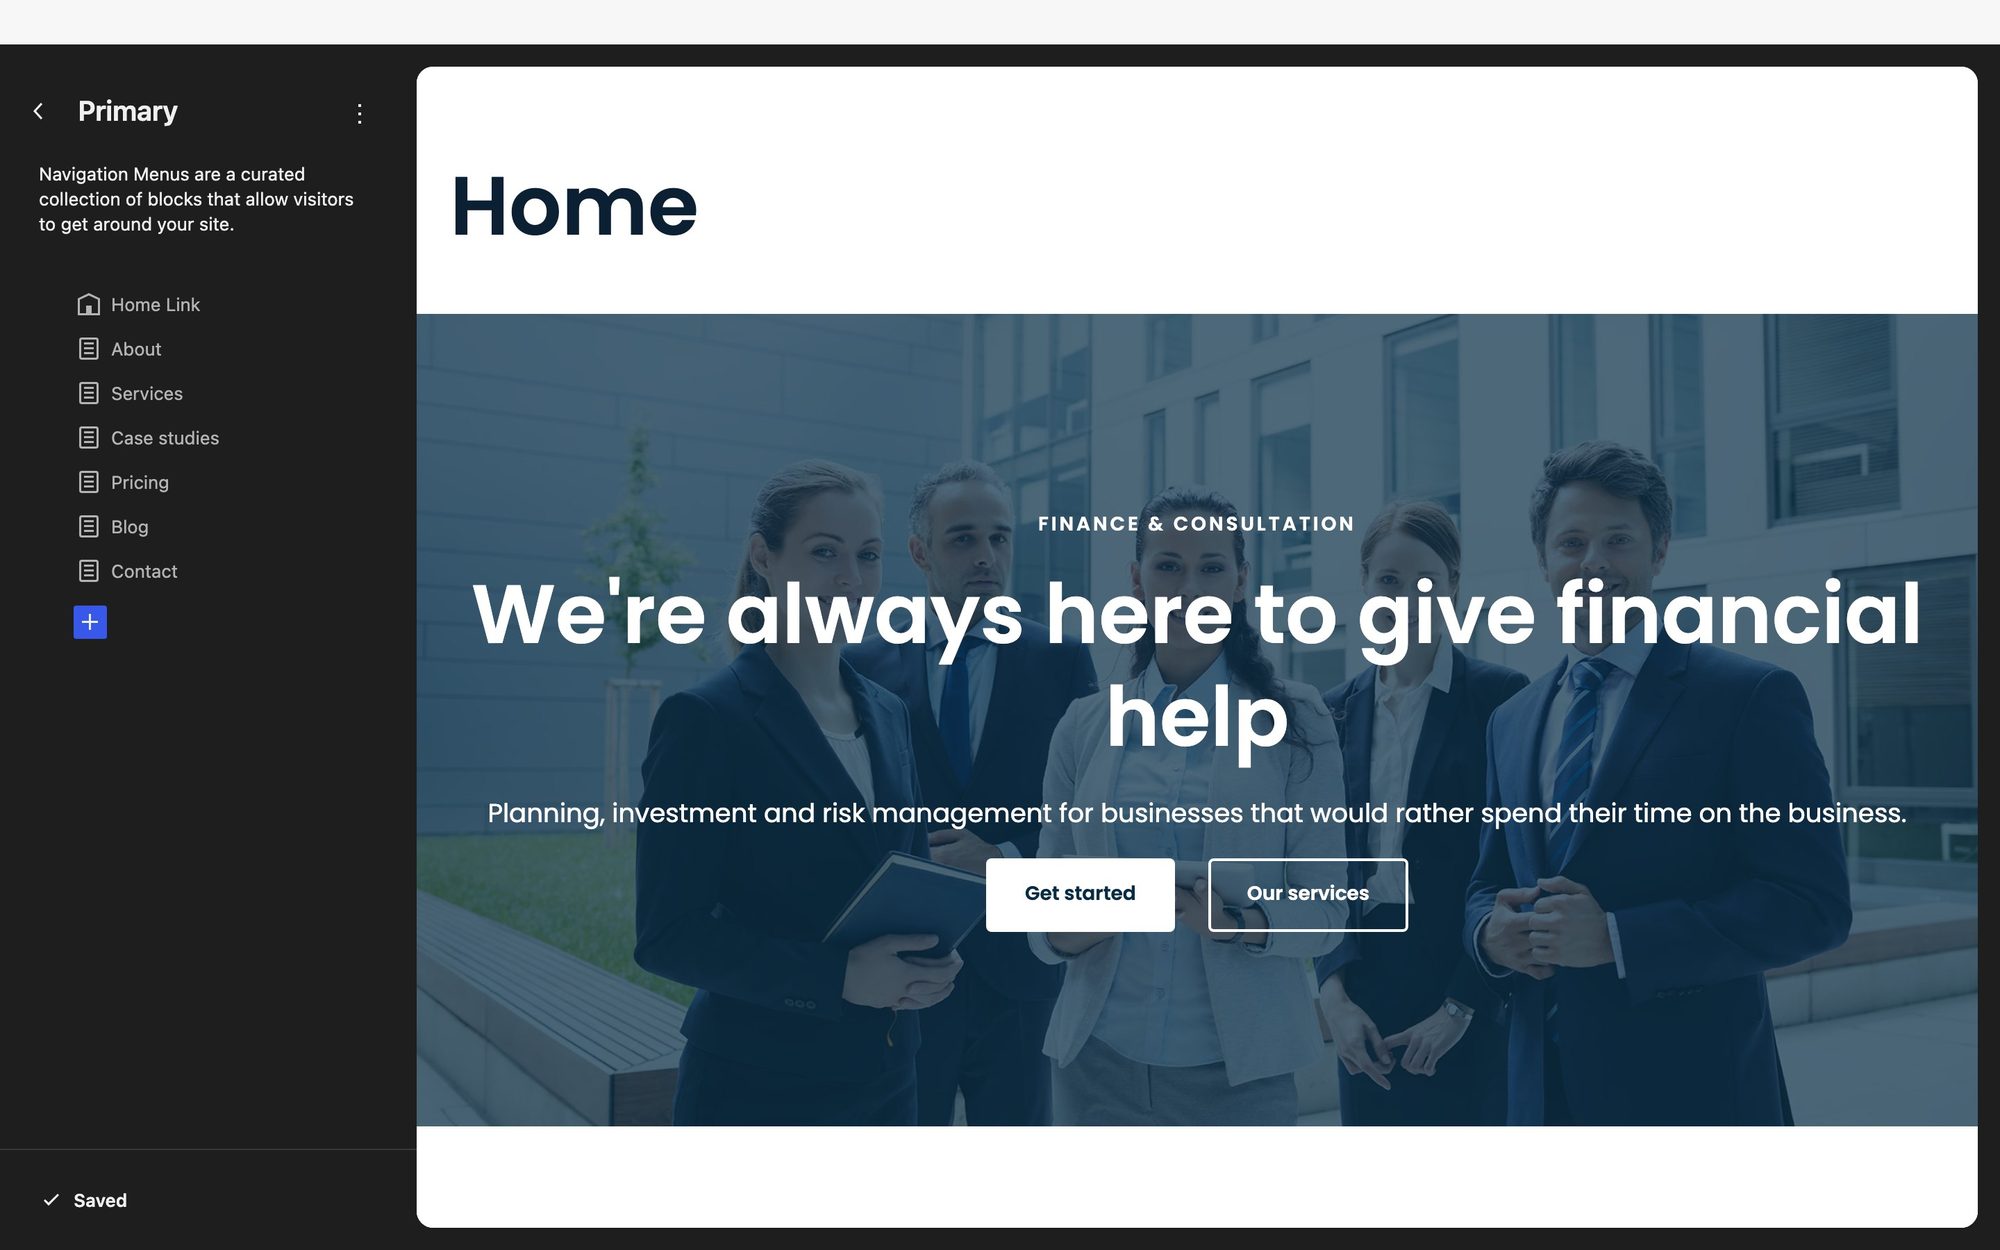
- Reorder links with Move up and Move down in the ⋮ menu beside each link.
- Add a link with the + under the list: search for a page, or paste any web address.
- Remove a link from its ⋮ menu. The page itself is not deleted.
On a phone the menu folds into a single button that opens it full screen. That happens by itself.
The header button and the footer
Get started in the header is an ordinary Button block: click it in the Header template part to change its words, and use the Link icon to point it at your Contact page or a booking service. The footer’s description, services list and contact column are ordinary text in the Footer template part; its Recent posts column lists your newest posts by itself.
Colours and fonts
Colours and fonts are set once for the whole site in Appearance → Editor → Styles. Click Styles, then Browse styles.
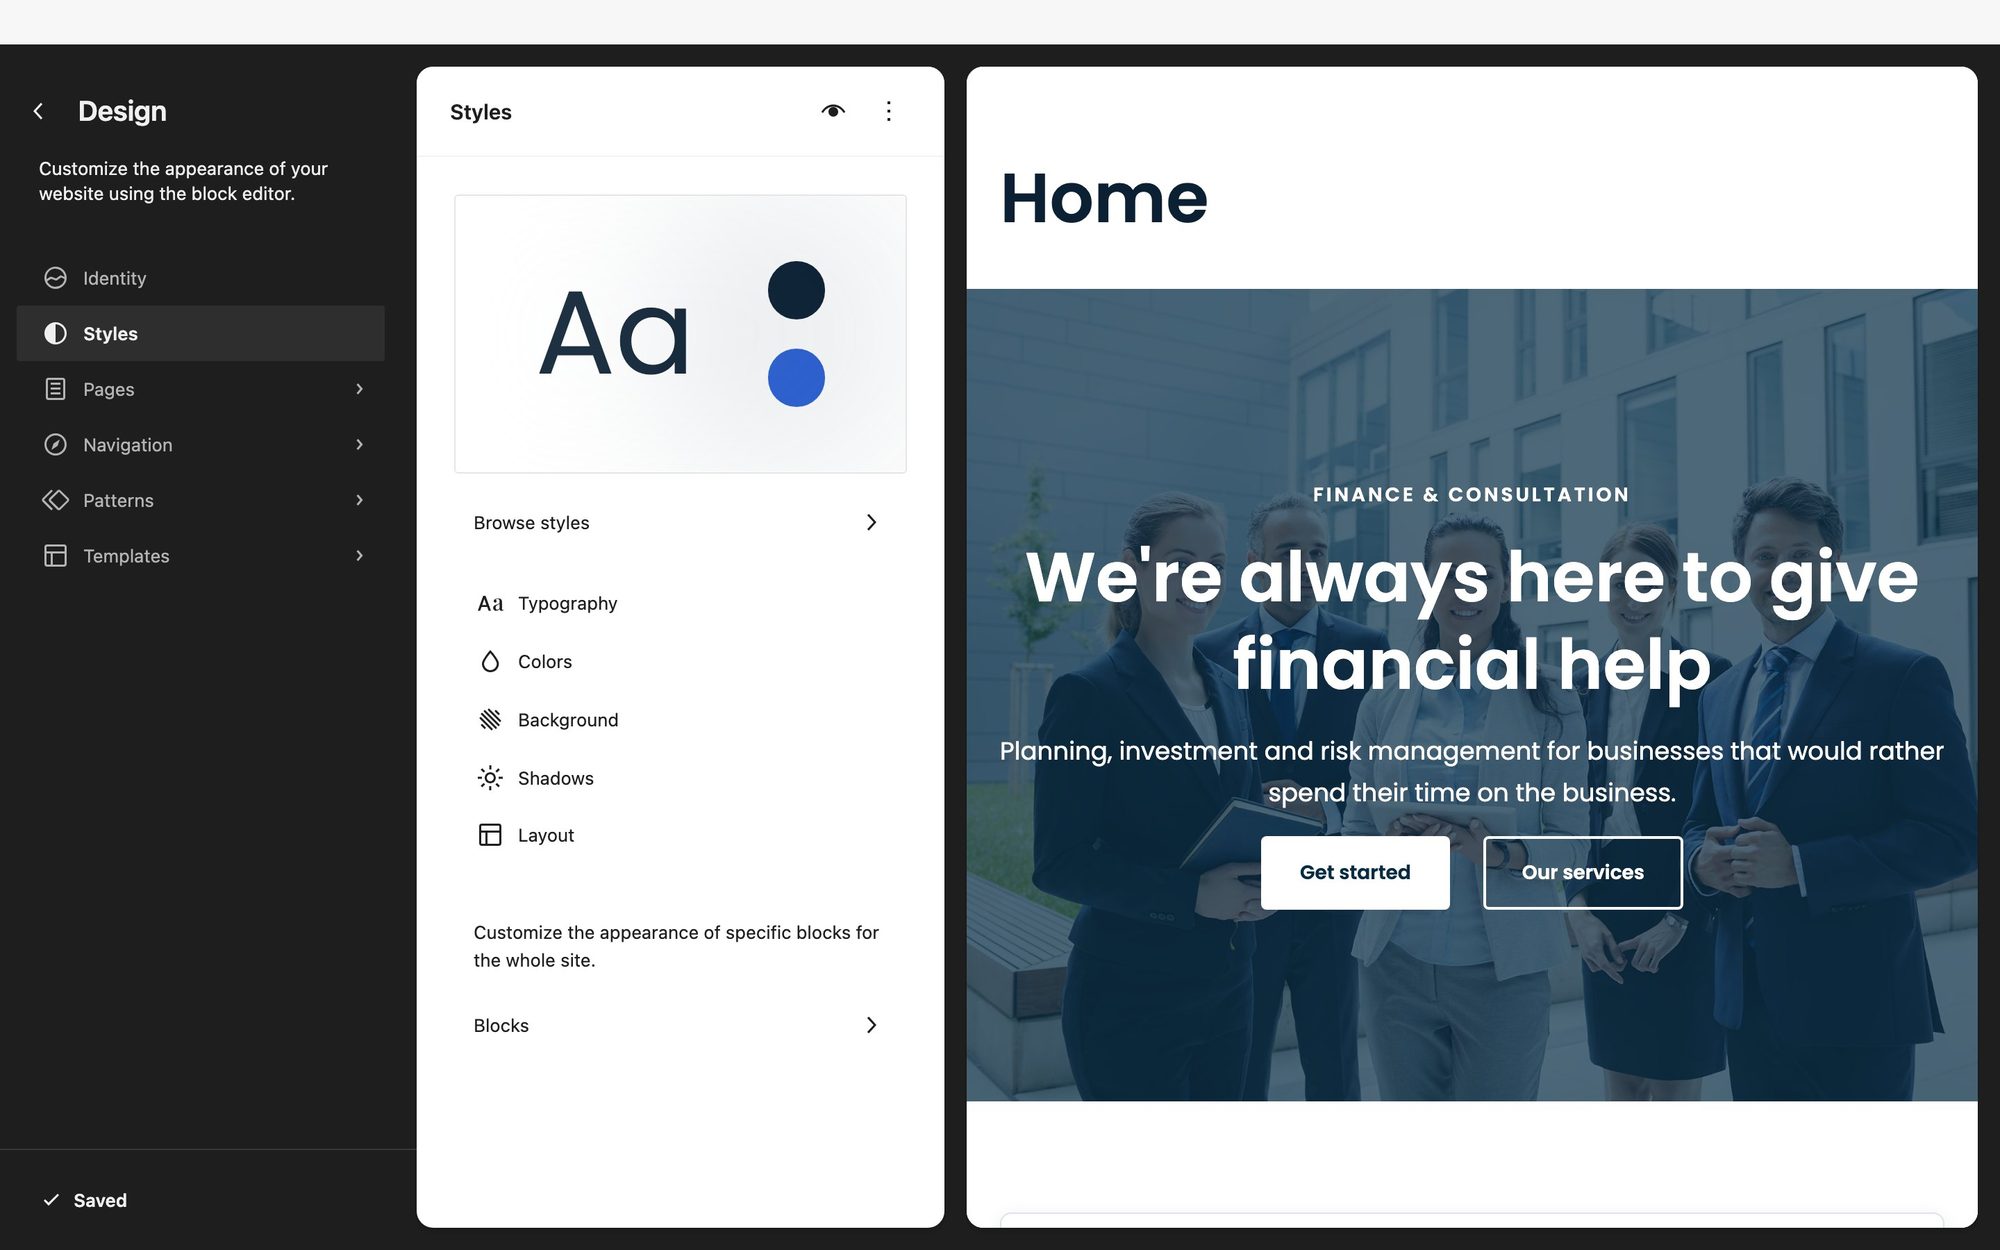
Click a palette and the preview changes immediately. Your live site does not change until you click Save, so try as many as you like.
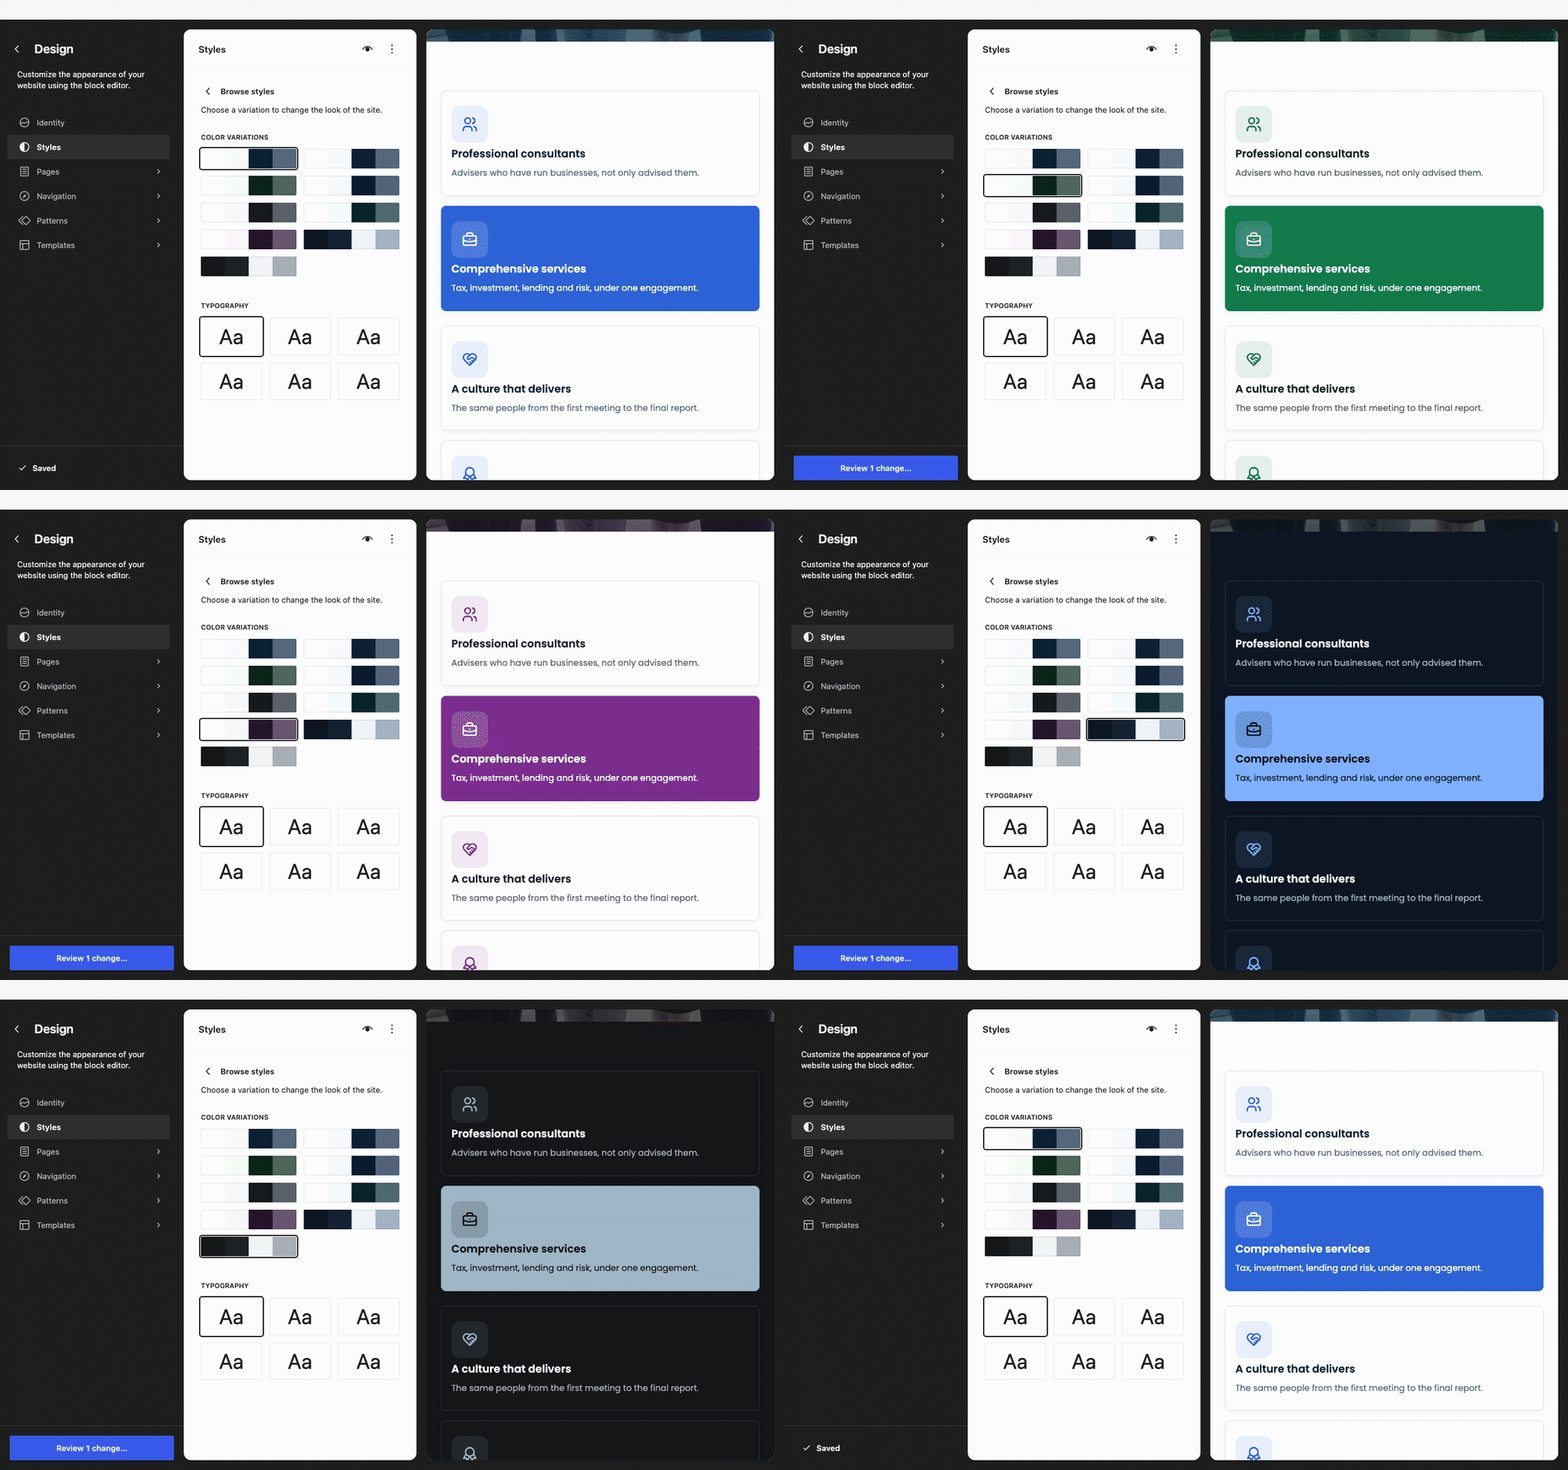
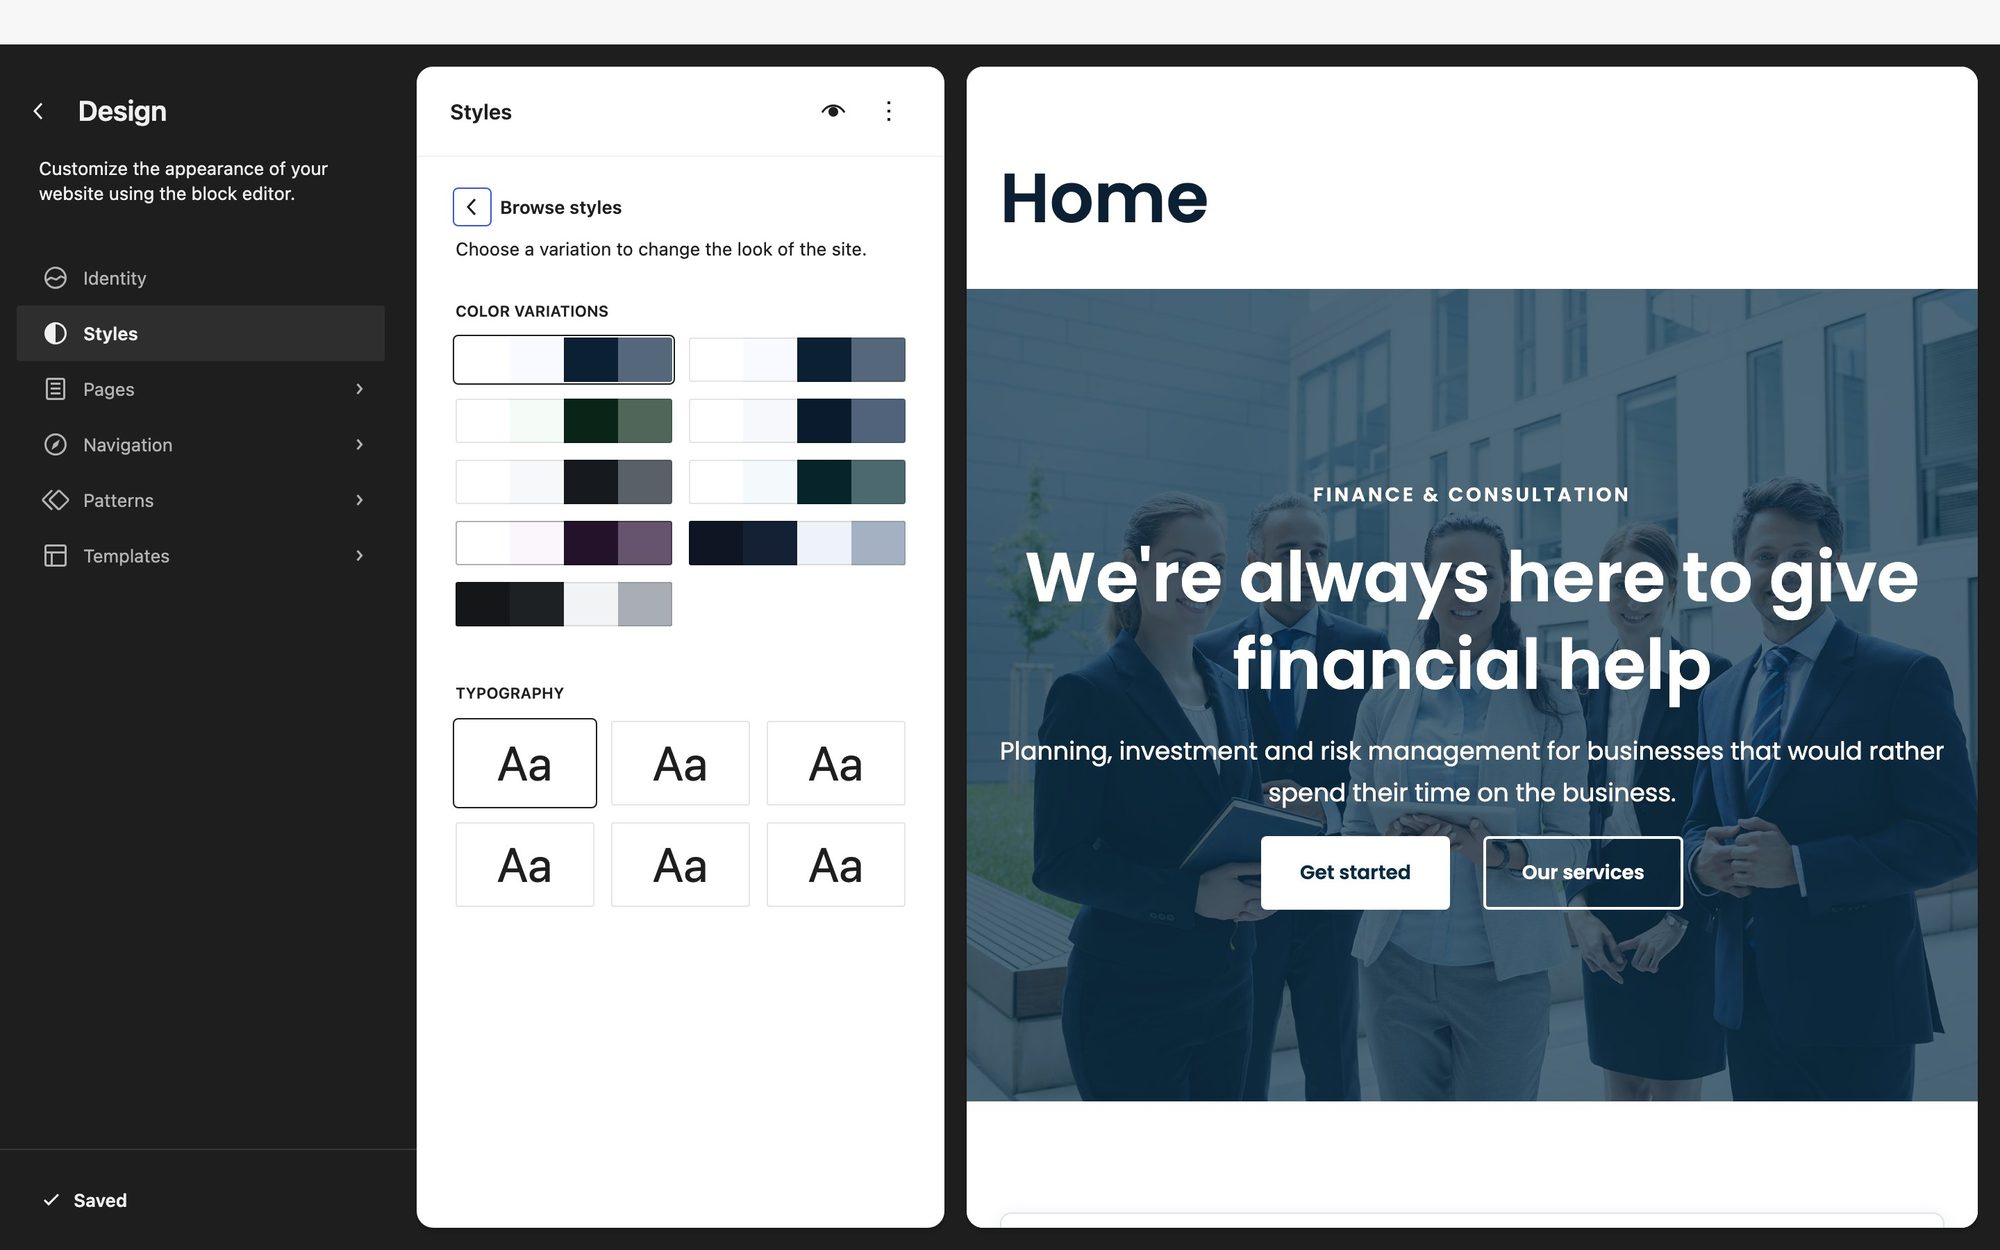
The eight palettes
| Palette | Page | Buttons and links | Dark bands |
|---|---|---|---|
| Azure (the theme’s own) | Light | Blue | Deep navy |
| Emerald | Light | Green | Forest |
| Navy | Light | Navy blue | Midnight blue |
| Slate | Light | Slate grey | Charcoal |
| Teal | Light | Teal | Deep teal |
| Plum | Light | Plum | Aubergine |
| Midnight | Dark | Light blue | Near black |
| Graphite | Dark | Steel | Near black |
Every palette was checked before release: body text, secondary text, links and button labels meet WCAG AA contrast on every background the design uses, in light mode and in dark mode.
Why the brand blue is not the link colour
Unioncorp’s bright blue, #4f86f9, is only 3.4:1 against white — too light for text anyone has to read. It is kept as the Accent for decoration, and a deeper blue, Primary, carries buttons, links and icons. The other palettes follow the same rule.
The five font pairings
Unioncorp uses Poppins and Inter, both served from your own site rather than from Google. The typography variations rearrange them:
- Poppins throughout — the default.
- Poppins headings, Inter text — easier on long pages.
- Inter throughout — plainer and more compact.
- Inter headings, Poppins text.
- System fonts — each device’s own fonts, and no font files to download at all.
Change one colour, or undo
To adjust a single colour, open Styles → Colors → Edit palette and click a swatch. Colours are named by job — Primary for buttons and links, Dark for the dark bands, On primary and On dark for text sitting on those grounds — so one change applies everywhere that colour is used. If you darken or lighten Primary or Dark, check the matching On … colour still reads clearly against it.
To undo, click Revisions at the bottom of the Styles panel and go back to any earlier save, or open the ⋮ menu at the top of Styles and choose Reset styles.
Dark mode
The moon at the right of the top bar lets each visitor choose light or dark. It is separate from your palette: dark mode turns the palette you chose over rather than replacing it, so an Emerald site stays green.
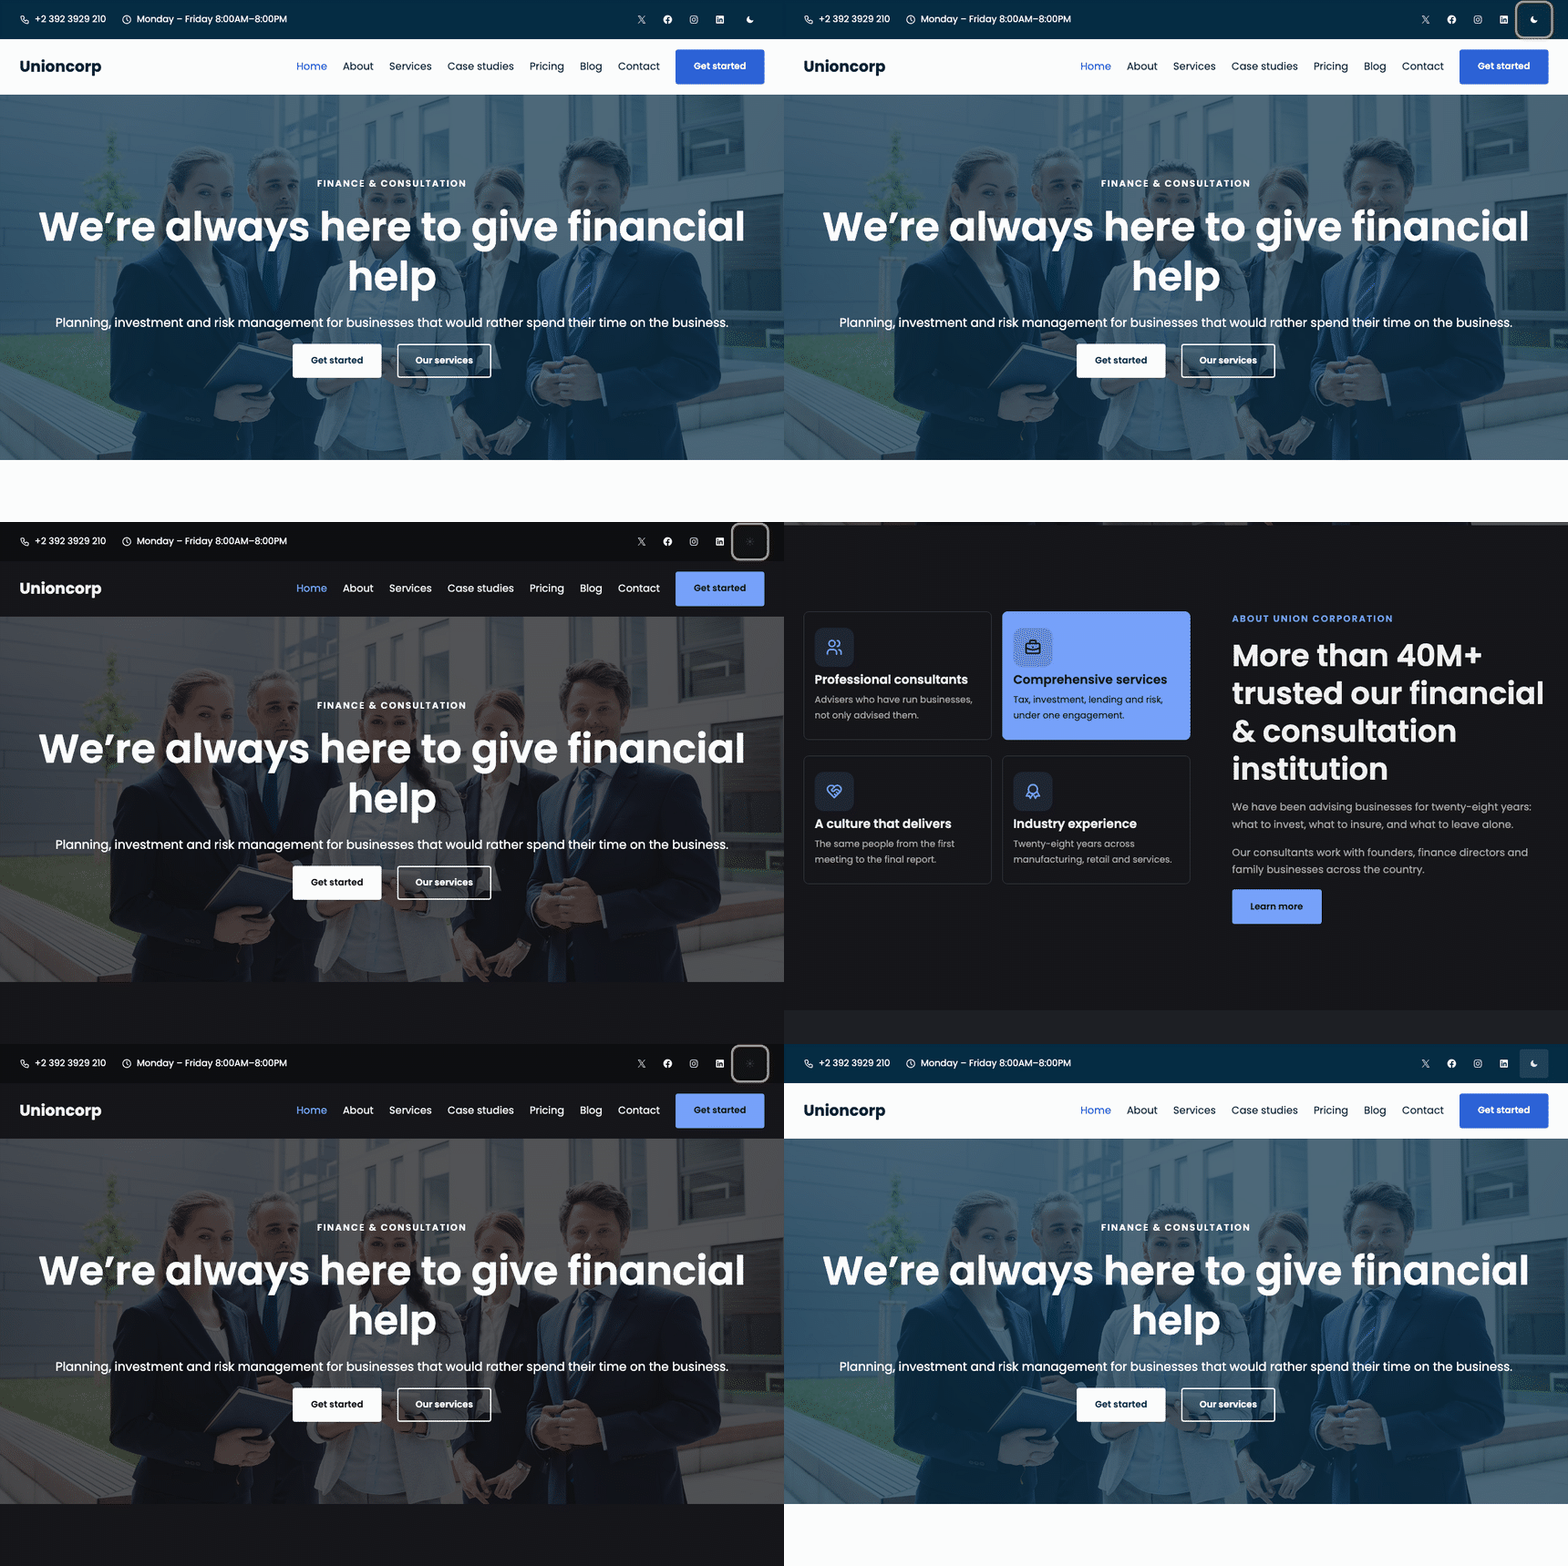
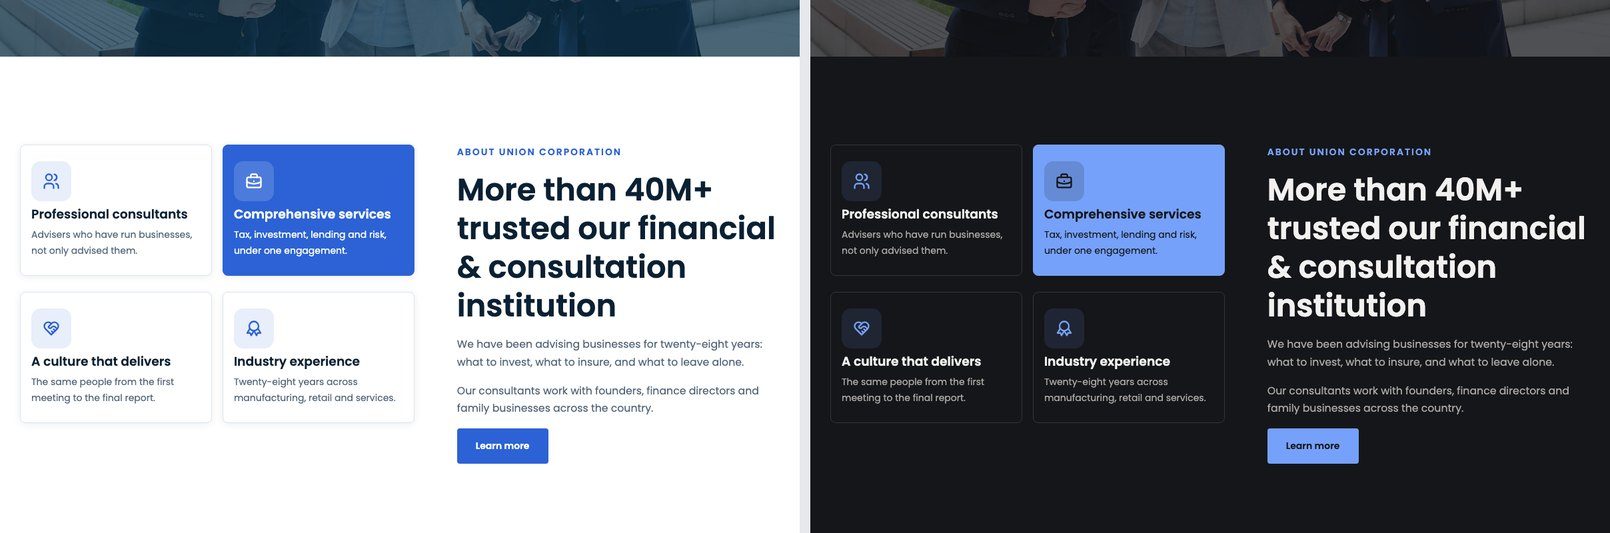
- Until a visitor clicks it, it follows their phone or computer’s own light or dark setting.
- Once they click, it remembers their choice on that device.
- It is applied before the page is drawn, so a phone in dark mode never flashes white.
To remove the switch, add add_filter( 'unioncorp_enable_dark_mode', '__return_false' ); to a child theme or a small plugin. To move it, edit the Header template part and drag the button: any Button block with the class unioncorp-scheme-toggle becomes the switch. Put the class on the button itself, not on the Buttons group around it.
Page templates
A template decides what surrounds a page’s content: the header, a banner, a sidebar, the footer. For a page you choose between three:
- Pages (the default) — a photograph banner carrying the page’s title, above the content.
- Page without title — no banner and no title. Home uses it, because it opens with its own hero.
- Page with sidebar — the content, with the sidebar beside it.
To switch, open the page, click the Page tab in the sidebar, click the template’s name next to Template, and choose Change template.
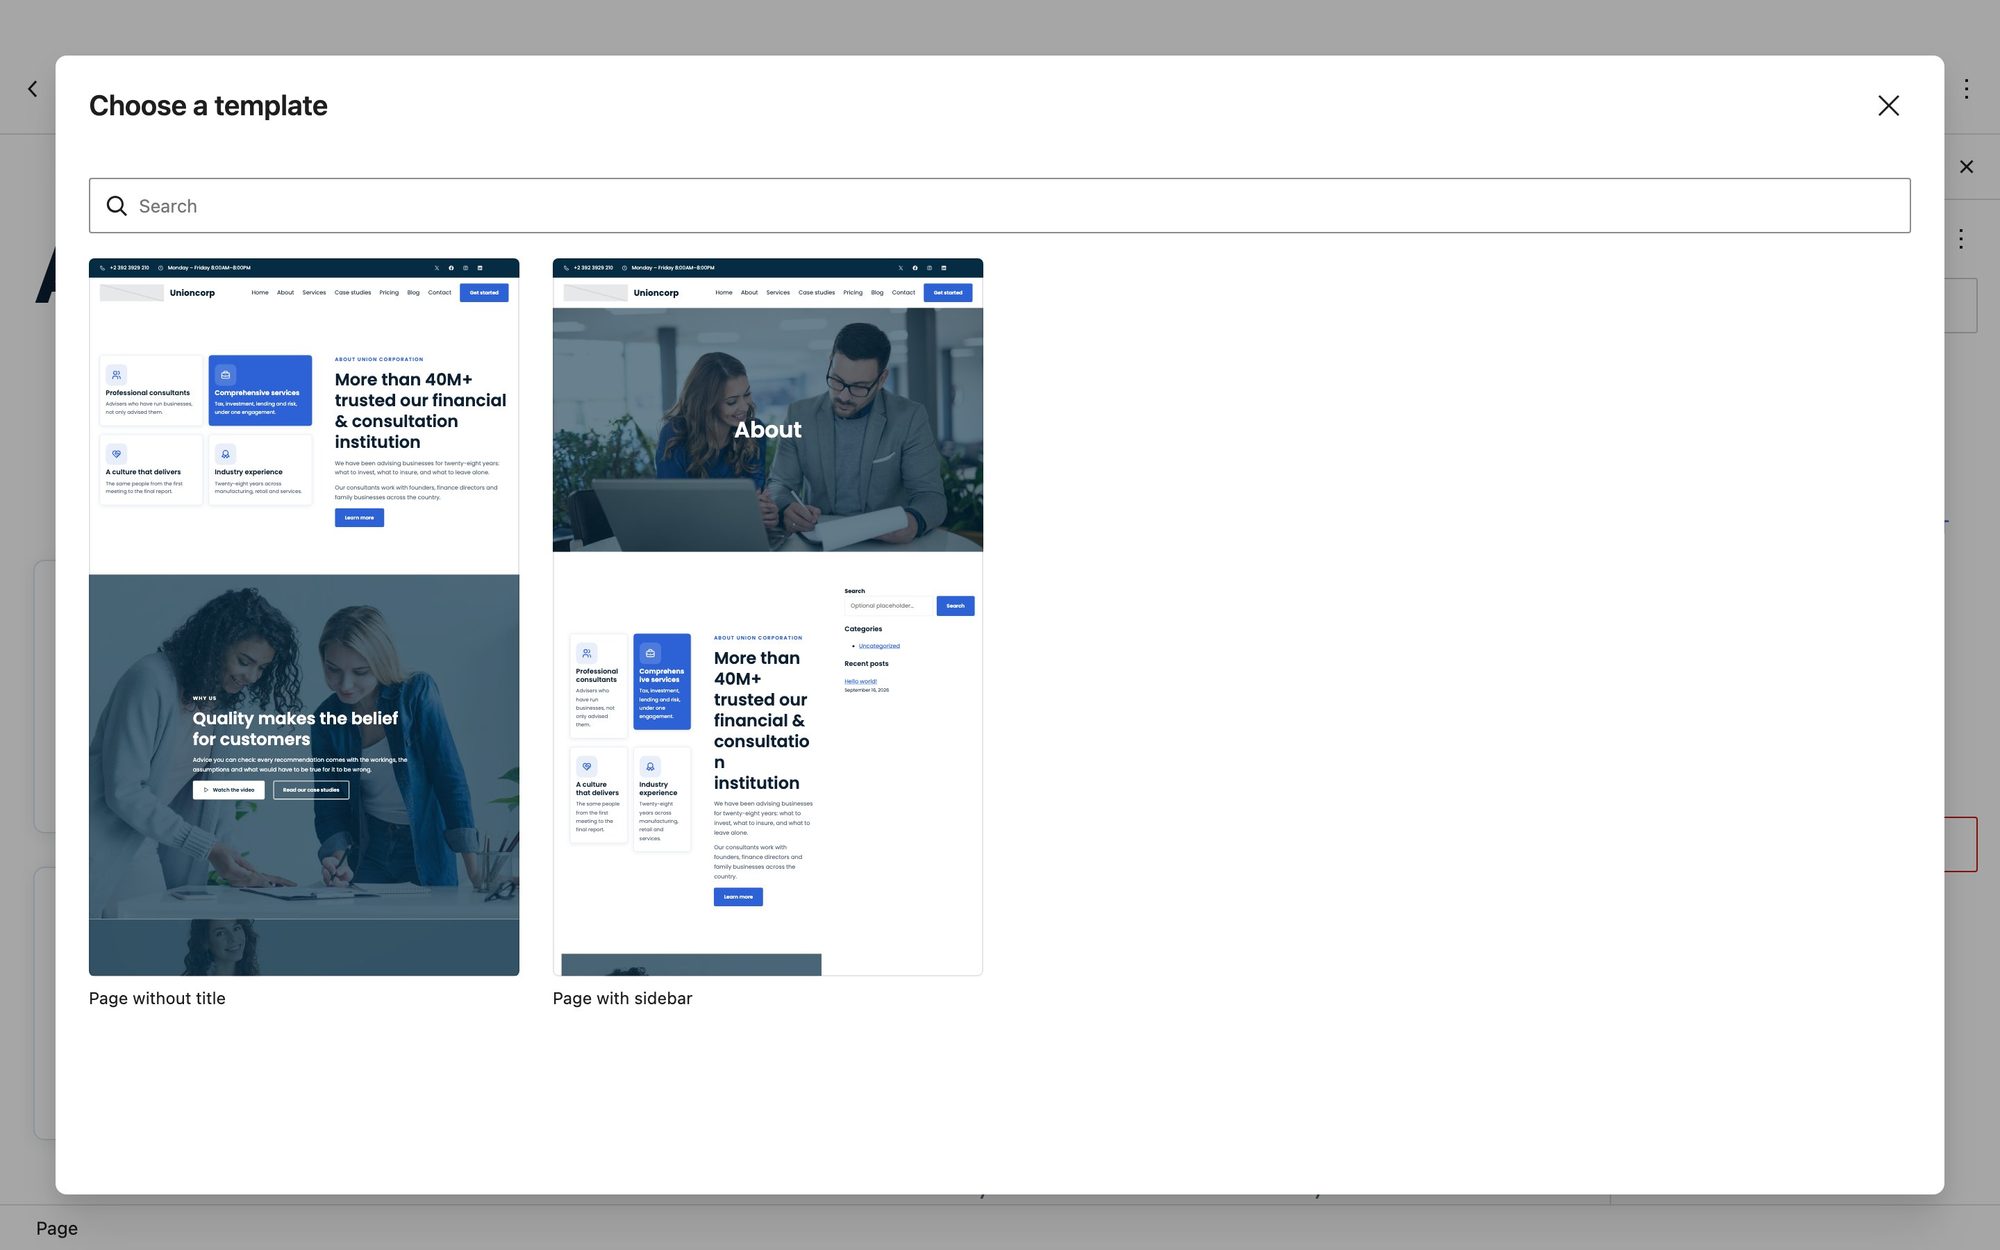
Posts can use Post with sidebar the same way. The blog, archives, categories, tags, author pages, search results and the 404 page each have their own template — fourteen in all — which you can change in Appearance → Editor → Templates.
Block styles
Some core blocks gain extra looks. Select the block, open the Styles panel in its settings, and click one.
| Block | Style | Looks like |
|---|---|---|
| Heading | Eyebrow | Small, spaced capitals in the primary colour — the line above each section title |
| Group | Card | A bordered card with a soft shadow that lifts on hover, as the service cards do |
| Group | Panel | A tinted panel with a primary-coloured bar down its left edge |
| Button | Ghost | An outlined button that fills on hover |
| List | Tick list | Ticks in the primary colour instead of bullets |
WooCommerce and form plugins
WooCommerce. Install it and Unioncorp styles it — shop, product pages, cart and checkout take the theme’s colours, fonts and buttons, three products to a row, in light and dark mode. The shop styles load only on shop pages, and nothing at all loads without WooCommerce.
Form plugins. Unioncorp’s own enquiry form needs none, but if you use one it is styled to match: Contact Form 7, WPForms, Gravity Forms, Fluent Forms, Forminator or Ninja Forms. Their fields, buttons and messages take the theme’s look, and the styles load only on a site that has one of them.
Updates
Unioncorp is not in the WordPress.org theme directory, so it checks updates.colorlib.com for new versions twice a day. A new version then appears in Dashboard → Updates and on Appearance → Themes, like any other theme, and updates with one click.
The check sends the theme’s version, your WordPress and PHP versions, your site’s language, whether it is a multisite, and an identifier made from your site address with your site’s own secret key. It sends no personal data and no site name, and the identifier cannot be turned back into your address. Two filters control it:
// Stop checking altogether (you will not hear about new versions).
add_filter( 'unioncorp_check_for_updates', '__return_false' );

// Or send only the theme name and version.
add_filter( 'unioncorp_update_payload', function ( $payload ) {
	return array( 'theme' => $payload['theme'], 'version' => $payload['version'] );
} );
Updates change the theme, not your pages. The sections in your pages were copied from the theme when it was activated, so an update improves the header, footer, templates and styles straight away, while changes to the section patterns reach only sections inserted after the update.
Keyboard shortcuts worth knowing
| To | Mac | Windows |
|---|---|---|
| Save | ⌘ S | Ctrl S |
| Undo / redo | ⌘ Z / ⇧ ⌘ Z | Ctrl Z / Ctrl Shift Z |
| Select the text in a block (press again for the whole page) | ⌘ A | Ctrl A |
| Duplicate the selected block | ⇧ ⌘ D | Ctrl Shift D |
| Delete the selected block | ⌃ ⌥ Z | Shift Alt Z |
| Open List View | ⌃ ⌥ O | Shift Alt O |
| Show every shortcut | ⌃ ⌥ H | Shift Alt H |
| Add a block by name | Type / on an empty line, then the block’s name | |
If something is not where you expect
Activation built no pages. The site already had more than one page of its own, so Unioncorp left it alone. Insert the Unioncorp: pages layouts into pages of your own, then choose your front page in Settings → Reading.
My front page shows the latest blog posts. Go to Settings → Reading, choose A static page, and pick Home as the homepage.
A button does nothing when it is clicked. It still links to #. Point it at a page — see Buttons and links.
An icon tile is empty, or says “Type / to choose a block”, in the editor. The page was built by Unioncorp 1.1.1 or earlier, where the icon sits inside the paragraph. It still shows on the site; to change it, use Edit as HTML as described in Change an icon, or insert the section again from the patterns.
The statistics do not count up. They were already on screen when the page opened, the visitor has reduced motion turned on, or animations are switched off with the unioncorp_enable_scroll_animations filter. Otherwise, check the heading still has the unioncorp-count class and holds a single number.
The video button leaves the site instead of opening a window. The link is not a YouTube address, or the button has lost its unioncorp-video class.
Enquiries are not arriving. Check the address in Settings → General and your spam folder, then test whether WordPress can send mail at all — most hosts need an SMTP plugin. If WordPress cannot send a password reset, it cannot send an enquiry.
I edited a pattern file in the theme and my page did not change. Pages hold copies of the sections, made when they were built. Edit the page, not the pattern.
I saved, but visitors still see the old version. A caching plugin or your host’s cache is serving a stored copy. Clear it from the plugin’s or host’s settings.
Still stuck?
Ask on the Colorlib support forum. Include your Unioncorp, WordPress and PHP versions, what you did, and what you expected to happen — a screenshot helps.