How to Move WordPress to a New Domain Without Affecting SEO
Often, webmasters get the urge to move their WordPress site to a new domain. Whether it’s because the domain they’ve had their heart set on for ages is finally available or because the old domain name didn’t fully capture your site’s intended essence.
As online entrepreneurs, you’re probably familiar with the basic techy stuff but moving your site to a new domain is something you reckon only a developer should do. After all, there are some tasks you can’t copy-paste your way out of (I know you tried!).
Moving your site to another domain doesn’t necessarily have to be something you need to hire a developer for. In this article, I’ll walk you through a simple tutorial on moving your WordPress site to a new domain without affecting SEO – the non-techy way.
Let’s get some basics out of the way before we begin.
Why Move Your Site to a New Domain?
There are a few basic reasons why online entrepreneurs are faced with the challenge of moving their site to a new domain in the first place. Some of these are positive causes while others are negative.
Positive Reasons to Move Your Site
Better Domain Name: One of the absolute best reasons you could have for moving your site to a new domain is that the domain name you’ve been waiting ages for is finally available. It’s available and all yours for the taking. An authoritative domain name can have a lasting, positive effect on helping you acquire traffic goals and page views. However, if the new domain name isn’t likely to boost traffic (or help in any other way), then making the switch won’t be fruitful for your business growth.
Company Acquisition: Another popular reason for moving your site to a new domain is the acquisition of a company. If your company acquires another company, it could mean that it’s time to register a new domain name. Since it’s an acquisition, you’d be keeping your content in place. According to Hover, PayPal was developed after x.com, an Internet financial services company, acquired Confinity in 2000.
Negative Reasons to Move Your Site
Re-branding Required: Entrepreneurs often find that it diverts from the intended goals as their business grows. Whether it’s the outcome of a brilliant idea or it just happened on its own, if this new diversion is positive (financially speaking), it could mean some serious re-branding is required. You’ll want new everything for your new idea – new name, new domain, new logo.
Spam Penalties: Sometimes situations worsen due to negligence and Google slams your site down with a horde of spam penalties. Violating Google’s guidelines is more common than you might think and recovering from its after effects can take ages. Website owners with little traffic often choose to move their site to a new domain in such scenarios.
Regardless of which reason yours is most coherent with, the outcome remains unchanged: You have to move your site. Before we delve head first into the tutorial, let’s get some basic housekeeping.
Basic Housekeeping
Before we move on to the tutorial, you must create a full backup of your WordPress site. This preliminary step falls under best practices of site management and serves a dual purpose – your site will remain safe if you encounter an error and you’ll have the content you need to move already downloaded (which you’d have had to do either way).
Creating a backup means that you’ll be downloading your entire site’s content from its respective hosting server(s). When I say all of your content, this means backing up two parts of your WordPress website:
- The Files: The static files create your WordPress site’s skeleton – core WordPress files, theme files, etc. If you don’t back up the static files you’ll have to install a new theme and configure your new site’s settings from scratch.
- The Databases: Your entire site’s content (posts, pages, comments, media files) and data are stored into databases. Backing up the databases is vital if you want to save all of the content on your site.
There are three ways to create a backup of your WordPress site:
- Use a plugin: When it comes to WordPress, there’s a plugin for everything and creating backups is no exception to this rule. Backup Buddy and VaultPress are premium plugins that’ll create complete backups of your WordPress site in just a few clicks. Both offer great value for money and come with support from WordPress experts. But if you’d prefer a free solution then BackWPup will get the job done.
- Use the cPanel: Most web hosting providers permit their customers to access the cPanel. Creating a WordPress backup from the Database Wizard is a simple three-step process that doesn’t require any coding effort on your part.

You should remember that it’s best to create a few partial backups as compared to one full backup because they’ll be easier to restore later on.
If you’d like to explore even more backup solutions for WordPress, check out our post on Comprehensive Backup Solutions for WordPress To Keep Your Data Safe 2015. Once you’ve created a backup of your old WordPress site, you can move on to the tutorial.
How to Move WordPress to a New Domain without Affecting SEO
This section will walk through a detailed tutorial to help you move your WordPress site to a new domain without significantly affecting its SEO. If you haven’t already registered a new domain and set it up on a hosting server, follow Step 3 in our post How to Start a Blog From Scratch.
Step 1: Migrating Your WordPress Site to the New Domain
This section will move the old WordPress site to the new domain using the Bluehost cPanel. Once you have your domain name registered and purchased a web hosting plan from Bluehost, you can log into the Bluehost cPanel to start uploading your old site to the new domain. We’ll break up this step into three parts so it’s easier to follow.
Create a New Database
One of the most common mistakes webmasters make is forgetting to create a new database when moving their WordPress site to a new domain.
- From cPanel’s homepage, navigate to the databases tab.

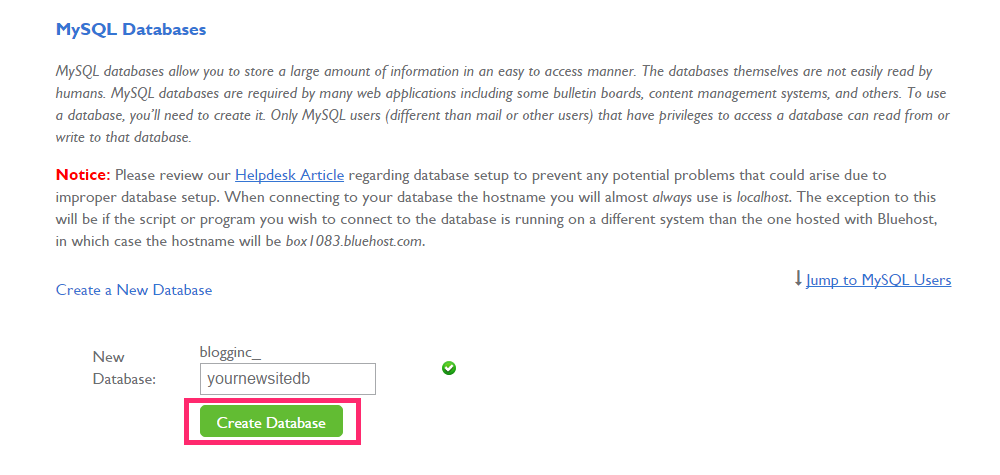
- Choose a username for the new user.
- Enter a password or use the Password Generator to create a strong password.
- Write down your database user’s username and password in a safe location.


Edit the wp-config.php File
Remember how we created backups of the old site’s static files in the Basic Housekeeping section? Open up the folder you saved them in and find your wp-config.php file, which is generally located in the root directory.
- Open the
wp-config.phpfile in a text editor. - Find the following lines of text and replace them with:
- The name of your new database.
- Username of the user assigned to the new database.
- Password of the user assigned to the new database.
- Save the
wp-config.phpfile.
This step ensures that the system will look for your new site’s content in the new database that was specified.
Upload the Backed Up Files and Database Tables
In this step, we’ll restore the partial backups that we created of the old site onto the new site through the new site’s cPanel.
- Log in to the new site’s cPanel.
- Navigate to the files section from the cPanel homepage and click the Site Backup Pro icon.

- Restore the home directory backup.
- Restore the website files (static files) backup.
- Restore the databases and tables backup.
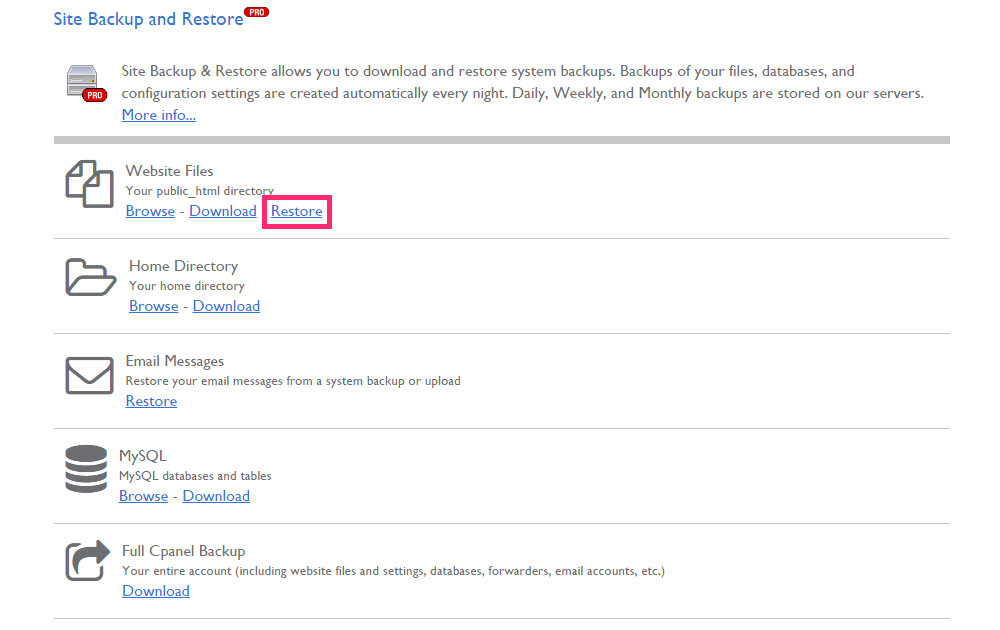
Remember that the backups could take a while to upload depending upon the size of your old website. Once you’re done with this, your new site should be working properly. This is a great time to take out a few minutes and make sure the layout of your pages and posts is in order, correct any broken links, and check WordPress settings.
Step 2: Preserving SEO on the New Domain
You’ve successfully set up your old WordPress site on a new domain. The difficult part of the tutorial is over and all we have left to do is preserve our old site’s SEO as much as possible. This section will cover three steps to optimally lessen the negative effect site migration can have on your search traffic.
Configuring Permanent Page Redirects
Setting up permanent 301 redirects to your old site will help your loyal viewership find your new domain. You can simply publish a post or send a newsletter to everyone notifying them about the change but adding permanent page redirects helps preserve SEO and improve user experience by redirecting both readers and search engines to your new domain.
- Log in to the cPanel of your old WordPress website.
- Under the files section on the homepage, click on the File Manager icon.
- Find your old site’s
.htaccessfile and add this code to it:
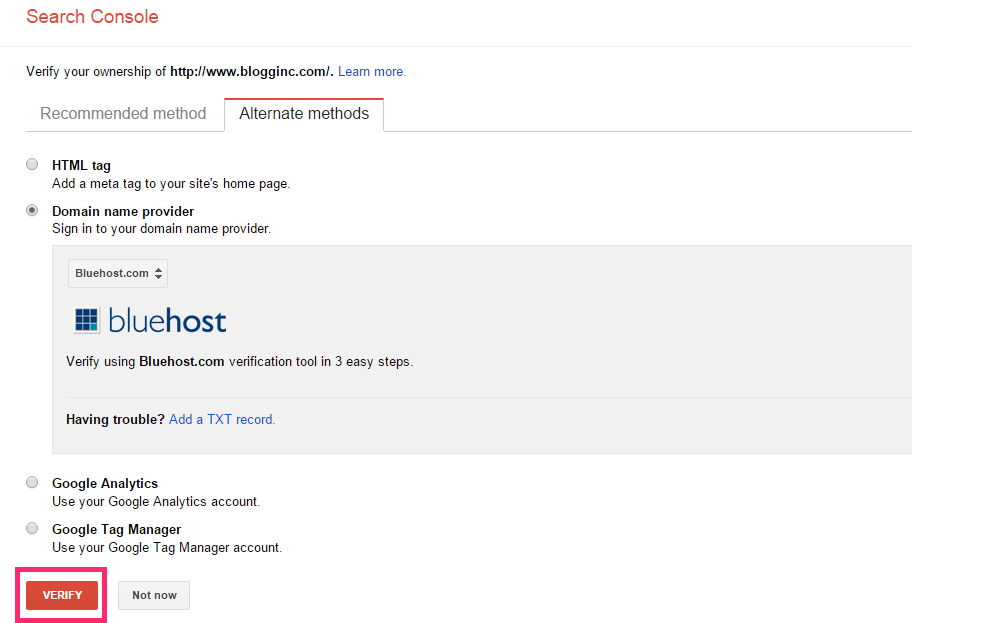
Informing Google About Your New Domain
By logging into Google Webmaster Tools, you can let Google know about your new site. Follow these steps to complete the procedure:
- Log in to Google Webmaster Tools.
- Enter your new site’s domain name in the box.
- Click the Add Property button to continue.
- Verify your ownership of the website by navigating to the Alternate methods tab.
- Select one of the listed options.
Submitting a Sitemap to Google Webmaster Tools
Sitemaps will let you inform search engines about the pages on your new site that are available for crawling. They tell web crawlers where your new site’s pages are located and how they can reach them. Google Webmaster Tools allows you to submit your new site’s sitemap to Google.
- Create a sitemap using the Google XML Sitemaps plugin for WordPress.
- Log in to Google Webmaster Tools.
- Select your site from the home page.
- Navigate to the Sitemaps bar on the right side of the screen.
- Click the Sitemaps button.
- Click the Add/Test Sitemap button to proceed.
- Type the name of your sitemap file into the text box that appears on the next screen.

By now, hoping everything went smoothly, you should have a fully functional WordPress site on the domain of your choice without suffering a significant loss in its SEO.
Wrapping It Up
We hope this guide helps you move your site to a new domain and serves as a manual for preserving its SEO.
Moving a WordPress site to a new domain without affecting its SEO takes a ton of effort and time on the webmaster. With some diligence and this step-by-step guide to help you, you can migrate your WordPress site without running into any unprecedented problems – even if you’re not particularly tech-savvy.
Were you able to successfully move your WordPress site to a new domain without affecting SEO? Did you encounter any errors or face trouble with the outlined steps? We’d love to hear about your experience so let us know all about it in the comments section below!
Related Posts


I have Moved WordPress to a New Domain, My old domain all posts normally redirecting to new domain name but problem is images not redirecting to new domain name,
https://www.oldname.com/wp-content/uploads/2016/01/image-name.jpg
I’m using this in htaccess
RewriteEngine on
RewriteCond %{HTTP_HOST} ^www.oldname.com [NC,OR]
RewriteCond %{HTTP_HOST} ^www.oldname.com [NC]
RewriteRule ^(.*)$ https://www.newname.com/$1 [L,R=301,NC]
RewriteEngine On
RewriteCond %{HTTP_HOST} ^oldname.com [NC]
RewriteRule ^(.*)$ https://www.oldname.com/$1 [L,R=301]
Waiting your reply thank you.